

The Klyra AI product documentation describes AI Voice Cloning as a voice-cloning capability powered by ElevenLabs, where users provide voice samples to create a lifelike voice clone.
What you can do
- Create a new voice from audio samples.
- Re-train an existing voice clone.
- Add an optional voice description.
- Select the voice gender.
- Choose a language and cloned voice for text-to-speech.
- Enter text and use Listen or Synthesize.
- Review, play, and download generated audio.
Before you start
Prepare a clear recording of the voice you want to clone. The interface recommends:- Approximately 1–2 minutes of clear audio.
- No background noise.
- Sample quality is more important than quantity.
- MP3 format.
- Up to 10 MB.
Open AI Voice Cloning
Open AI Voice Cloning from the Voice section of the Klyra sidebar. The workspace has two main areas:- Instant Voice Cloning on the left.
- AI Voiceover on the right.
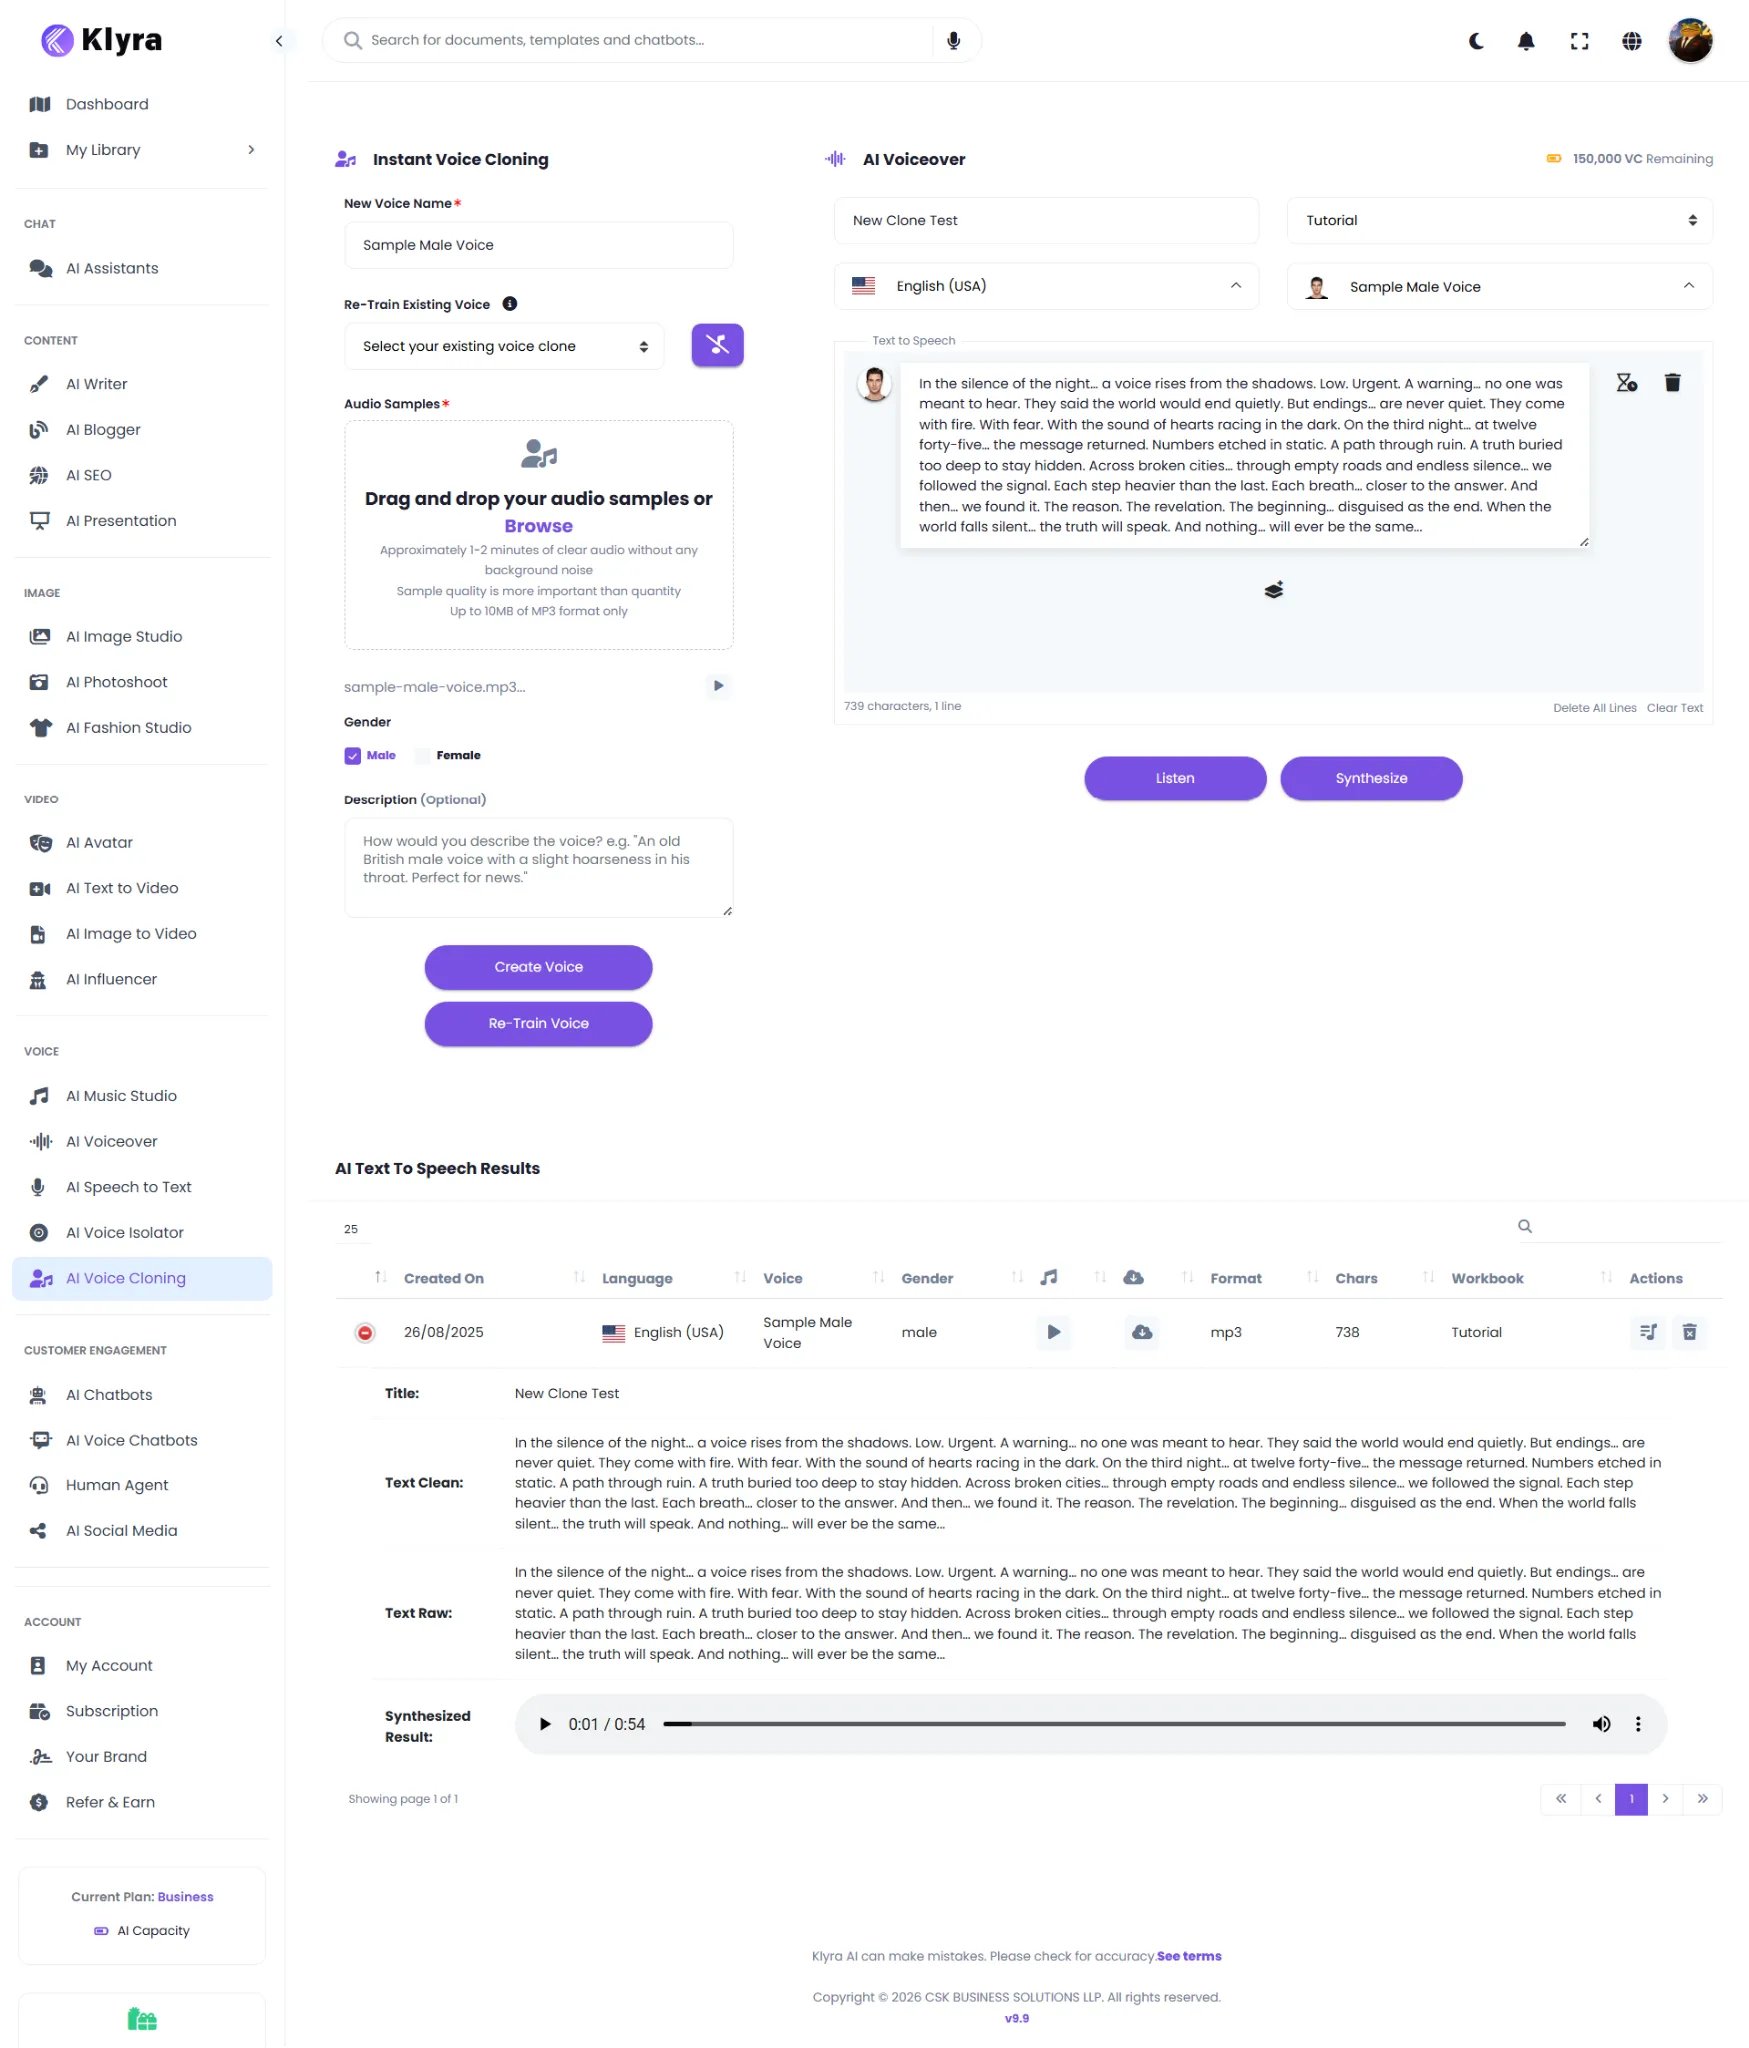
Create a new voice clone
1. Enter a voice name
Under Instant Voice Cloning, enter a name in New Voice Name. Example:Sample Male VoiceUse a descriptive name so the voice is easy to identify later.
2. Upload audio samples
Use Browse or drag and drop your audio into Audio Samples. The interface recommends approximately 1–2 minutes of clear audio without background noise and indicates that quality is more important than quantity. After uploading a sample, the file appears below the upload area with a play control.3. Select the gender
Choose:- Male
- Female
4. Add an optional description
Use Description to record useful information about the voice. Example:An old British male voice with a slight hoarseness in his throat. Perfect for news.
5. Create the voice
Click Create Voice. The cloned voice can then be selected in the AI Voiceover area.Re-train an existing voice
The Re-Train Existing Voice selector lets you choose an existing voice clone. Use this workflow when you want to improve or update an existing clone with additional samples.1. Select an existing voice
Open Re-Train Existing Voice and select the voice you want to re-train.2. Add additional samples
Upload the additional audio samples using the Audio Samples area. The same sample guidance shown in the interface applies:- Approximately 1–2 minutes of clear audio.
- No background noise.
- Quality over quantity.
- MP3 format.
- Up to 10 MB.
3. Start re-training
Click Re-Train Voice.The supplied interface confirms the re-training workflow but does not specify detailed training behavior or a fixed processing time, so those details are not assumed here.
Generate speech with your cloned voice
After creating the clone, use the AI Voiceover panel.1. Enter a title
Enter a title for the voiceover task. Example:New Clone Test
2. Select a workbook
The screenshot shows a Workbook selector. The example uses:Tutorial
3. Select a language
Use the language selector. The example shows:English (USA)
4. Select the cloned voice
Use the voice selector and choose the clone you created. The example shows:Sample Male Voice
5. Enter your text
Enter the content you want the voice to speak in the Text to Speech editor. The interface displays a character count below the editor.6. Listen
Click Listen to preview the voiceover workflow.7. Synthesize
Click Synthesize to generate the audio result.The screenshot shows separate Listen and Synthesize actions. Use the action that matches whether you want to preview or generate the audio.
Review generated results
Generated audio appears under AI Text to Speech Results. The interface shows these columns:
The supplied screenshot shows a result with:
- English (USA)
- Sample Male Voice
- male
- MP3
- 738 characters
- Tutorial workbook
Play and download audio
Use the audio player in the result row to listen to the generated voiceover. Use the download control in the results table to access the generated audio. The screenshot shows the generated result in MP3 format.Complete workflow
For a new voice:AI Voice Cloning vs AI Voiceover
Klyra’s product documentation separately describes AI Voiceover as a broader text-to-speech experience with many voices and languages, while AI Voice Cloning focuses on creating a reusable voice clone from samples.
Best practices
Use clean recordings
The interface specifically recommends clear audio without background noise.Prioritize quality
The upload guidance states that sample quality is more important than quantity.Use descriptive voice names
Examples:Narrator - EnglishCustomer Support - EnglishBrand Voice - English
Add useful descriptions
Use the optional Description field to document characteristics that help you identify the voice later.Preview before synthesis
Use Listen when you want to preview the voice workflow before creating the final synthesized result.Review generated audio
Play the result after synthesis and confirm that it is suitable before downloading or using it elsewhere.Troubleshooting
My sample will not upload
Check the requirements visible in the interface:- MP3 format.
- Maximum displayed file size of 10 MB.
- Approximately 1–2 minutes of clear audio.
- Minimal background noise.
I cannot find my cloned voice
Check the voice selector in AI Voiceover and confirm that the voice was created successfully.I want to improve an existing clone
Select the voice under Re-Train Existing Voice, upload additional samples, and click Re-Train Voice.The generated result is not using the voice I expected
Before synthesis, verify:- The selected language.
- The selected voice.
- The text in the editor.
- The task title and workbook.
Quick reference
You’re ready to create voice clones
You now know how to:- Create a new voice clone.
- Re-train an existing voice.
- Select a language and cloned voice.
- Enter text for speech synthesis.
- Preview and synthesize audio.
- Review generated voiceovers.
- Play and download generated audio.