

The workflow shown in this guide contains five setup steps: Configure, Customize, Train, Embed, and Channels.
How AI Chatbots works
The chatbot setup follows this workflow:1
Configure
Define the chatbot’s name, instructions, messages, AI model, interaction type, and interface language.
2
Customize
Customize the chatbot’s logo, avatar, colors, branding, message timestamps, and widget position.
3
Train
Add knowledge sources such as URLs, PDFs, text, or Q&A so the chatbot can answer using your information.
4
Embed
Get the chatbot embed code, adjust its dimensions, and copy the code for use on your website.
5
Channels
Optionally connect supported messaging channels such as Telegram and WhatsApp.
Open AI Chatbots
From the Klyra sidebar, open AI Chatbots. The AI Chatbots dashboard gives you an overview of your chatbot activity and provides shortcuts for common tasks.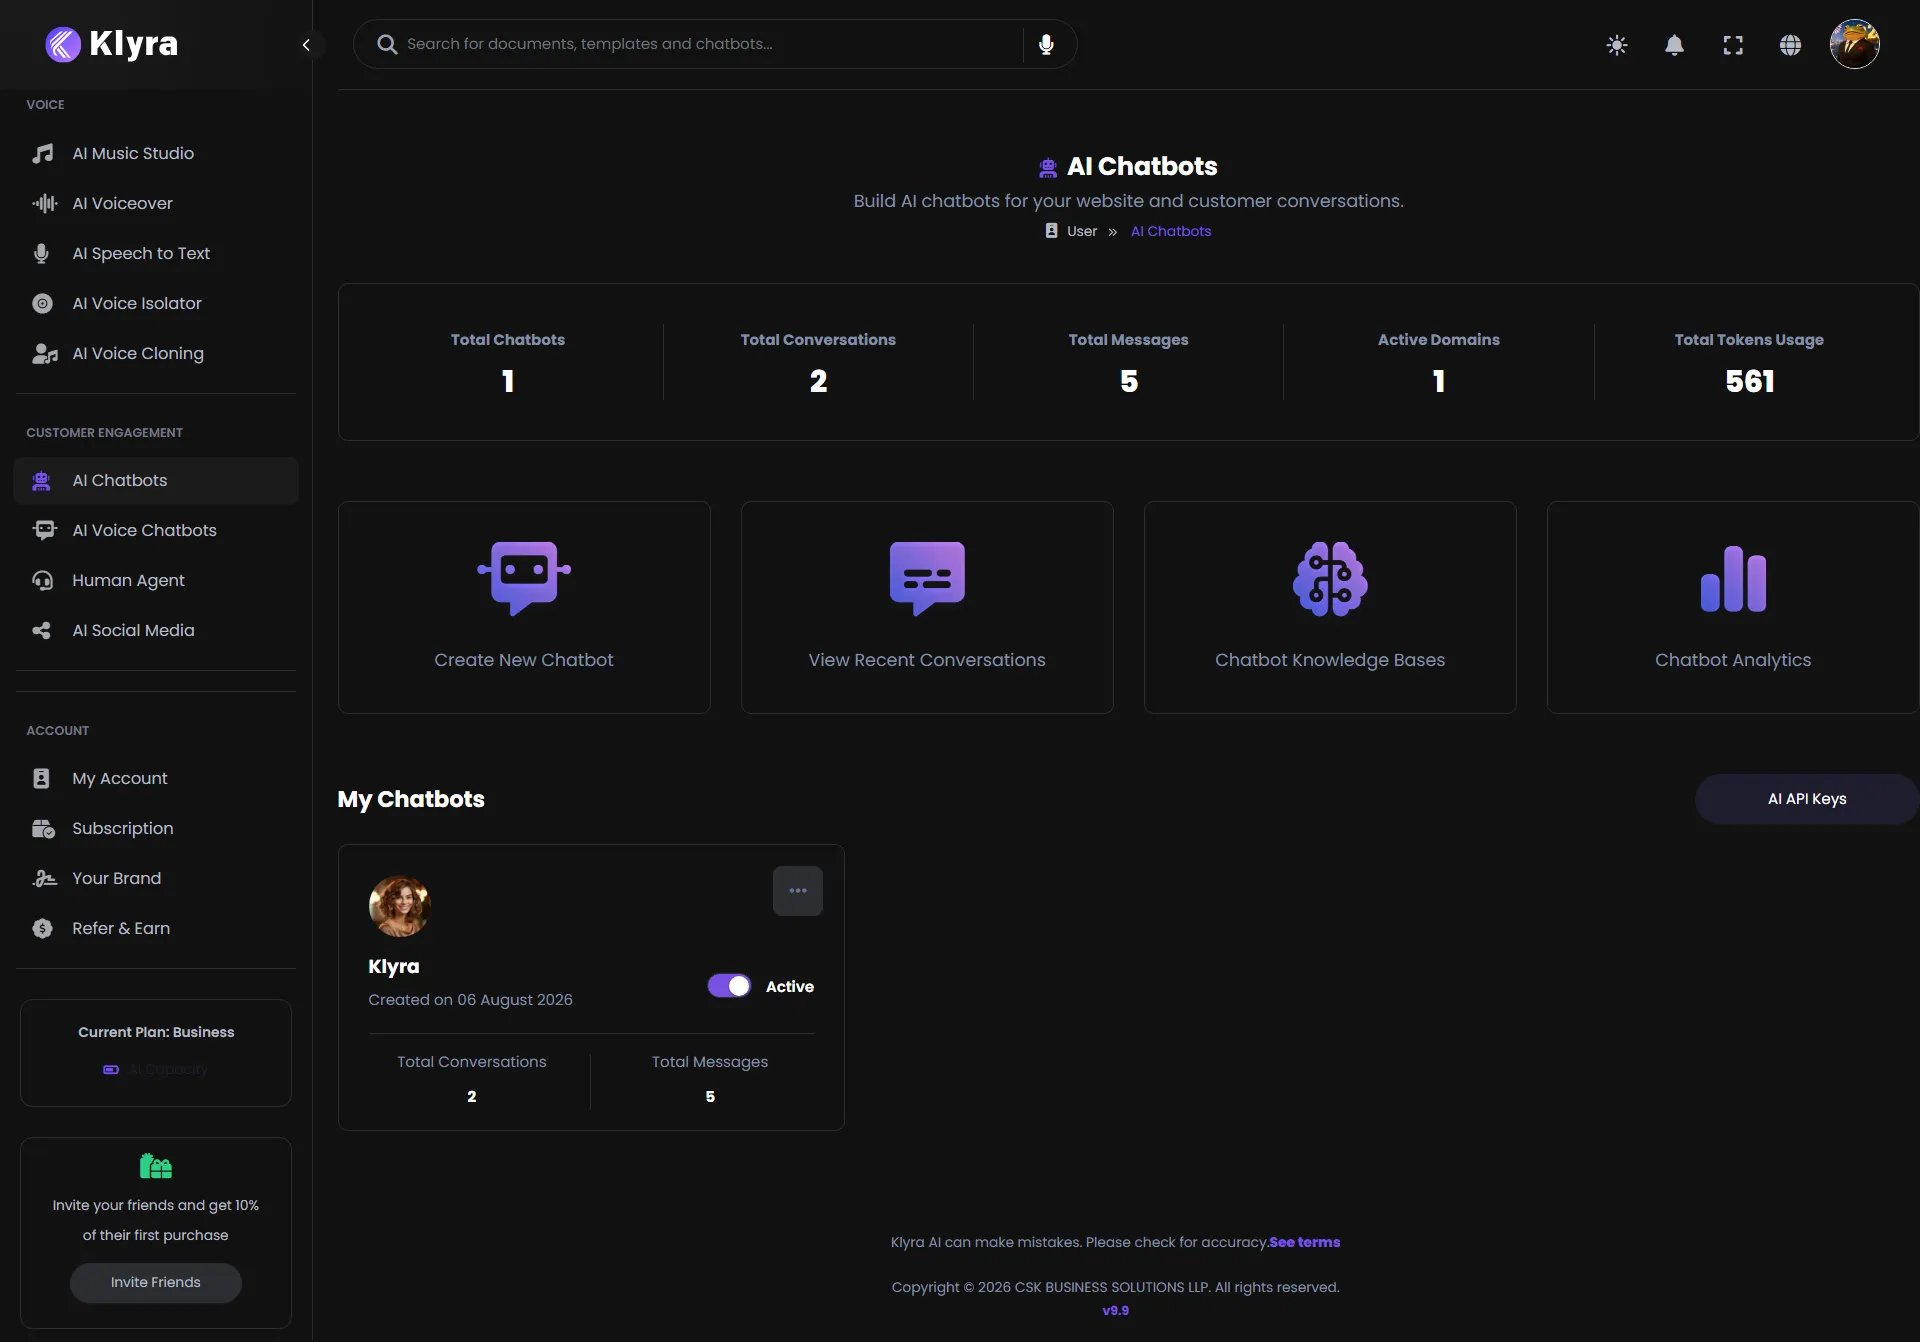
Dashboard overview
The dashboard can show:- Total Chatbots
- Total Conversations
- Total Messages
- Active Domains
- Total Tokens Usage
- Create New Chatbot
- View Recent Conversations
- Chatbot Knowledge Bases
- Chatbot Analytics
The metrics and chatbot information shown in the dashboard are workspace data. Your values will differ depending on your chatbot activity.
Create a chatbot
Select Create New Chatbot to begin. The setup wizard contains five steps:- Configure
- Customize
- Train
- Embed
- Channels
Step 1: Configure the chatbot
The Configure Chatbot step defines the chatbot’s core behavior and conversation settings.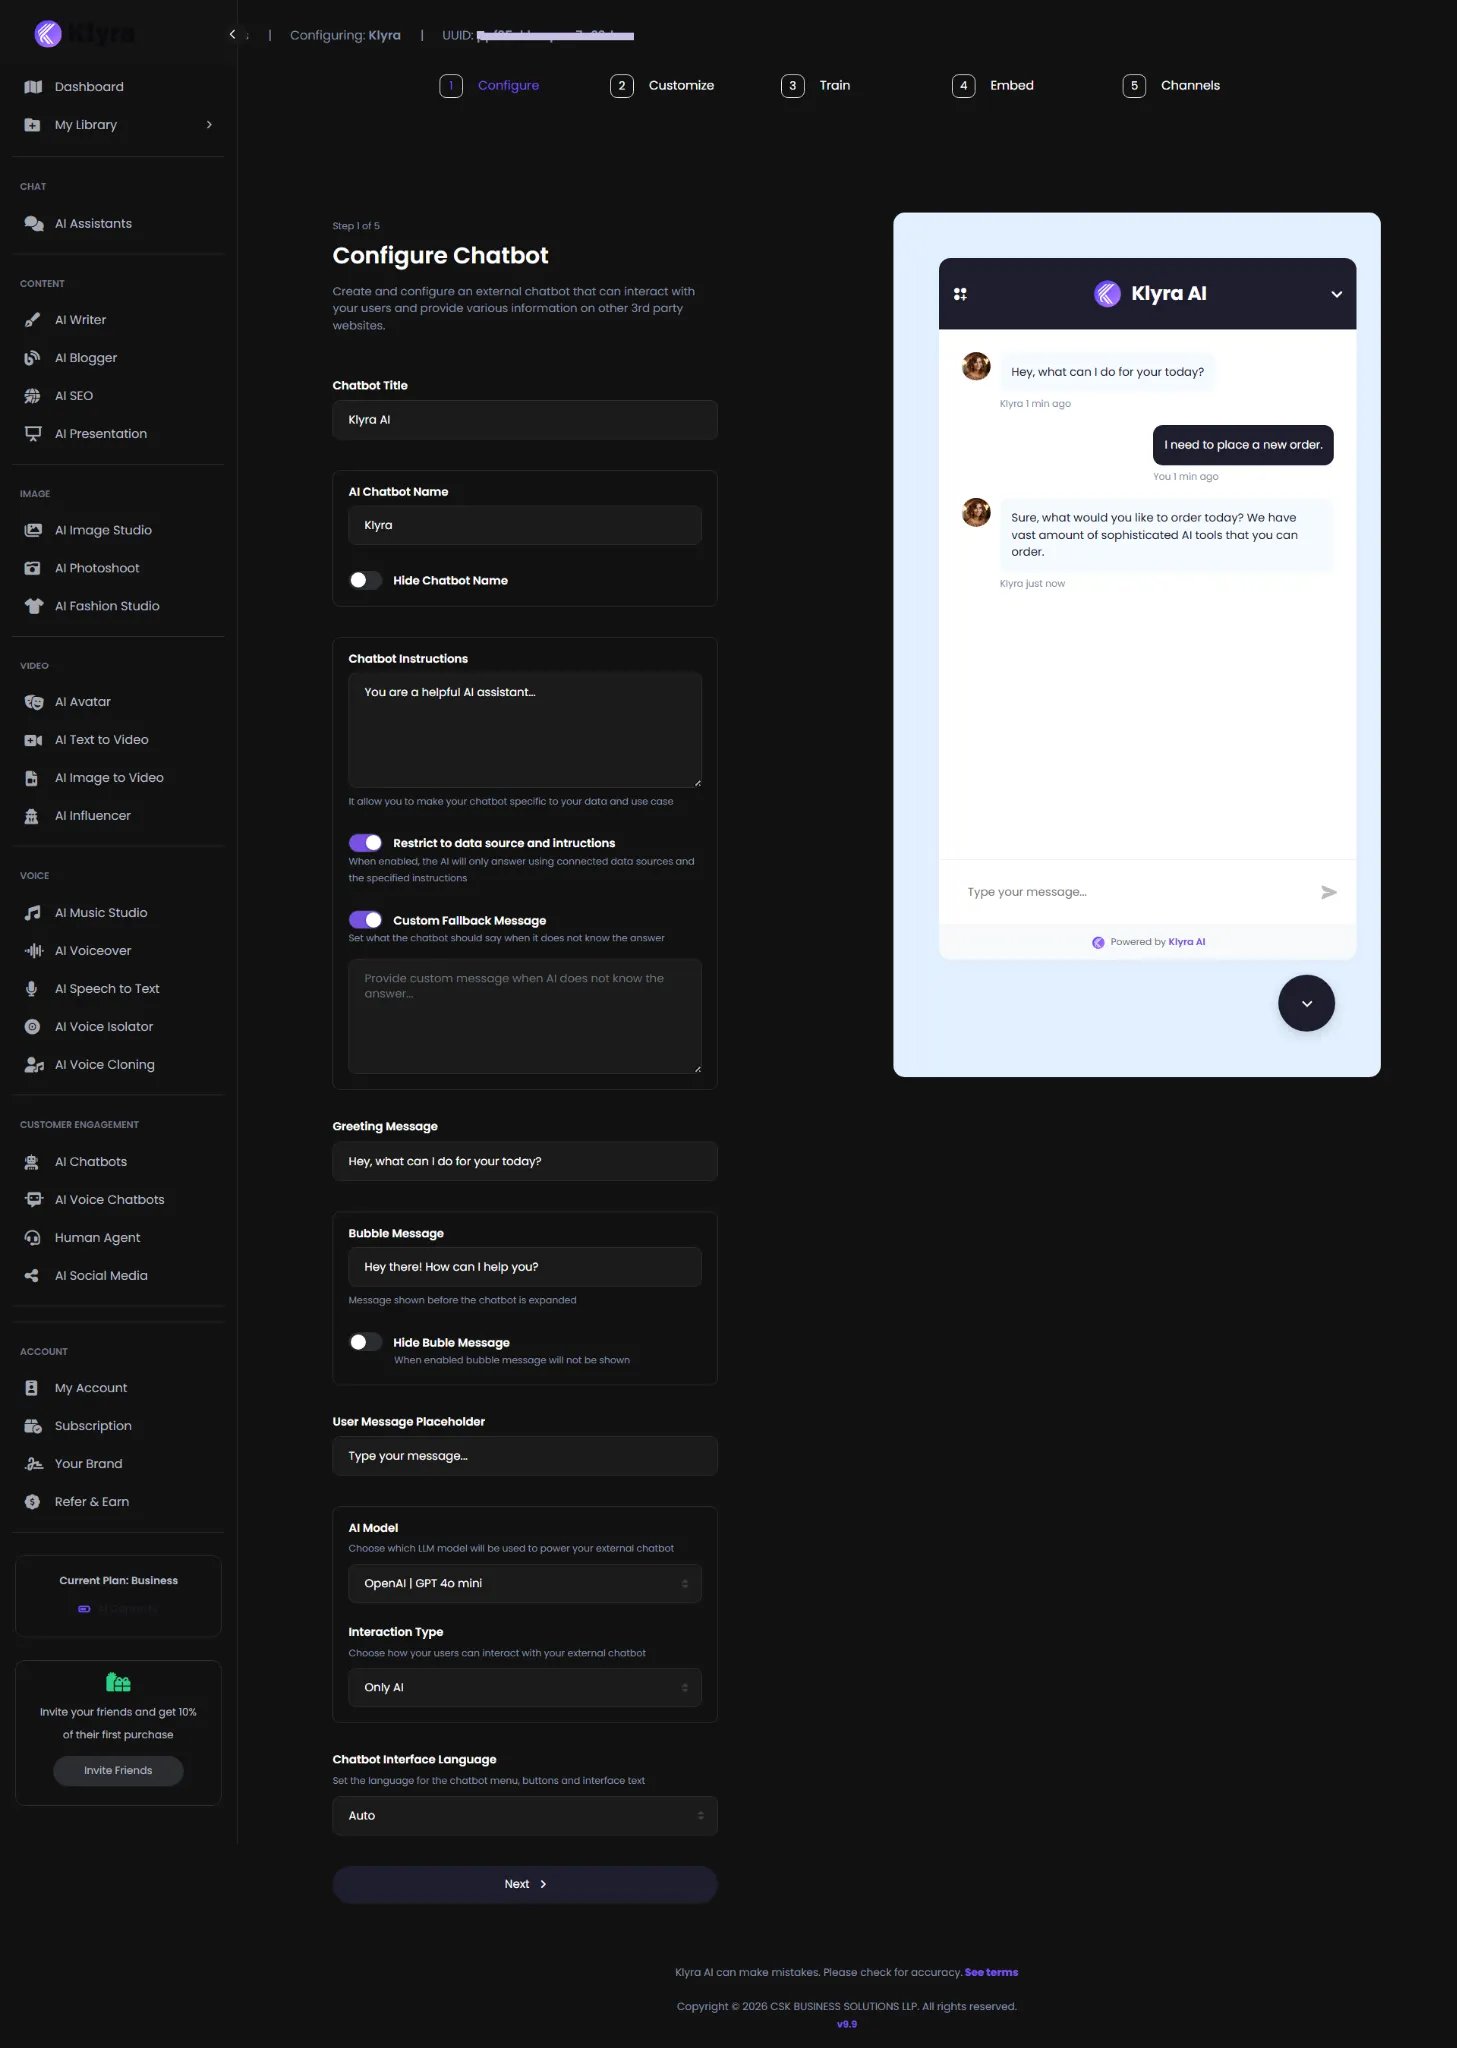
Chatbot Title
Enter the title used to identify the chatbot configuration.AI Chatbot Name
Set the name displayed by the AI chatbot. The interface also provides a Hide Chatbot Name option if you do not want the chatbot name displayed.Chatbot Instructions
Use Chatbot Instructions to describe how the chatbot should behave and respond. The interface provides an example instruction:You are a helpful AI assistant…Use this area to provide the instructions that define your chatbot’s intended behavior and use case.
Restrict to data source and instructions
The Restrict to data source and instructions option controls whether the AI should answer using only the connected data sources and the instructions you provide. When enabled, the interface explains that the AI will only answer using connected data sources and the specified instructions.Enable this setting when you want the chatbot’s responses to stay closely tied to the information you provide through its connected sources and instructions.
Custom Fallback Message
Enable Custom Fallback Message if you want to define what the chatbot should say when it does not know the answer. The interface provides a field for entering the custom response. For example, you can use a concise message that tells the visitor that the requested information is not available.Greeting Message
Set the Greeting Message shown when the chatbot starts a conversation. The screenshot uses:Hey, what can I do for you today?
Bubble Message
Set the Bubble Message displayed before the chatbot is expanded. The interface also provides Hide Bubble Message. When enabled, the bubble message will not be shown.User Message Placeholder
Set the text displayed inside the message input before the visitor types. The screenshot uses:Type your message…
AI Model
Choose the AI model that powers the external chatbot. The screenshot shows: OpenAI | GPT 4o mini The available models in your account may differ.Interaction Type
Choose how users interact with the chatbot. The screenshot shows: Only AIChatbot Interface Language
Set the language used for the chatbot interface, including its menu, buttons, and interface text. The screenshot shows: Auto Click Next to continue.Step 2: Customize the chatbot
The Customize Styles step controls the chatbot’s visual appearance.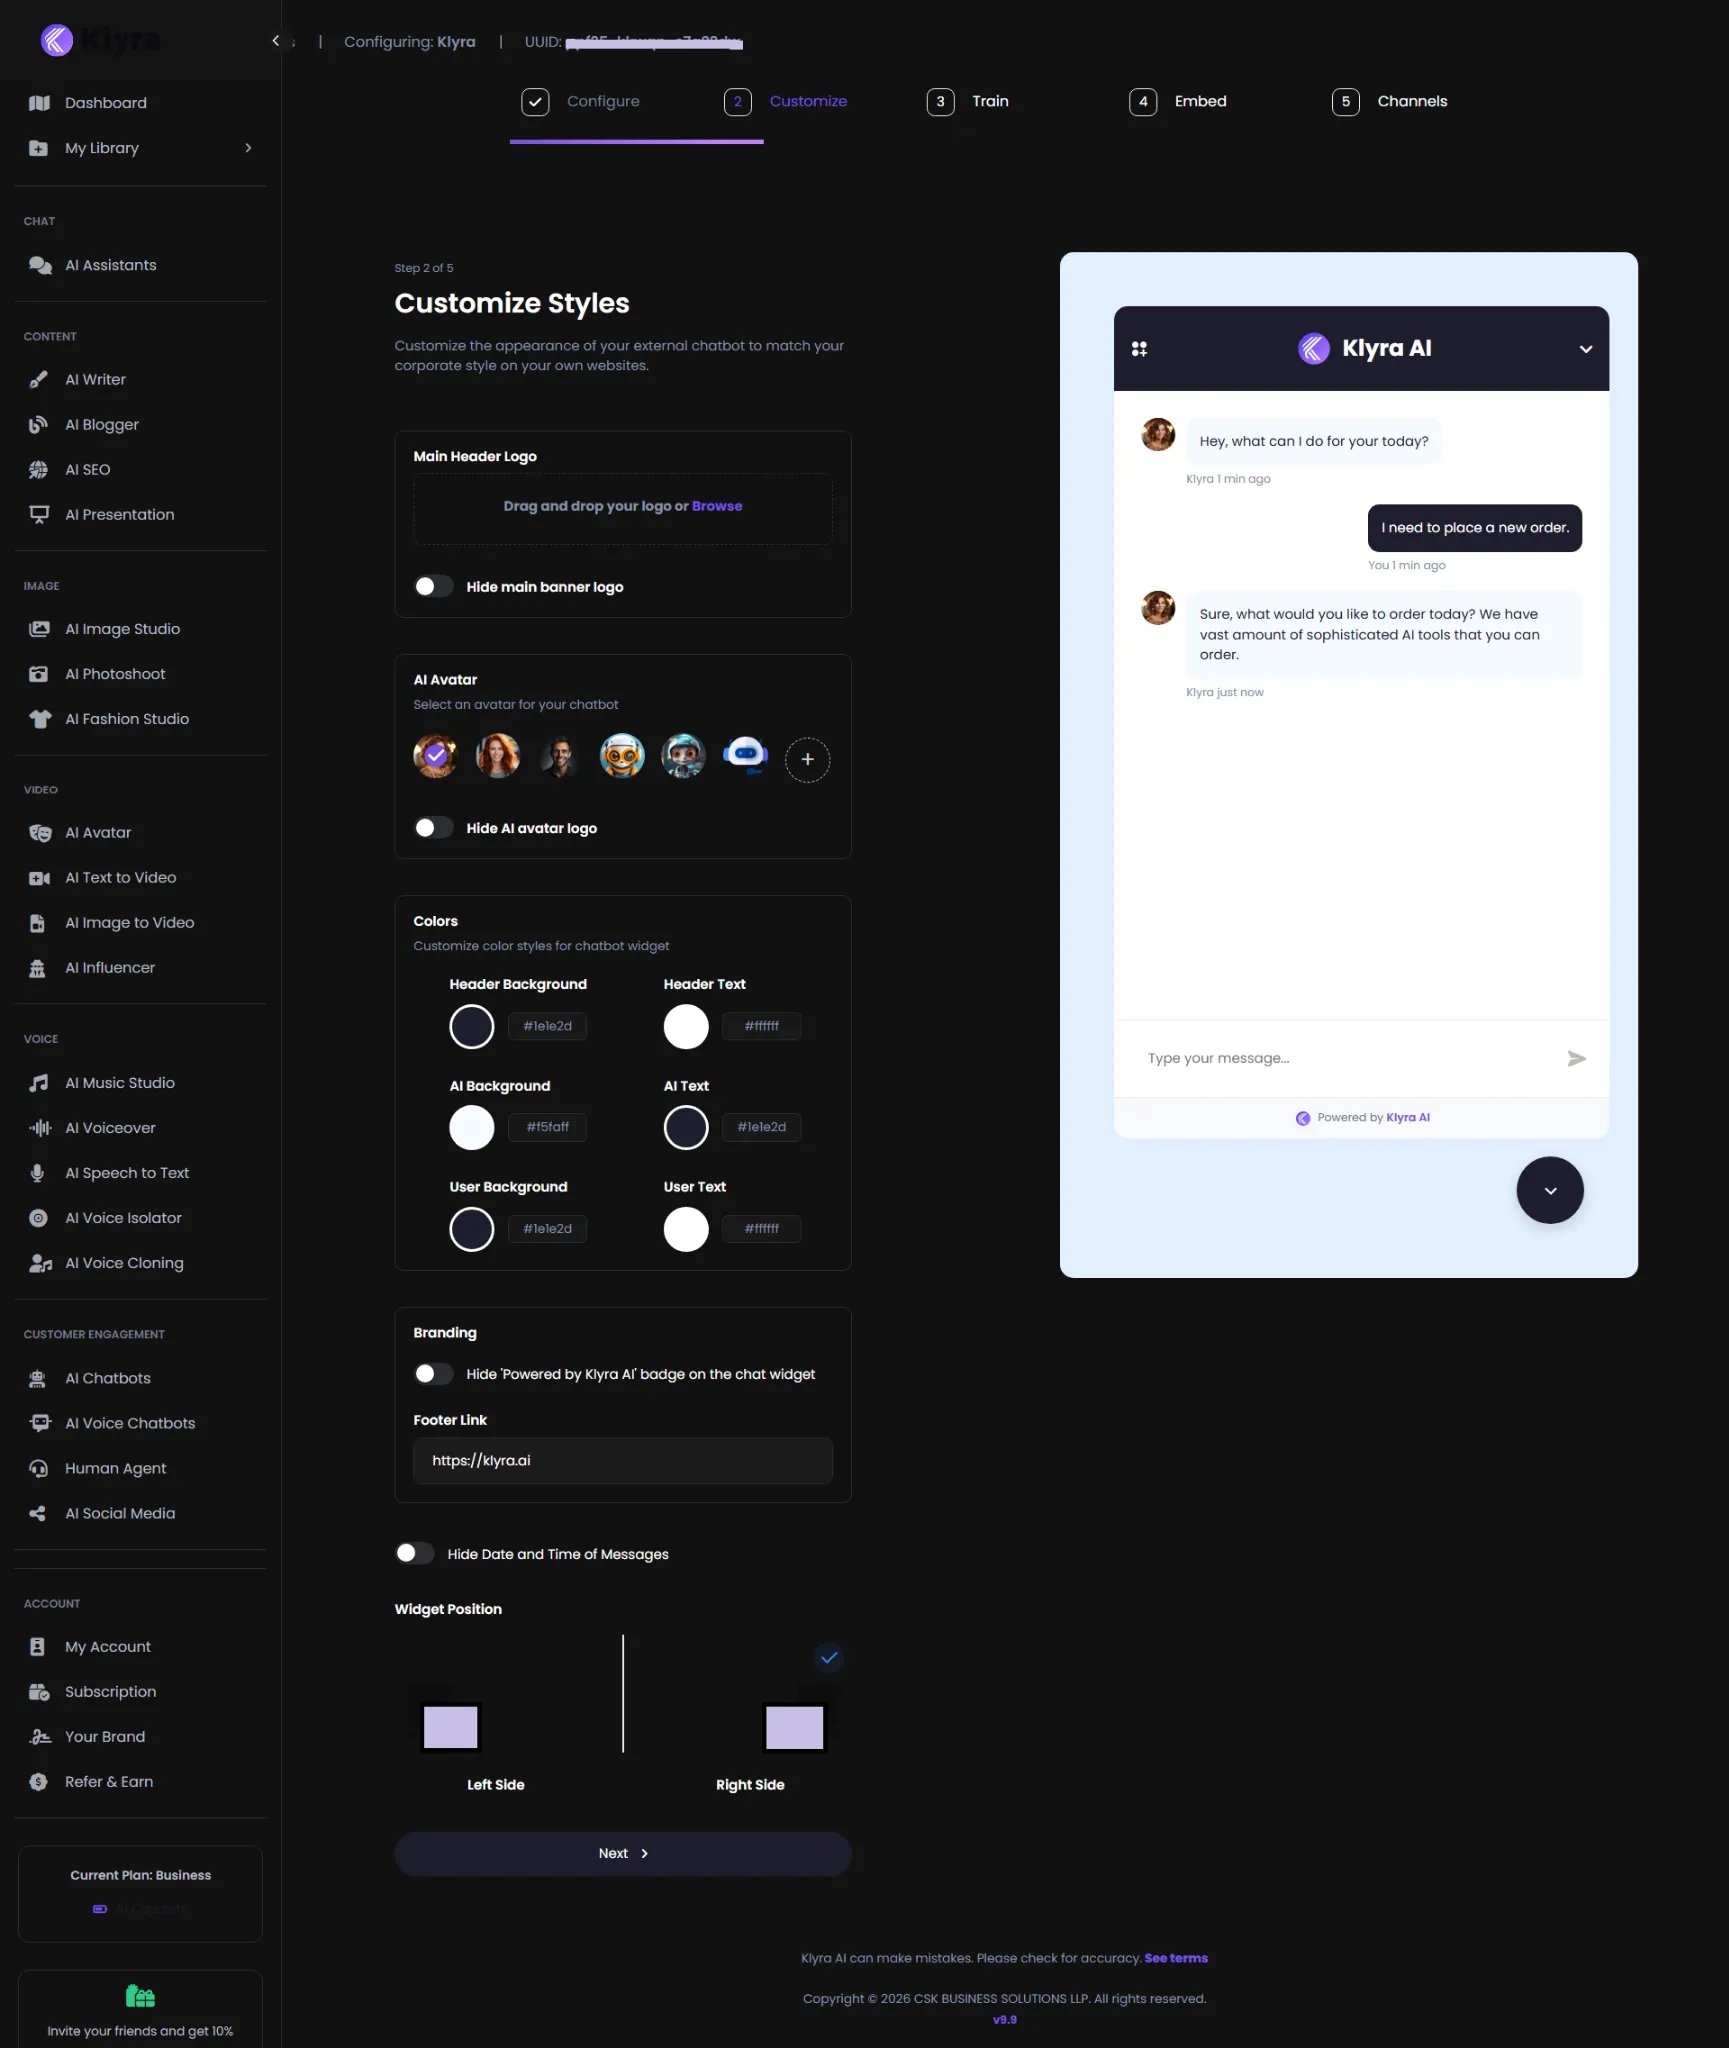
Main Header Logo
Upload your logo using Drag and drop your logo or Browse. You can also enable Hide main banner logo if you do not want the main header logo displayed.AI Avatar
Select an avatar for the chatbot. The interface displays several avatar choices and a button to add another option. You can also enable Hide AI avatar logo if you do not want the avatar displayed.Customize colors
The Colors section lets you customize the visual colors used by the chatbot widget. The settings shown include:- Header Background
- Header Text
- AI Background
- AI Text
- User Background
- User Text
Use colors that maintain clear contrast between the chatbot header, AI messages, and user messages.
Branding
The Branding section includes an option to: Hide “Powered by Klyra AI” badge on the chat widget You can also set a Footer Link. The screenshot shows:https://klyra.ai
Message timestamps
You can enable: Hide Date and Time of Messages When enabled, date and time information is hidden from messages.Widget position
Choose where the chatbot widget should appear:- Left Side
- Right Side
Step 3: Add a Knowledge Base
The Add a Knowledge Base step lets you provide information that the chatbot can use to personalize its responses.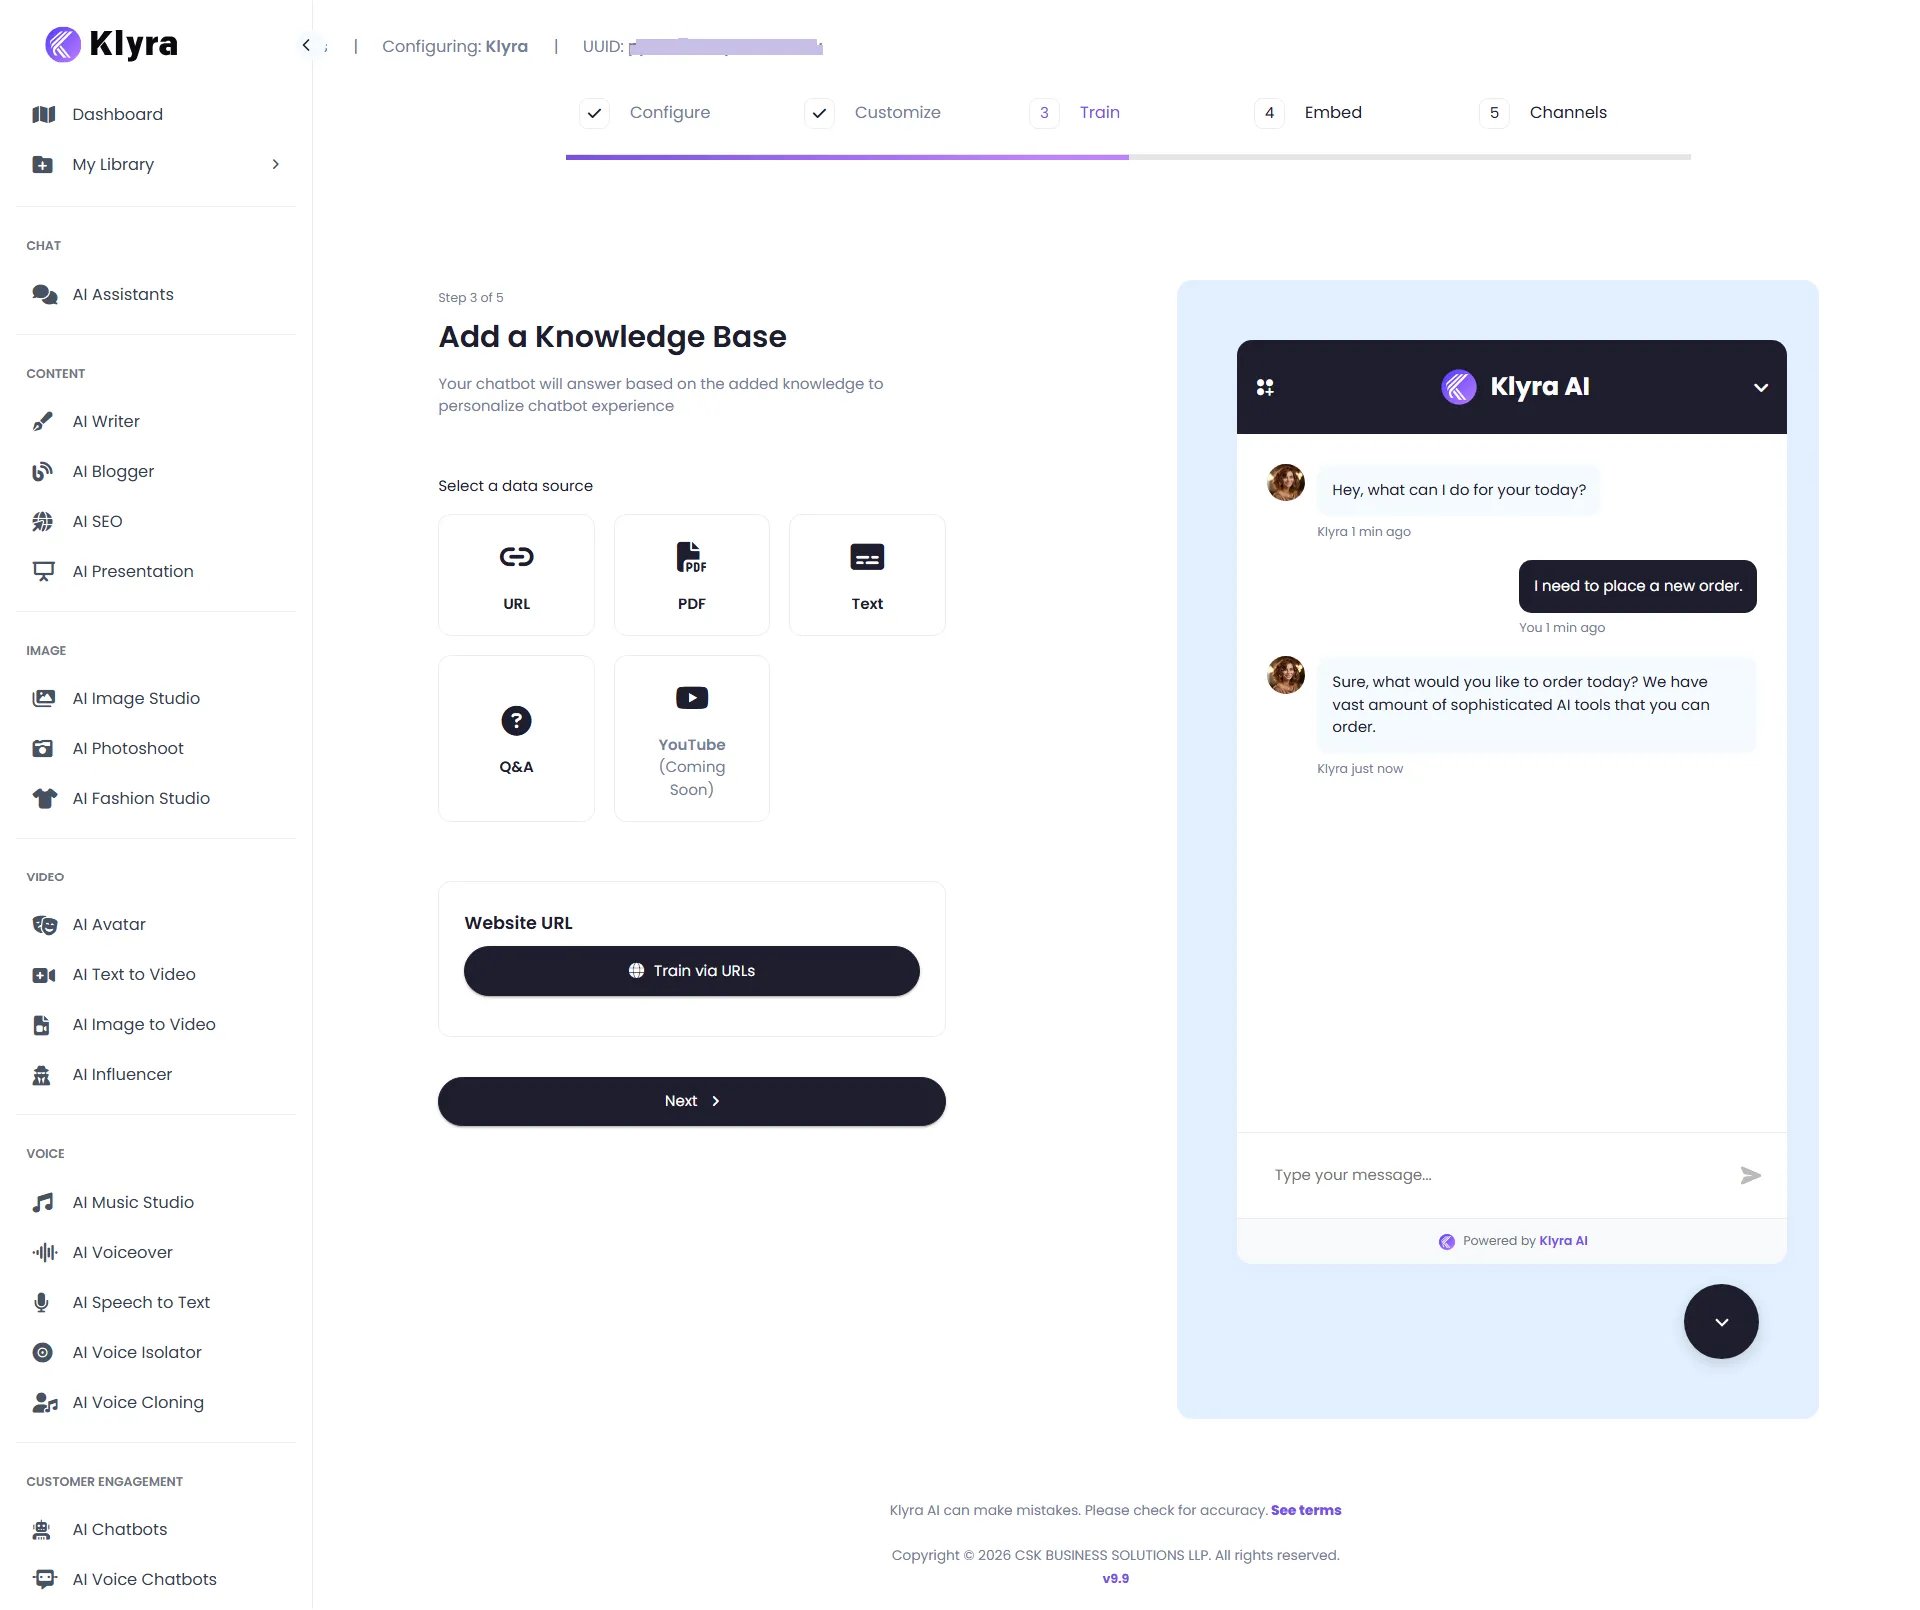
Select a data source
The interface shows these data-source options:- URL
- Text
- Q&A
- YouTube marked Coming Soon
Train via URLs
When using the URL option, the interface provides a Website URL field and a Train via URLs button. Enter the website information you want the chatbot to learn from, then select Train via URLs.The screenshot shows YouTube as Coming Soon, so this tutorial does not treat YouTube as an available training source.
Other knowledge sources
Depending on the source you choose, the knowledge base can also use:- PDF documents
- Text
- Q&A
Step 4: Embed and integrate
The Embed and Integrate step provides the code required to place your chatbot on a website.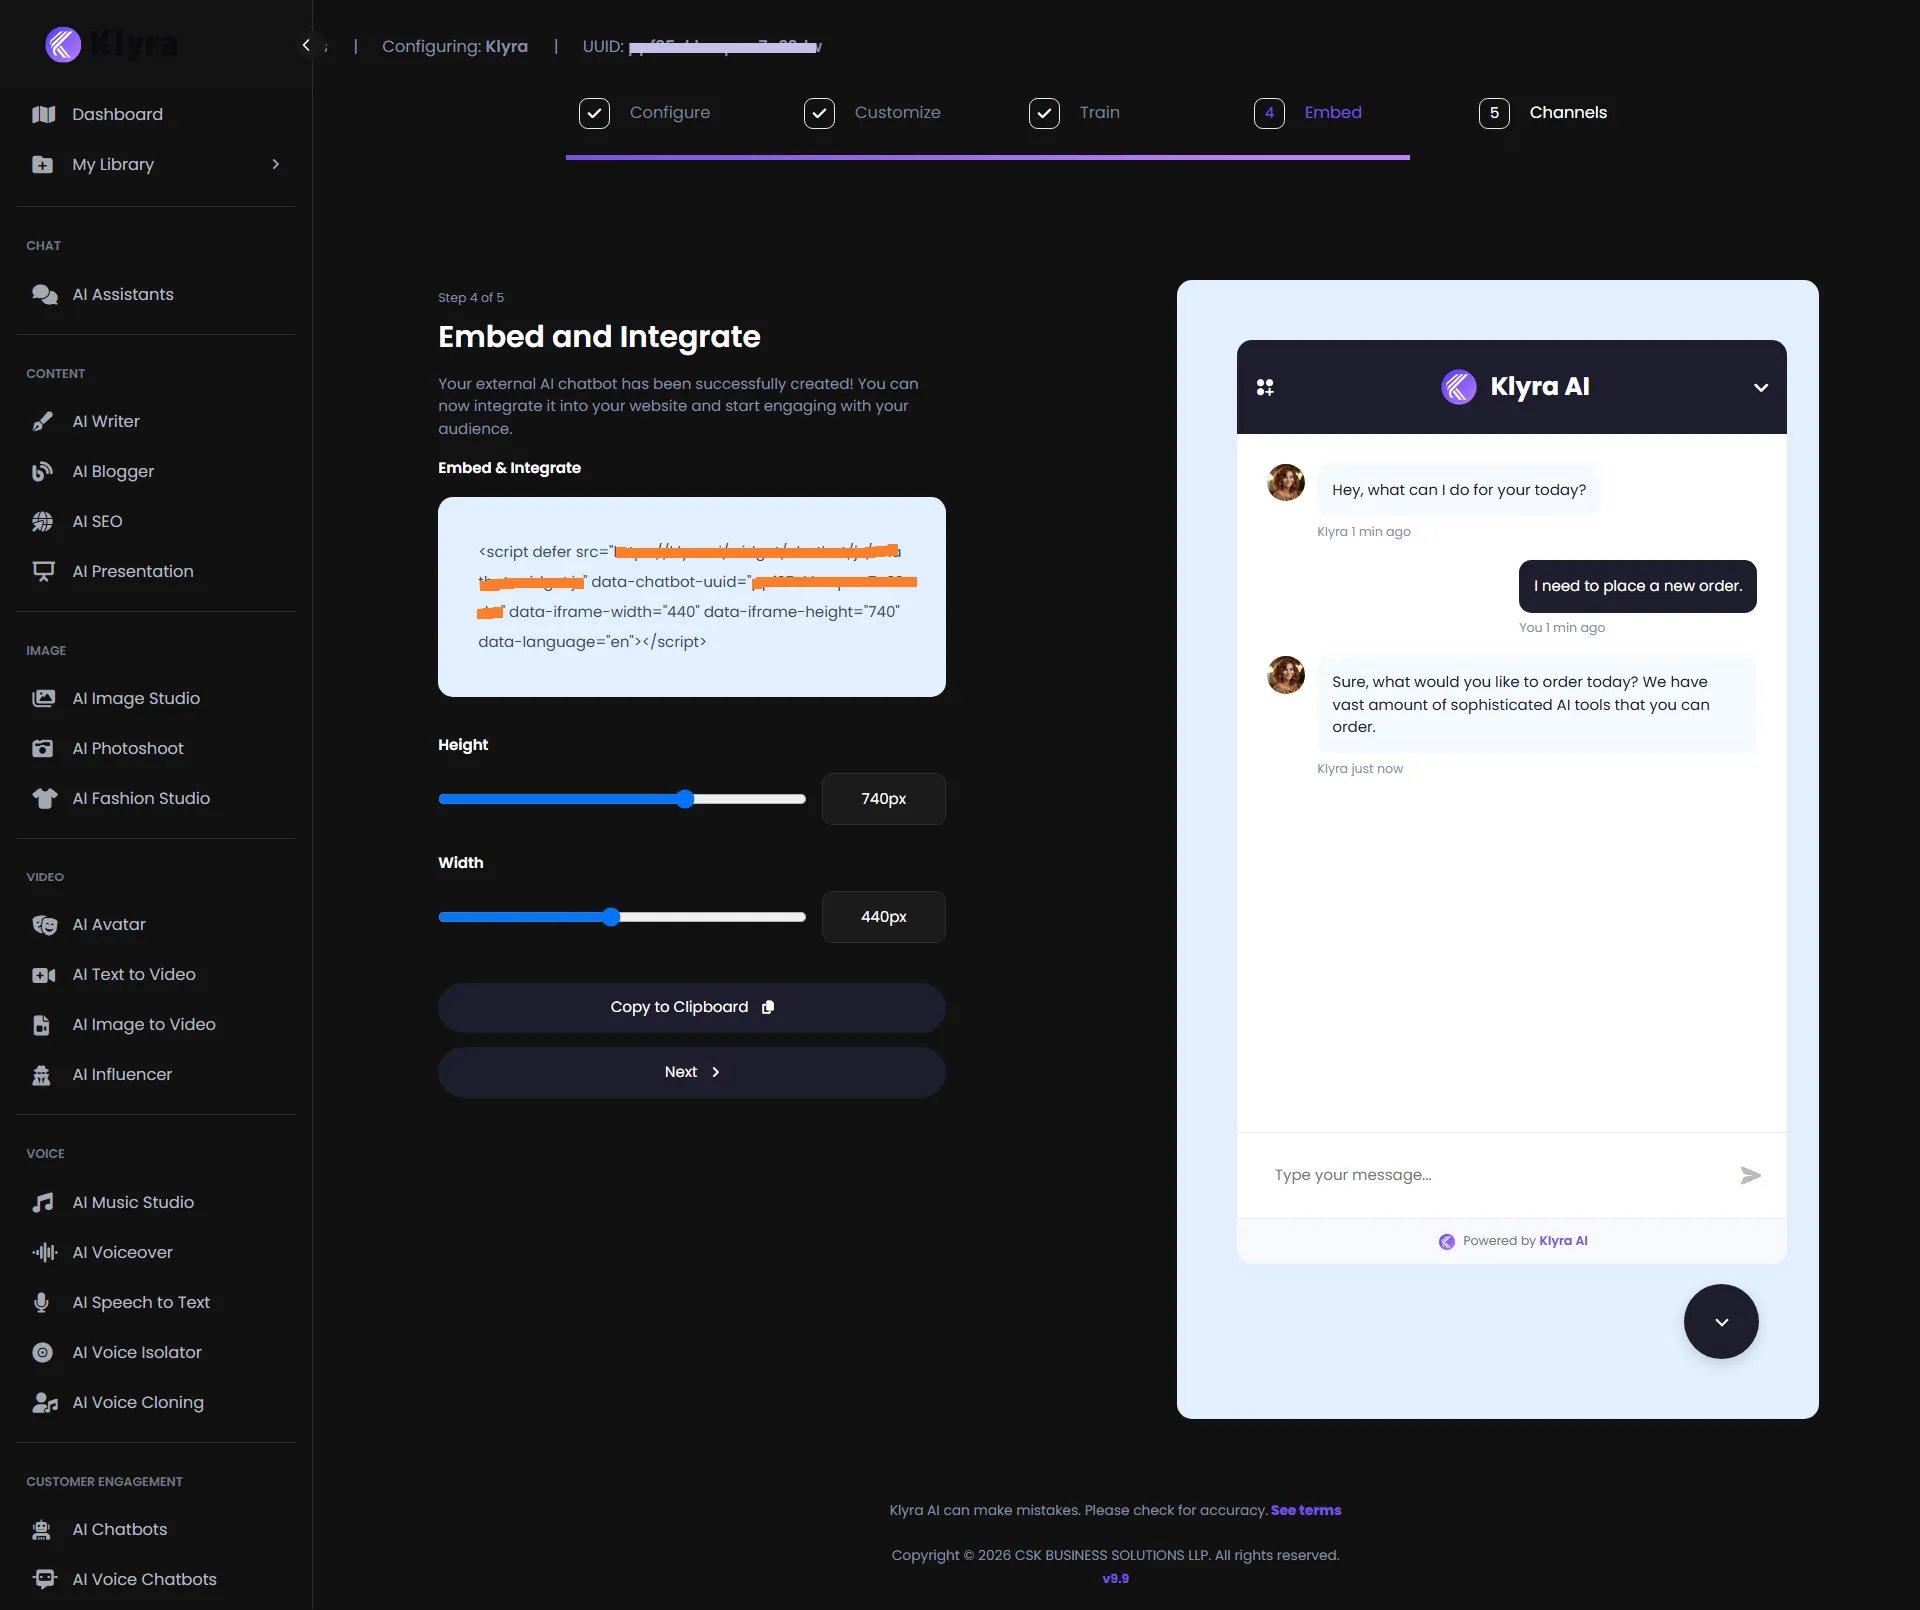
Review the embed code
Klyra generates an embed snippet for the configured chatbot. The code shown in the interface includes chatbot-specific attributes as well as:- iframe width
- iframe height
- language
Set the height
Use the Height control to set the chatbot height. The screenshot shows: 740pxSet the width
Use the Width control to set the chatbot width. The screenshot shows: 440px Adjust the dimensions to suit the layout of your website.Copy the embed code
Click Copy to Clipboard to copy the generated embed code. You can then place the code in the appropriate location on your website.The generated code is specific to the chatbot you configured. Use the code generated by Klyra rather than creating a new embed snippet manually.
Step 5: Connect chatbot channels
The Chatbot Channel step is optional and lets you extend the chatbot experience through supported messaging channels.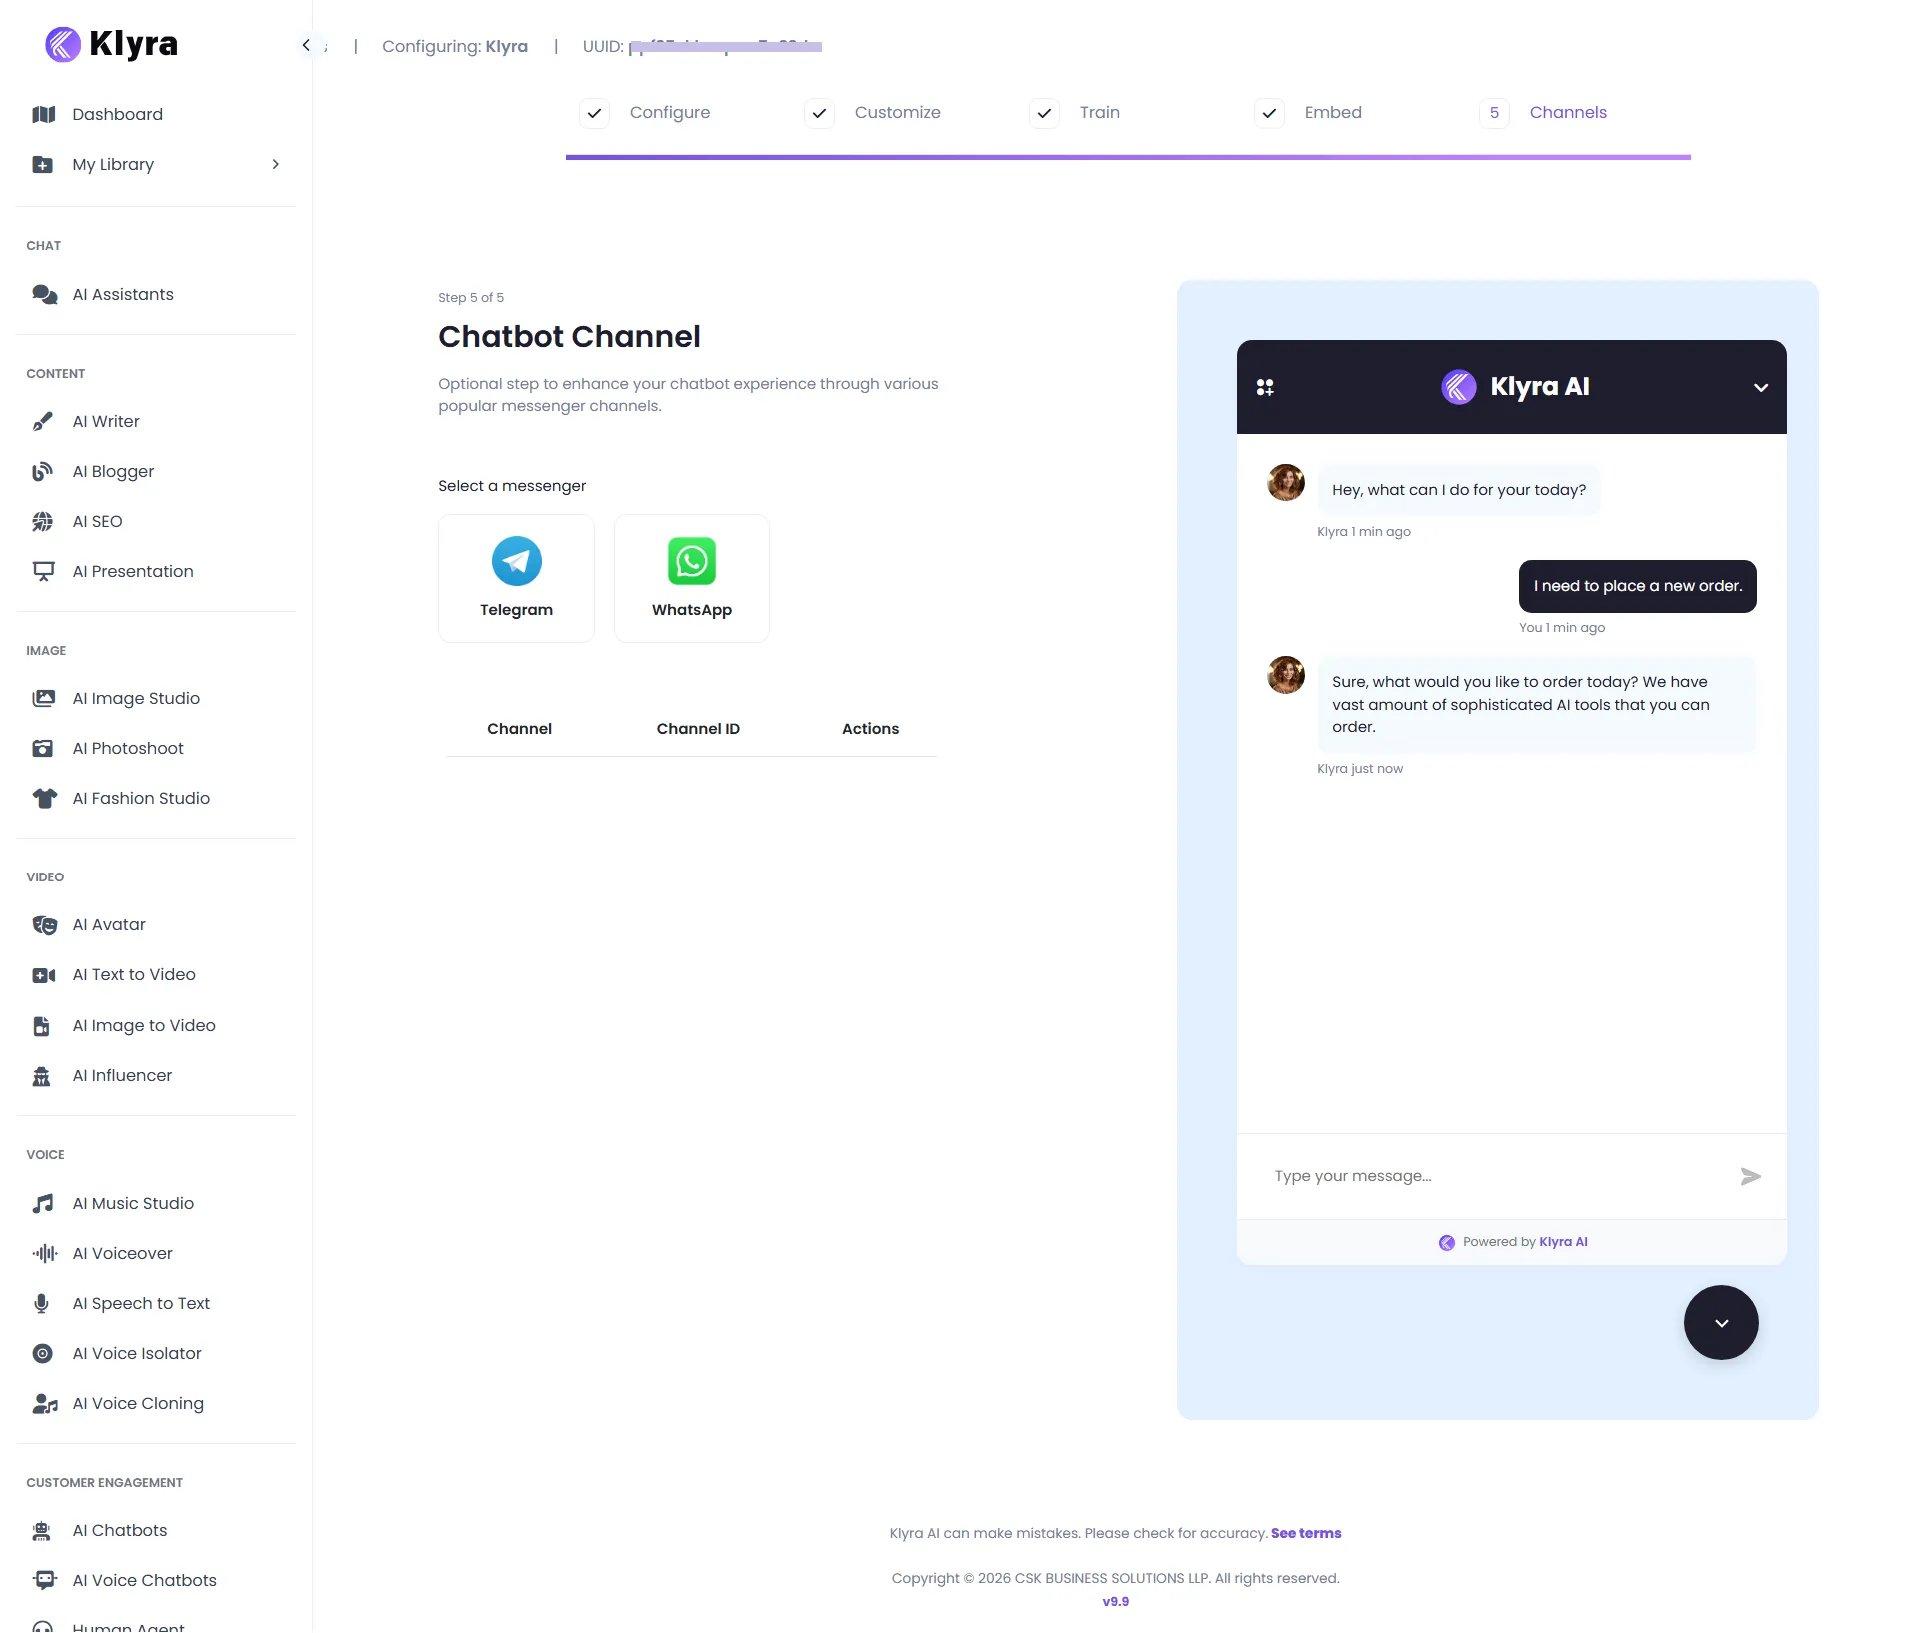
Select a messenger
The interface currently shows:- Telegram
- Channel
- Channel ID
- Actions
Channel configuration is optional. You can use the website chatbot without configuring an additional messaging channel.
Complete the chatbot setup
Once the five-step setup is complete, your chatbot can be used according to the configuration you selected. The resulting experience can include:- A customized website chatbot widget
- Responses based on your configured instructions
- Responses based on your connected knowledge sources
- Your selected AI model
- Your chosen interface language
- Optional Telegram or WhatsApp channel connections
Recommended setup workflow
1
Start with clear instructions
Define the chatbot’s purpose, audience, and expected behavior in Chatbot Instructions.
2
Control the information it uses
If appropriate for your use case, enable Restrict to data source and instructions and provide the relevant knowledge sources.
3
Customize the experience
Add your logo, choose an avatar, set colors, configure branding, and select the widget position.
4
Train with useful information
Add the website URLs, PDFs, text, or Q&A content that the chatbot should use.
5
Test the website experience
Use the generated embed code and verify the chatbot’s appearance and behavior on your website.
6
Add messaging channels if needed
Connect Telegram or WhatsApp when you want the chatbot available through those channels.
Best practices
Write specific chatbot instructions
Instead of a generic instruction, describe the chatbot’s role, audience, and expected behavior. For example:- Explain what the chatbot helps users with.
- Define the type of answers it should provide.
- Specify how it should respond when information is unavailable.
- Keep responses aligned with your business use case.
Use a focused knowledge base
Add information that is relevant to the chatbot’s purpose. A focused knowledge base makes it easier to maintain the information the chatbot should reference.Configure a useful fallback
A clear fallback message helps users understand what to do when the chatbot cannot answer a question.Match the visual design to your website
Use your logo, brand colors, avatar, footer link, and widget position to make the chatbot fit naturally into your website.Test before publishing the embed
After copying the generated embed code, test the chatbot on the target website. Check its appearance, message input, responses, and available interactions.Troubleshooting
The chatbot is not answering from my website content
Review the Train step and confirm that the intended source was added and trained. If you want the chatbot to stay restricted to your supplied information, review Restrict to data source and instructions in the Configure step.The chatbot does not look right on my website
Review:- Header logo
- AI avatar
- Colors
- Branding
- Widget position
- Embed width
- Embed height
I do not want the chatbot name displayed
Enable Hide Chatbot Name in the Configure step.I do not want the message bubble displayed
Enable Hide Bubble Message in the Configure step.I do not want message dates and times displayed
Enable Hide Date and Time of Messages in Customize Styles.I want to connect Telegram or WhatsApp
Open the Channels step and select the supported messenger you want to configure.Quick reference
You’re ready to build your chatbot
You now know how to:- Create an AI Chatbot
- Configure its identity and behavior
- Set instructions and fallback responses
- Choose an AI model
- Customize the chatbot’s appearance
- Add logos and avatars
- Configure chatbot colors and branding
- Add knowledge from URLs, PDFs, text, and Q&A
- Generate and copy website embed code
- Adjust chatbot dimensions
- Connect supported messaging channels