

AI Music Studio is part of Klyra AI, the AI Operating System. The goal is to keep music creation simple while giving you deeper controls when you need them.
What you can do
With AI Music Studio, you can:- Generate music from a text prompt.
- Build a song section by section with Composition Plan.
- Control song length, vibe, mood, vocals, styles, and advanced generation settings.
- Create instrumental or vocal tracks.
- Add positive and negative global style tags.
- Choose a generation model and optional seed.
- Browse, search, favorite, archive, download, and delete generated tracks.
- Play tracks from the persistent audio player.
- Stack multiple AI tracks in the multi-track Mixer.
- Adjust volume, pan, fades, and start timing for individual layers.
- Apply master volume, reverb, and lowpass processing.
- Save and recall named mixes.
AI Music Studio at a glance
The workspace has three main areas:- Studio for creating music.
- Library for managing generated tracks.
- Mixer for combining and balancing tracks.
Create your first track
Open AI Music Studio from Klyra AI. The Studio opens with the music composer at the top and your recent tracks below it.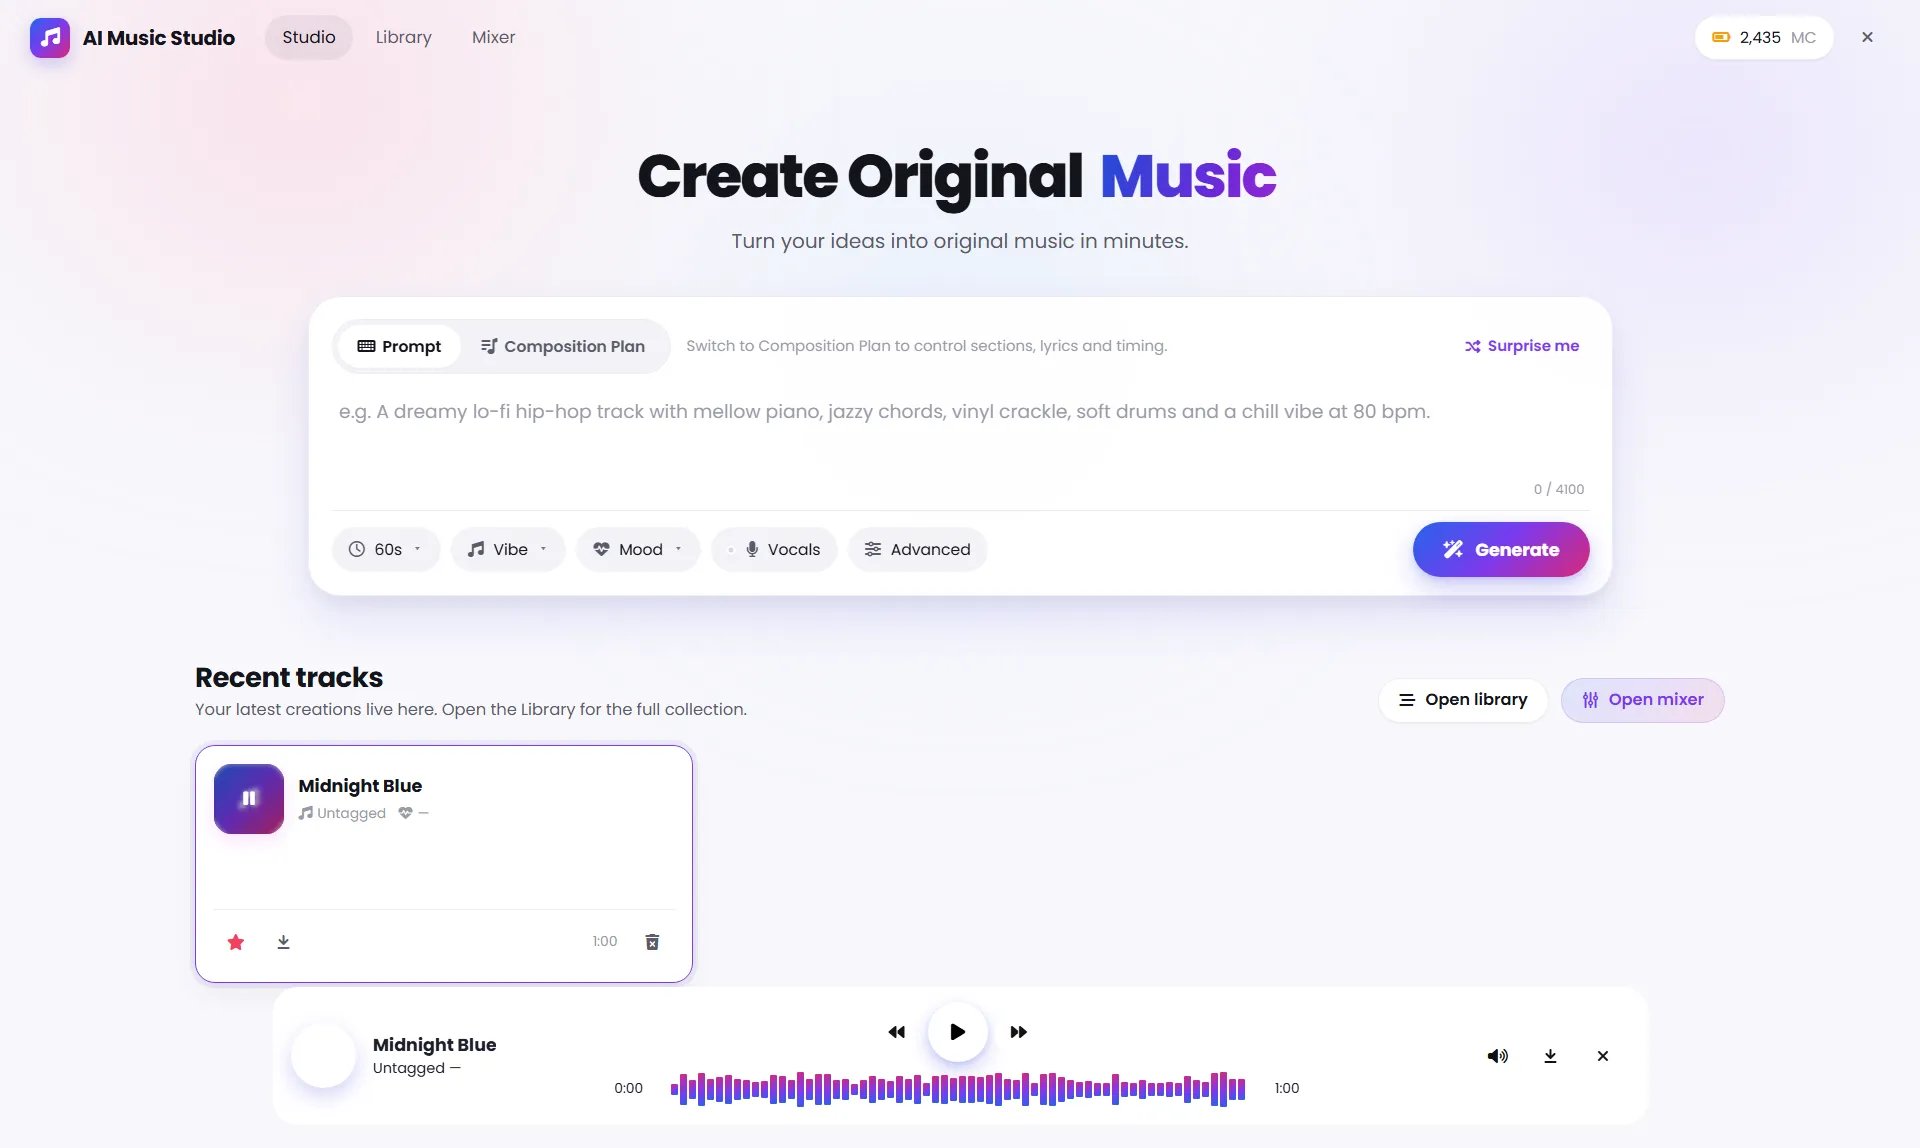
Step 1: Choose Prompt mode
The Studio provides two creation modes:- Prompt
- Composition Plan
Step 2: Write your music prompt
Describe the track you want to hear. A useful prompt can include:- Genre or musical style
- Instruments
- Mood
- Vocal preference
- Tempo
- Production characteristics
- Overall atmosphere
A dreamy lo-fi hip-hop track with mellow piano, jazzy chords, vinyl crackle, soft drums and a chill vibe at 80 bpm.The Studio interface provides a large prompt field with a character counter and a Surprise me option for generating a curated example prompt.
You do not need to write a technically complex prompt. Describe the sound, feeling, instruments, and energy you want.
Step 3: Set the track length
Use the length control to choose how long the generated track should be. The product specification describes quick length presets including:- Hook
- Loop
- Verse
- Short
- Full
- Extended
Step 4: Choose a vibe
Use Vibe to guide the overall musical direction. The product specification lists visual vibe categories including:- Cinematic
- Lo-Fi
- Electronic
- Ambient
- Orchestral
- Rock
- Jazz
- Hip-Hop
- Classical
Step 5: Choose a mood
Use Mood to influence the emotional character of the track. Choose a mood that matches the feeling you want the finished music to communicate.Step 6: Choose vocals or instrumental
Use Vocals to control whether the generated track includes vocals or is instrumental. The product specification describes this as an Instrumental vs Vocals toggle.Step 7: Open Advanced controls when needed
Use Advanced when you need additional control over generation. The product specification lists:- Custom track title or automatic title from the prompt
- Multiple output formats such as MP3 and WAV
- Selectable generation model
- Optional seed for reproducible results
Step 8: Generate
Click Generate. AI Music Studio processes the request and creates your track. The product specification describes a fullscreen generation progress experience with an animated visualizer and real-time AI Capacity information in the top bar.Generation uses your available AI Capacity. Klyra AI presents capacity to users rather than exposing its internal credit systems as the primary experience.
Use Composition Plan for more control
If you want to design the structure of a song yourself, switch from Prompt to Composition Plan.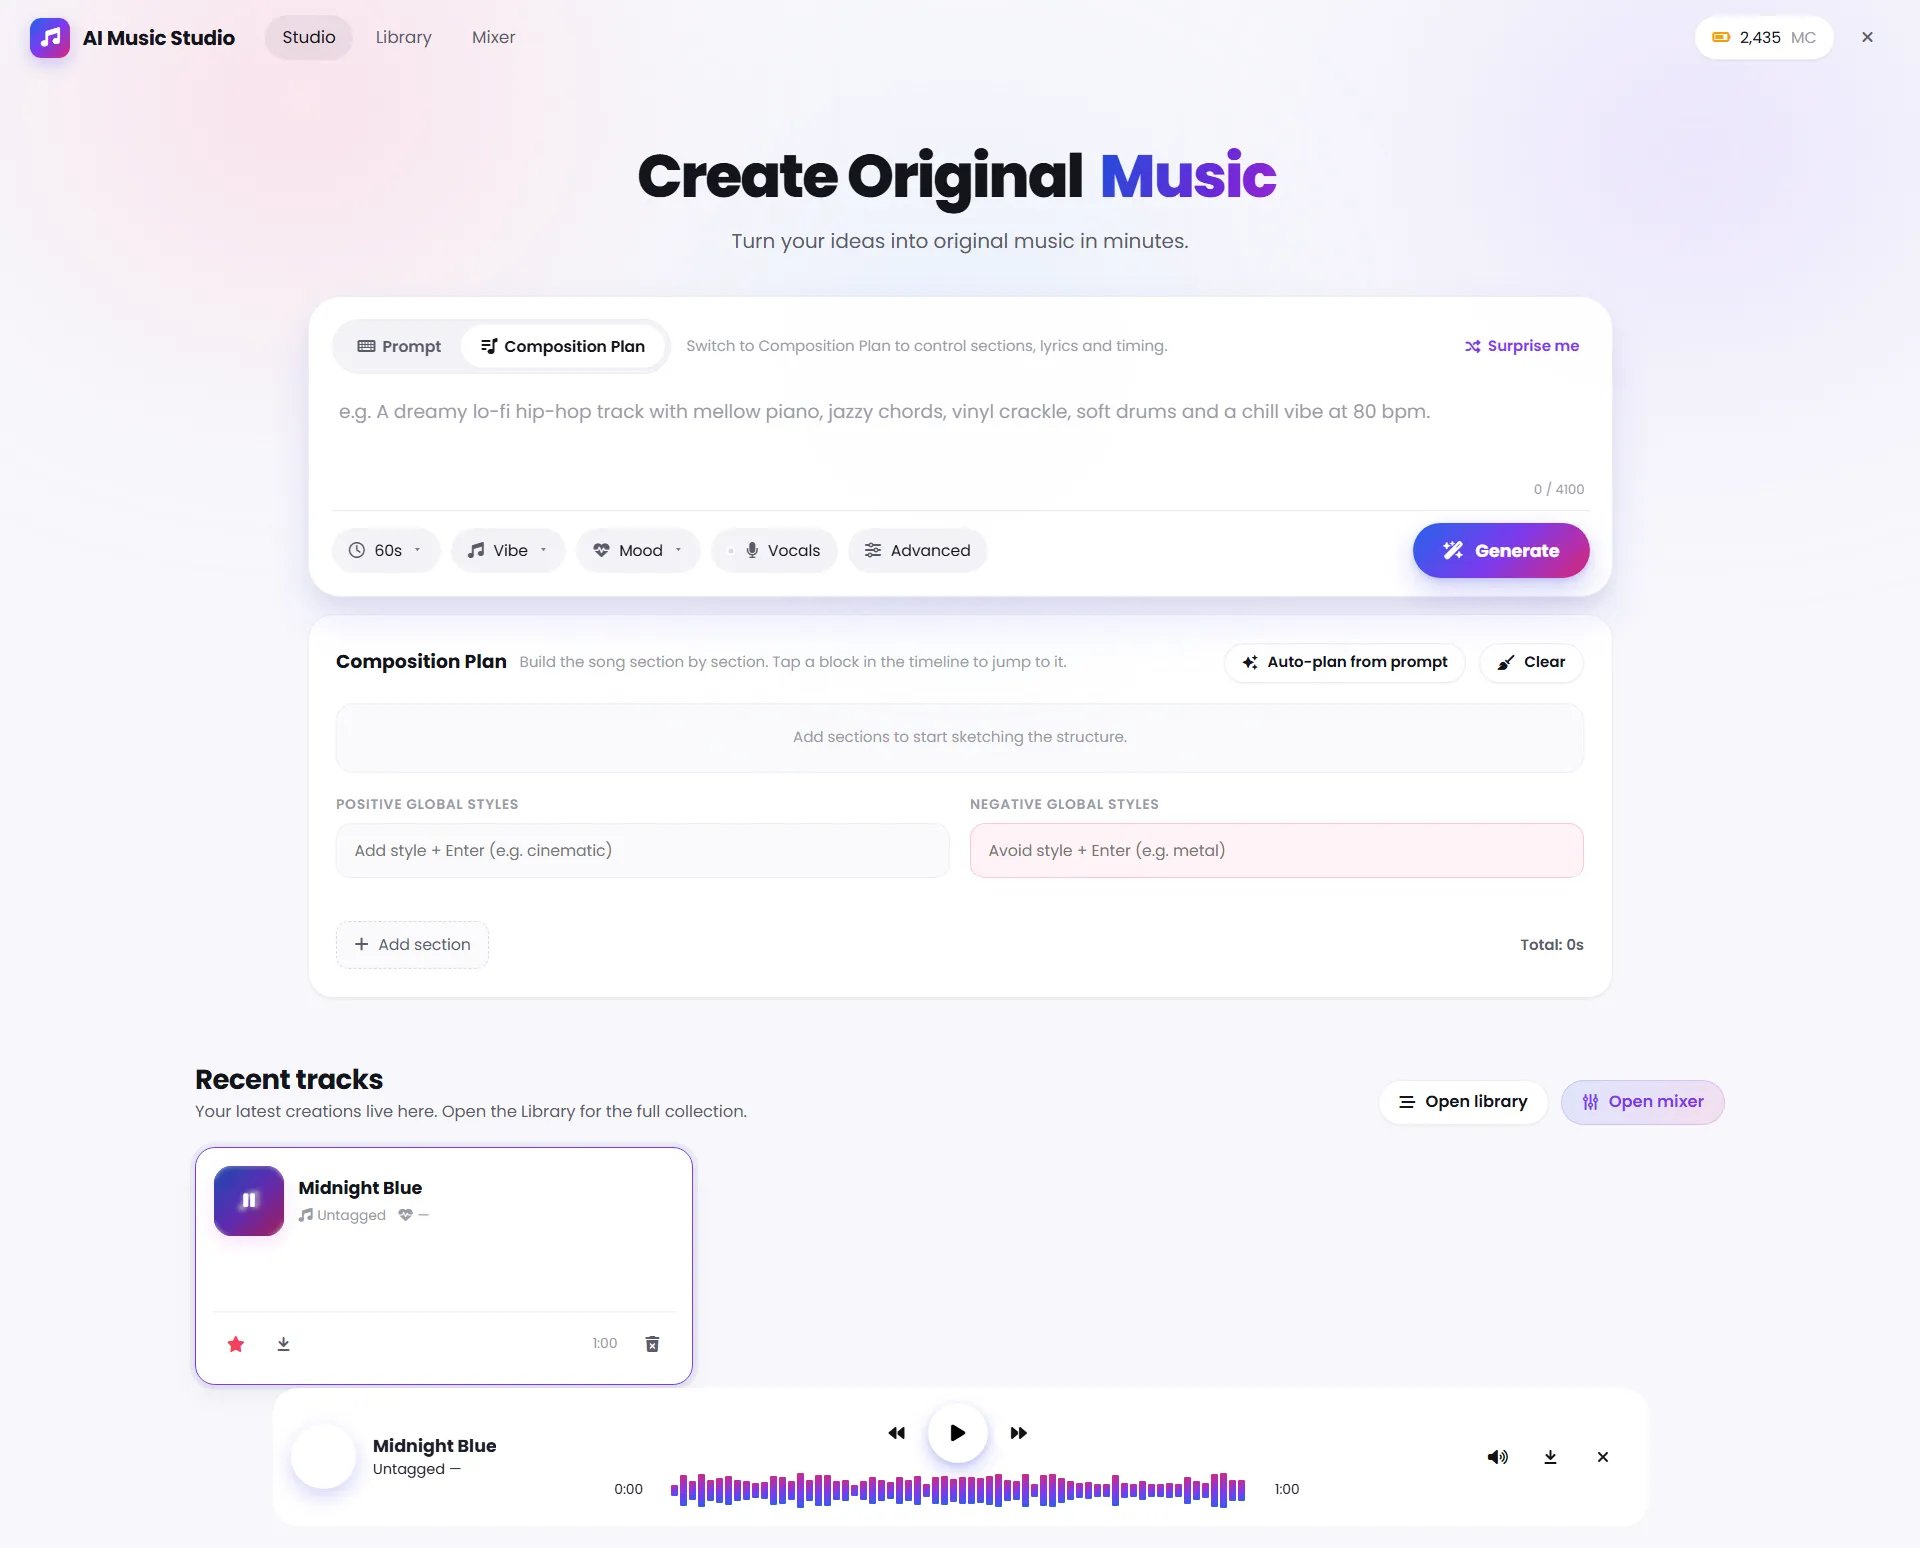
Auto-plan a song
Click Auto-plan from prompt to turn your existing prompt into a song structure. This is useful when you know the sound you want but do not want to manually build every section. The product specification explicitly supports automatically planning a full song layout from a prompt.Add sections manually
Use Add section to build your song timeline. You can add sections such as:- Intro
- Verse
- Chorus
- Bridge
- Other supported song sections
Configure each section
A section can be configured with its own:- Lyrics
- Length
- Styling
Use global styles
Composition Plan includes two style areas: Positive Global Styles Add styles you want the track to include. Examples:- Cinematic
- Warm
- Dreamy
- Analog
- Harsh
- Distorted
- Heavy metal
Use positive and negative styles together when you have a clear creative direction. Keep them focused rather than adding a long list of unrelated instructions.
Work with your recent tracks
Your latest creations appear in Recent tracks on the Studio home. The Recent tracks area is designed for quick access to your latest music without opening the full Library.- Favorite
- Download
- Delete
Play your music
AI Music Studio includes a persistent audio player. The player provides:- Play and pause
- Seek through the track
- Rewind and forward controls
- Volume control
- Download
The player remains available while you work elsewhere in the Studio, making it easier to compare or listen while continuing your workflow.
Manage your music in Library
Open Library from the top navigation. The Library is your central collection of generated tracks.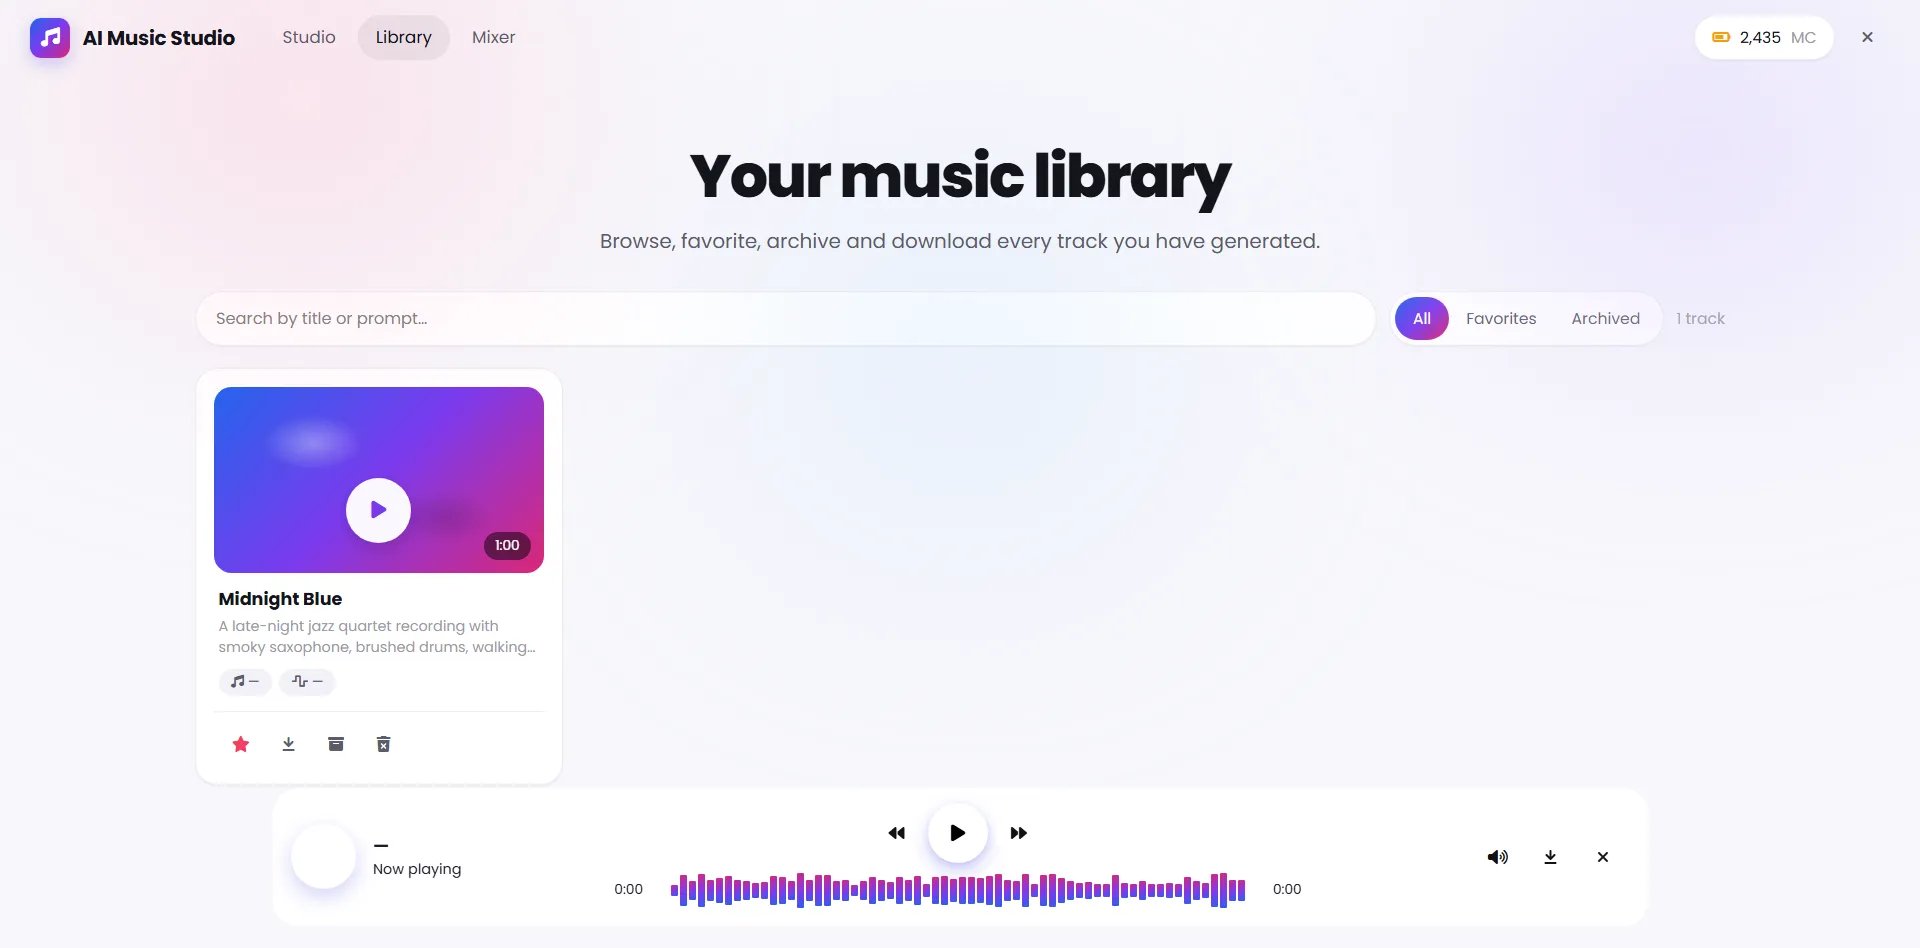
Search your tracks
Use the search field to find tracks by:- Title
- Prompt
Filter your collection
The Library provides filters for:- All
- Favorites
- Archived
Manage individual tracks
Each track card can include actions for:- Favorite
- Download
- Archive
- Delete
Load more tracks
For larger collections, the Library supports load-more pagination. This allows your music collection to grow without requiring everything to appear on the screen at once.Build a multi-track mix
Open Mixer from the top navigation. The Multi-track Mixer lets you combine AI-generated tracks as independent layers.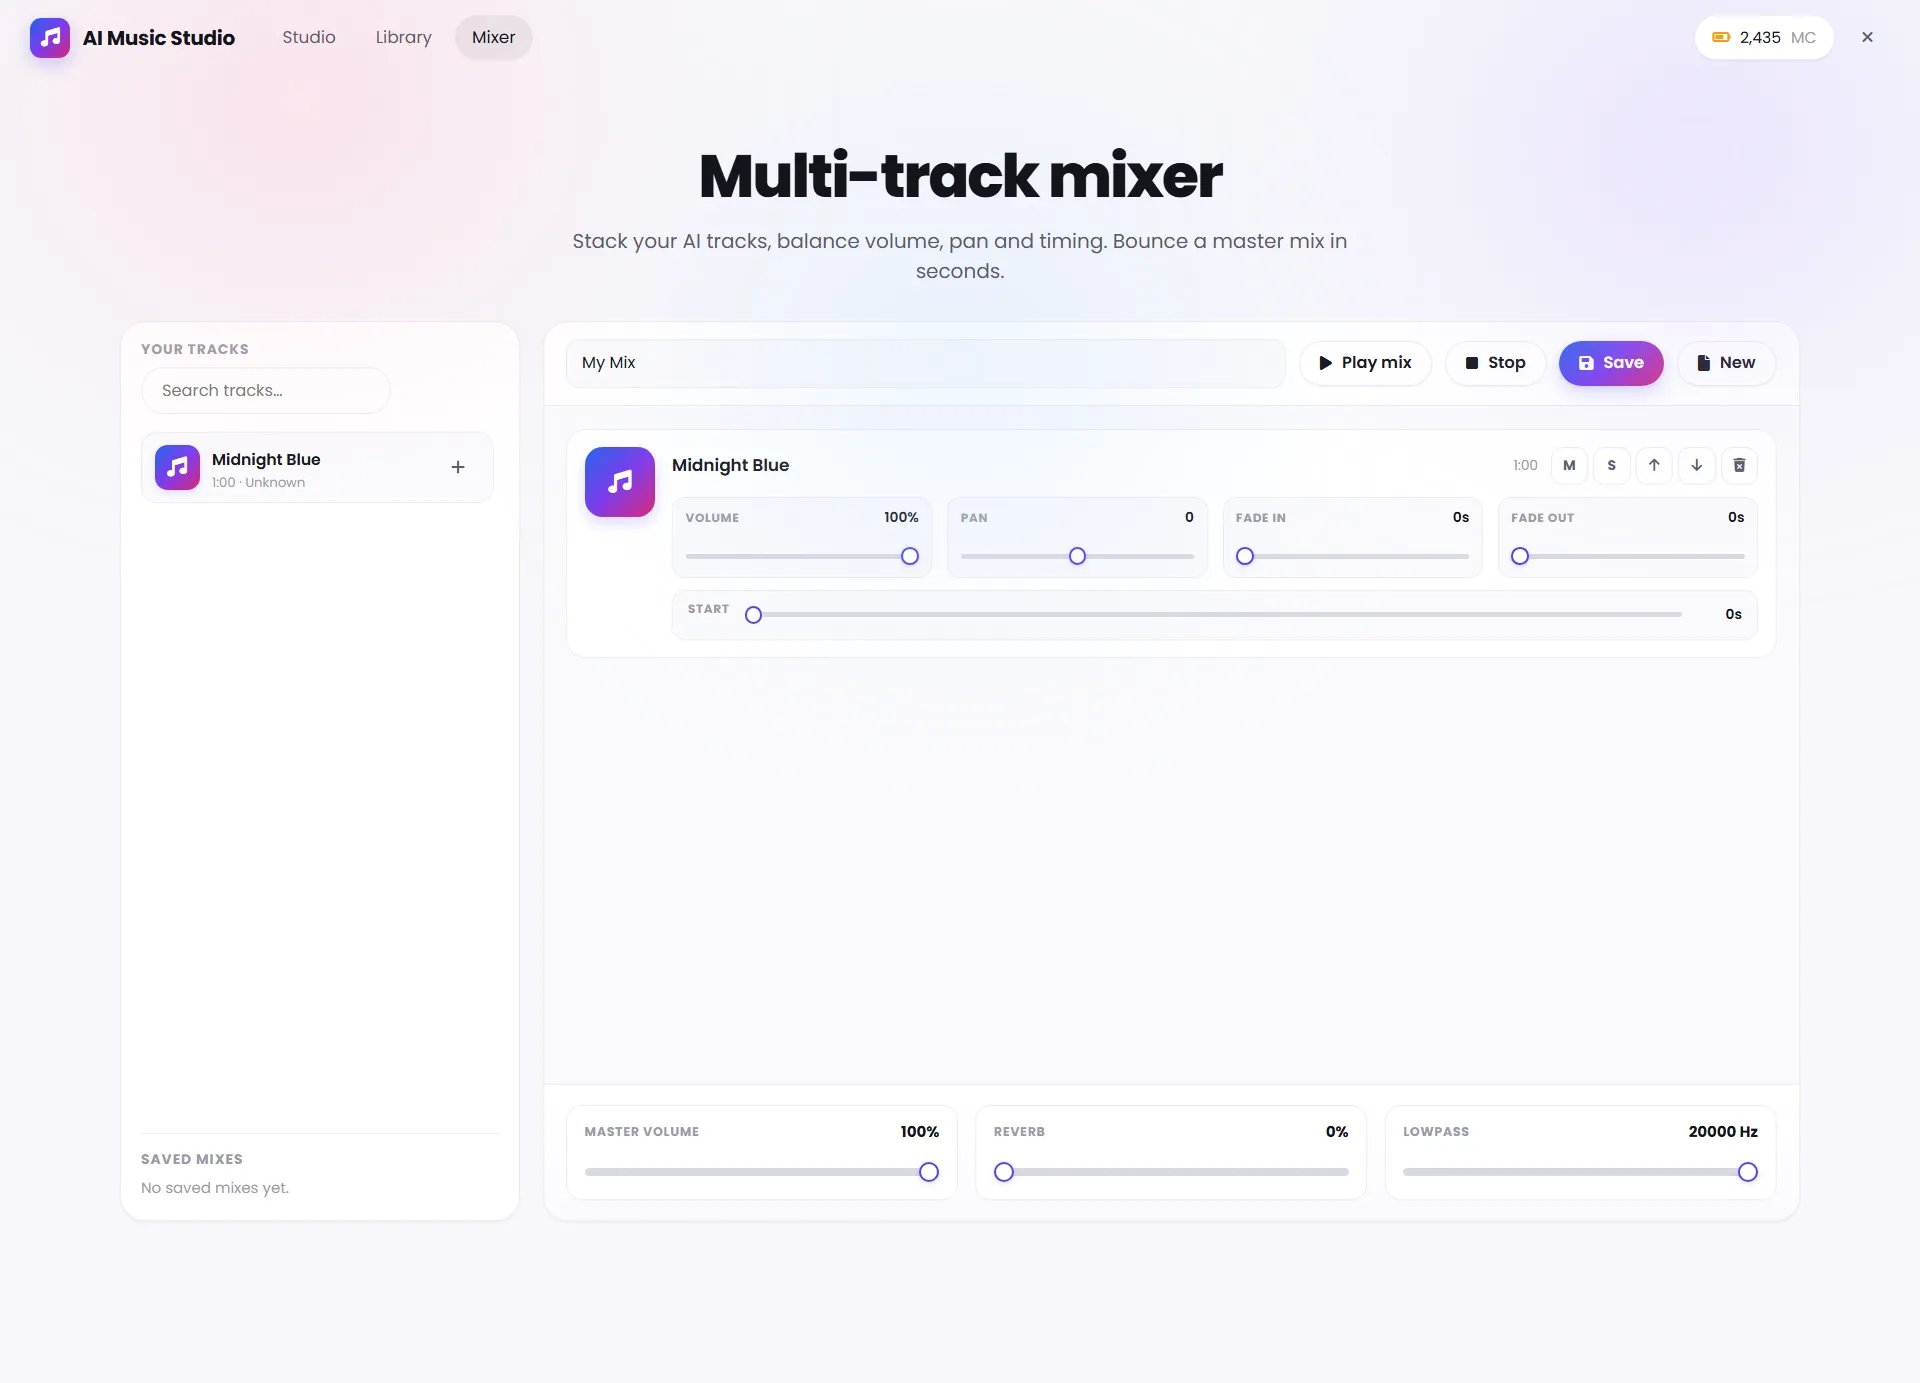
Step 1: Find a track
Use the Your Tracks panel on the left. Search your music collection and find the track you want to add. Click the + button to add it to the mix.Step 2: Add multiple layers
Repeat the process to build your mix. Each track appears as an independent layer in the main mixer. The maximum number of simultaneous layers is configurable by the product implementation.Step 3: Adjust volume
Use the Volume control for each layer to balance the relative level of the track. For example:- Lower a background layer.
- Raise a melody layer.
- Reduce a vocal layer if it is overpowering other elements.
Step 4: Adjust pan
Use Pan to position a layer within the stereo field. This can help separate layers and create a wider mix.Step 5: Add fade-in and fade-out
Use:- Fade In
- Fade Out
Step 6: Set the start time
Use the Start control to determine when a layer enters the mix. This is useful when one track should begin after another track has already started. The product specification lists per-layer start-time control as part of the Mixer.Step 7: Use Mute and Solo
Each layer provides M and S controls. Use:- Mute to temporarily silence a layer.
- Solo to hear a layer in isolation while evaluating the mix.
Step 8: Reorder layers
Use the up and down controls to change the layer order. The product specification supports one-click layer reordering.Adjust the master mix
The bottom of the Mixer contains master controls.Master Volume
Controls the overall output level of the mix.Reverb
Adds or reduces the master reverb effect.Lowpass
Controls the master lowpass filter. The Mixer specification identifies master volume, reverb, and lowpass as the master-bus controls.Make small changes and listen after each adjustment. The goal is a balanced mix, not simply the loudest possible output.
Play and save your mix
Use the Mixer controls to:- Play mix
- Stop
- Save
- New
Save a mix
Enter a name for your mix and click Save. Saved mixes can be recalled later.Start a new mix
Use New when you want to begin a separate mix.A simple workflow for your first song
1
Start with Prompt mode
Describe the genre, instruments, mood, energy, and overall sound you want.
2
Generate a short track
Use a shorter length while experimenting so you can quickly evaluate the direction.
3
Refine the prompt
Change the musical characteristics that are not working and generate another version.
4
Try Composition Plan
When you want more structural control, build an Intro, Verse, Chorus, Bridge, or other sections.
5
Organize your tracks
Use Library to favorite useful versions and archive tracks you do not currently need.
6
Build a mix
Open Mixer and add the tracks you want to combine.
7
Balance and save
Adjust volume, pan, fades, timing, and master effects, then save the finished mix.
Tips for better results
Describe the sound, not the technology
Instead of trying to specify how AI should generate the music, describe the result you want to hear. Include things such as:- Genre
- Instrumentation
- Mood
- Tempo
- Energy
- Vocal preference
- Production character