> ## Documentation Index
> Fetch the complete documentation index at: https://docs.klyra.ai/llms.txt
> Use this file to discover all available pages before exploring further.
# Ai writer
# AI Writer
Create high-quality content faster with AI-powered templates and intelligent writing assistance.
AI Writer helps you create different types of written content from a single workspace. Choose a ready-made template, provide the information needed for your task, generate your content, and refine the result in the built-in editor.
AI Writer includes 75+ prebuilt templates covering common content workflows such as articles, social media posts, emails, product descriptions, rewriting, summaries, video scripts, SEO content, and more.
## What you'll learn
In this tutorial, you'll learn how to:
* Find the right AI Writer template
* Create your first article with Article Generator
* Choose a language
* Add an article title and focus keywords
* Choose an AI model
* Control the creativity of the result
* Choose a tone of voice
* Set the number and approximate length of results
* Use Internet Access when current web information is needed
* Review and edit generated content
* Improve your results with better context and instructions
* Explore other AI Writer workflows
## How AI Writer works
AI Writer is designed around a simple workflow:
Decide what you want to create, such as an article, product description, social media post, email, or video script.
Select the AI Writer template that matches the type of content you want to create.
Give AI Writer the information it needs, such as your topic, title, keywords, audience, or other relevant details.
Configure the available options and generate your content.
Read the result, make edits in the built-in editor, and generate another result when needed.
The goal is not simply to generate text. The goal is to help you move from an idea to useful, editable content.
## Open AI Writer
From your Klyra AI workspace, open **AI Writer** from the **Content** section.
 The AI Writer workspace may evolve as new templates and capabilities are added. The workflow in this guide focuses on the core experience.
## Explore AI Writer templates
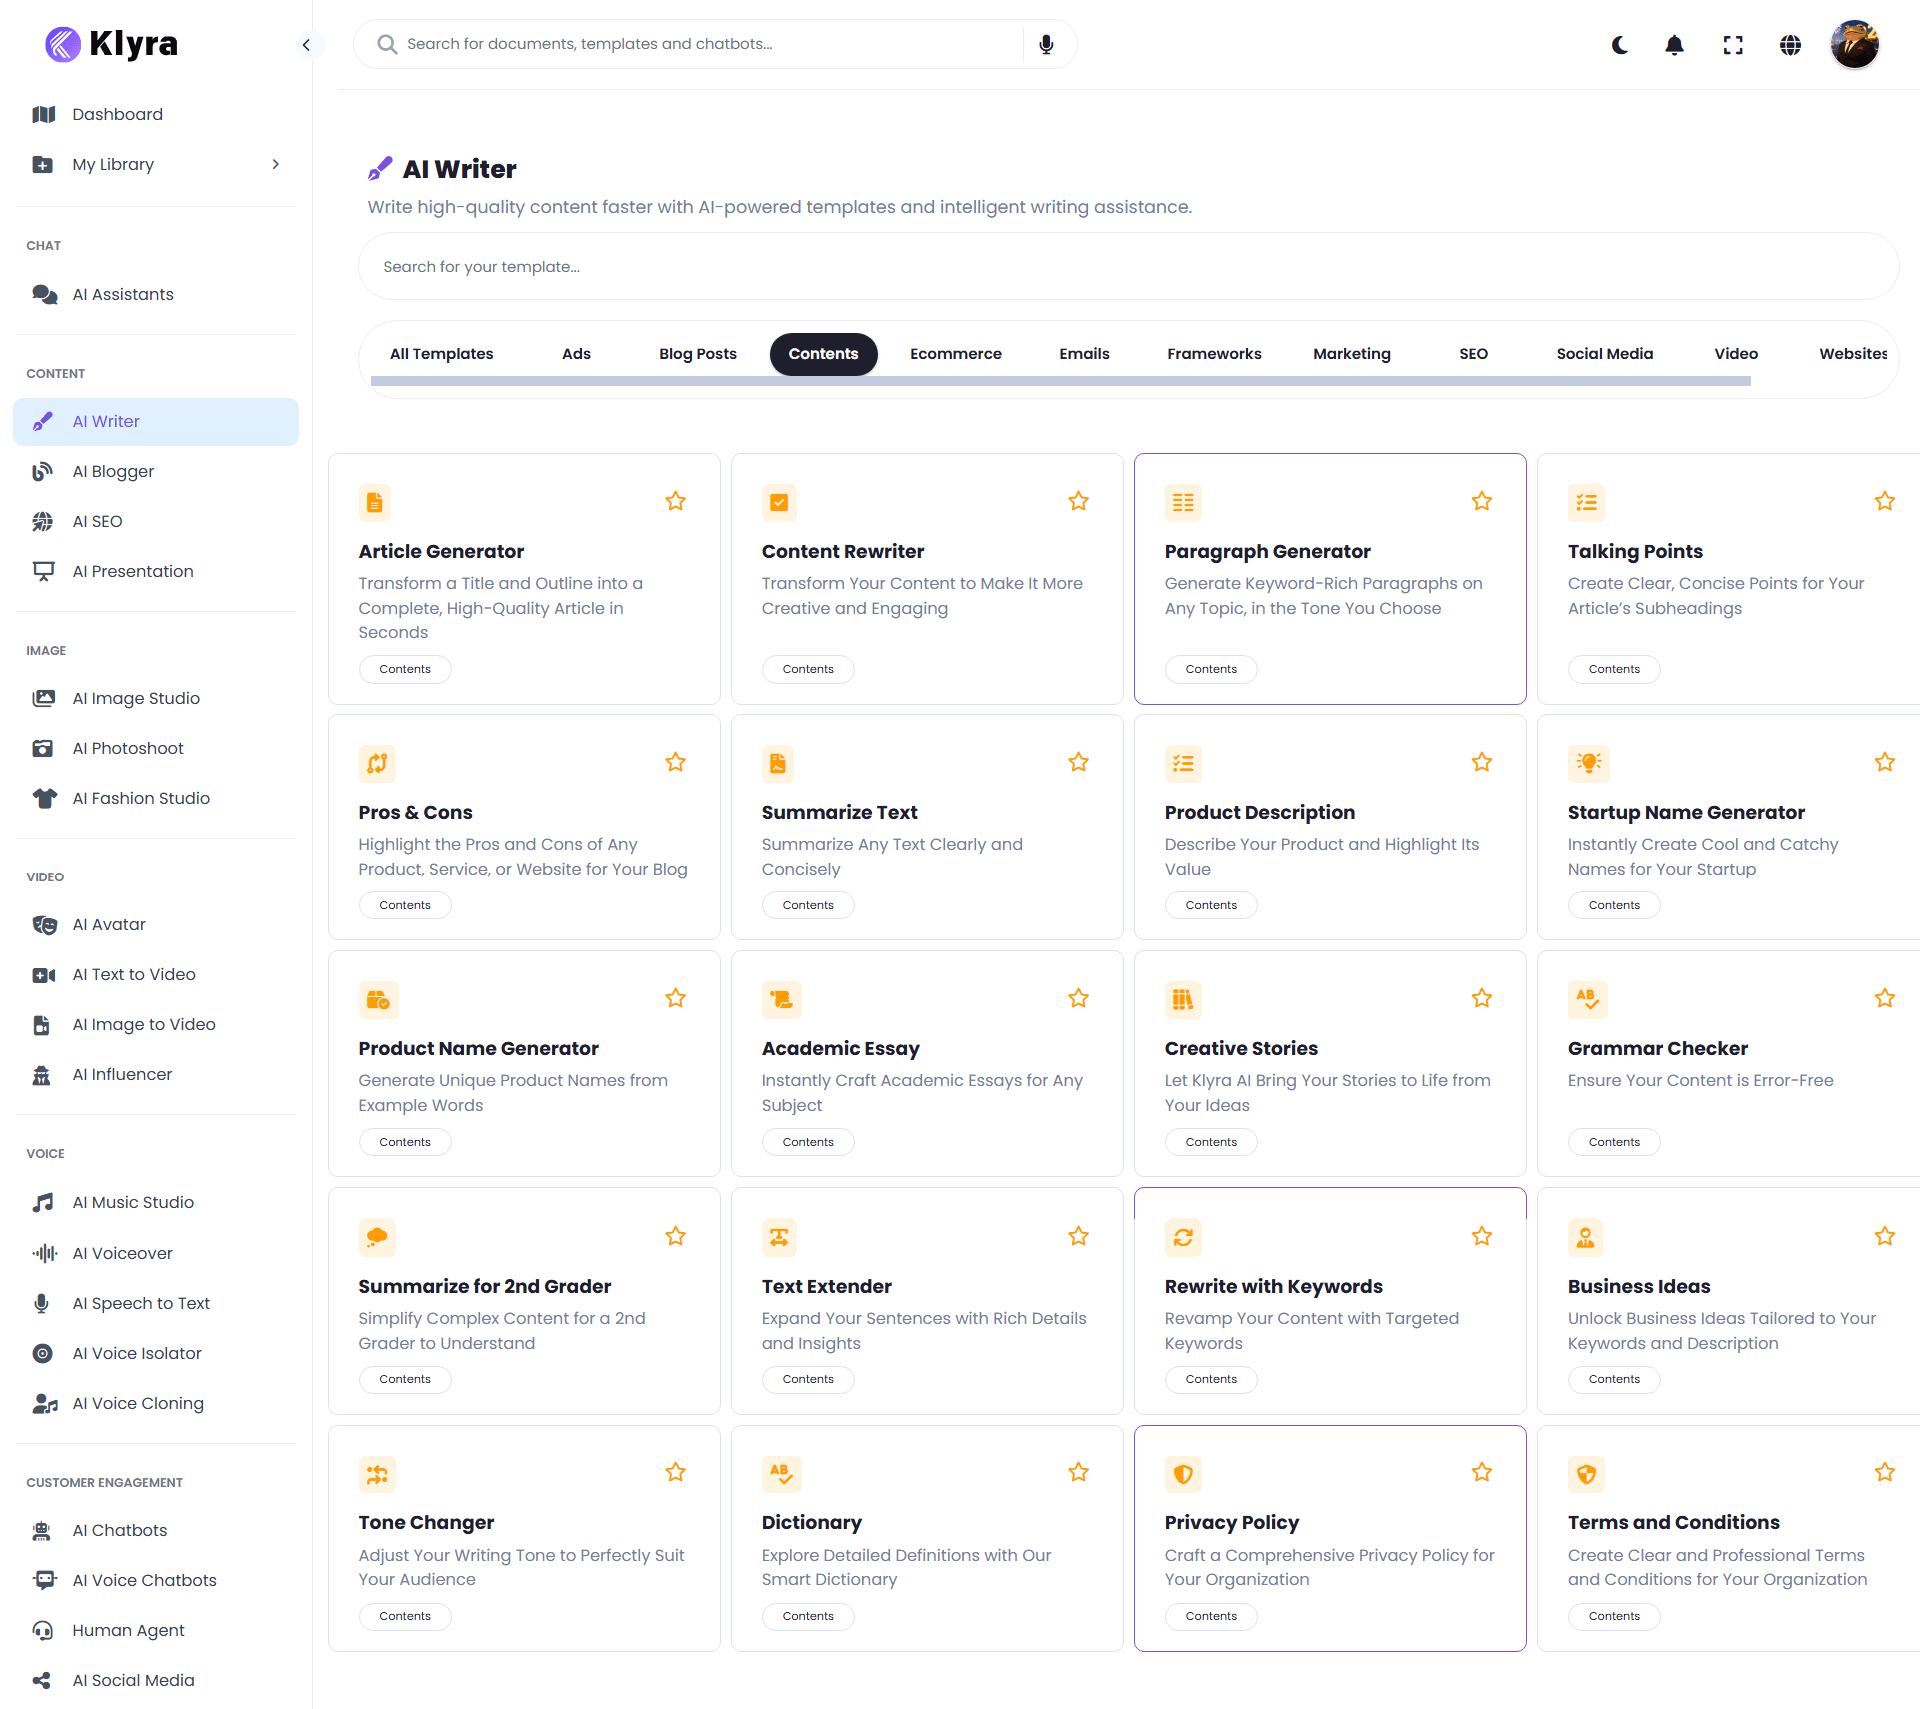
When you open AI Writer, you'll see a searchable collection of templates.
Use the template search field when you already know what you want to create. You can also browse templates by category.
The current interface includes categories such as:
* Ads
* Blog Posts
* Contents
* Ecommerce
* Emails
* Frameworks
* Marketing
* SEO
* Social Media
* Video
* Websites
The template library includes workflows such as:
* Article Generator
* Content Rewriter
* Paragraph Generator
* Talking Points
* Pros & Cons
* Summarize Text
* Product Description
* Startup Name Generator
* Product Name Generator
* Academic Essay
* Creative Stories
* Grammar Checker
* Text Extender
* Rewrite with Keywords
* Business Ideas
* Tone Changer
* Dictionary
* Privacy Policy
* Terms and Conditions
* Video Scripts
* Amazon Product Description
* LinkedIn Posts
* Company Bio
* Email Subject Lines
* Product Benefits
* Product Comparisons
* Twitter Tweets
* TikTok Video Scripts
* Newsletter Generator
The full template library is broader than the examples above.
Choose a template based on the result you want. You do not need to understand the underlying AI model before choosing a workflow.
## Create your first article
For your first workflow, we'll use **Article Generator**.
Article Generator is designed to transform a title and outline or article brief into a complete article.
### Step 1: Open Article Generator
Find **Article Generator** in the AI Writer template library and open it.
The AI Writer workspace may evolve as new templates and capabilities are added. The workflow in this guide focuses on the core experience.
## Explore AI Writer templates
When you open AI Writer, you'll see a searchable collection of templates.
Use the template search field when you already know what you want to create. You can also browse templates by category.
The current interface includes categories such as:
* Ads
* Blog Posts
* Contents
* Ecommerce
* Emails
* Frameworks
* Marketing
* SEO
* Social Media
* Video
* Websites
The template library includes workflows such as:
* Article Generator
* Content Rewriter
* Paragraph Generator
* Talking Points
* Pros & Cons
* Summarize Text
* Product Description
* Startup Name Generator
* Product Name Generator
* Academic Essay
* Creative Stories
* Grammar Checker
* Text Extender
* Rewrite with Keywords
* Business Ideas
* Tone Changer
* Dictionary
* Privacy Policy
* Terms and Conditions
* Video Scripts
* Amazon Product Description
* LinkedIn Posts
* Company Bio
* Email Subject Lines
* Product Benefits
* Product Comparisons
* Twitter Tweets
* TikTok Video Scripts
* Newsletter Generator
The full template library is broader than the examples above.
Choose a template based on the result you want. You do not need to understand the underlying AI model before choosing a workflow.
## Create your first article
For your first workflow, we'll use **Article Generator**.
Article Generator is designed to transform a title and outline or article brief into a complete article.
### Step 1: Open Article Generator
Find **Article Generator** in the AI Writer template library and open it.
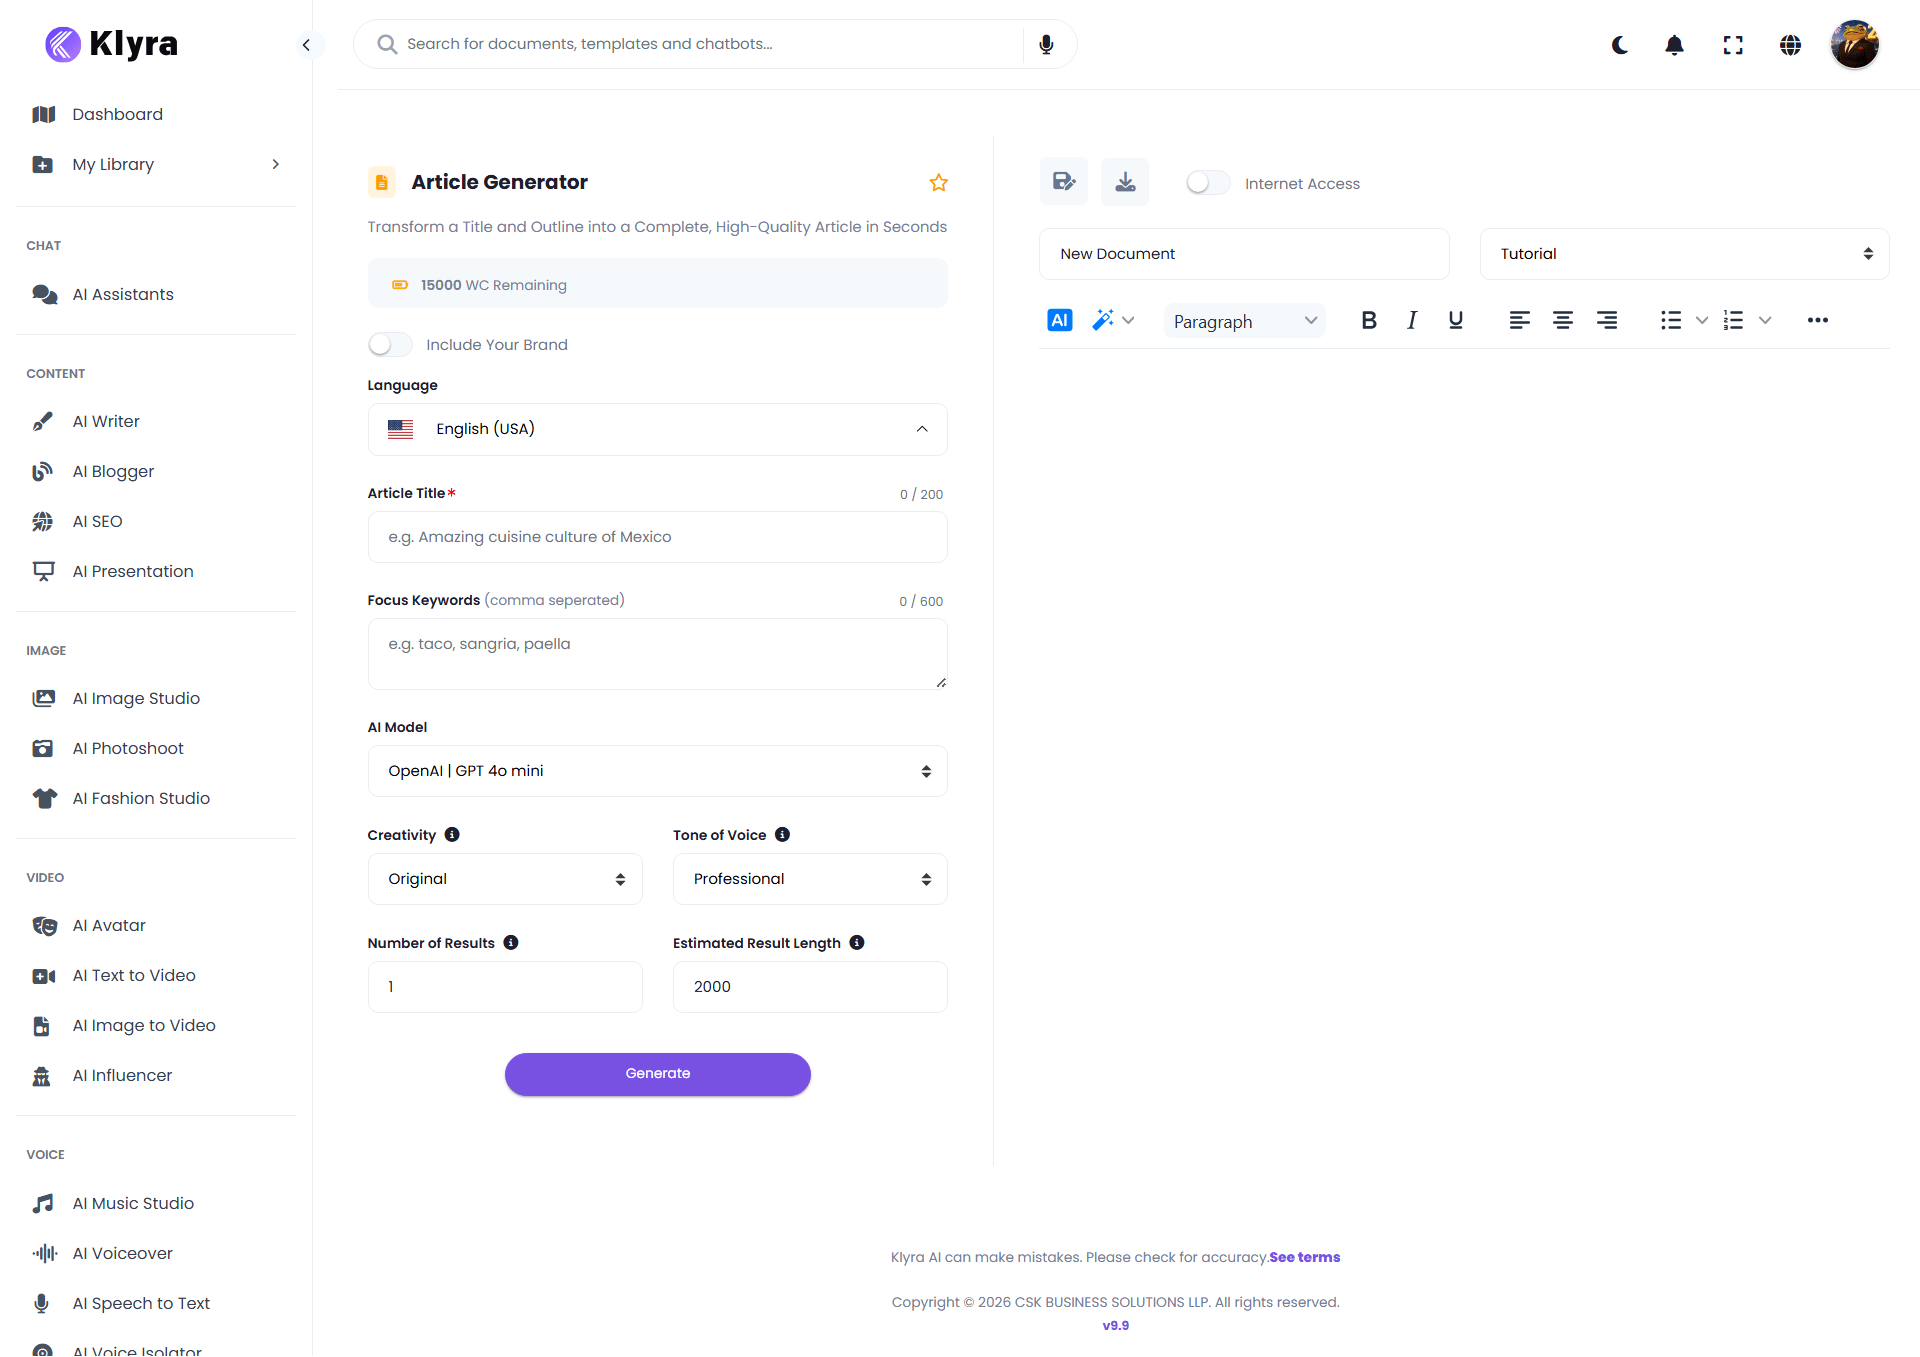 The Article Generator workspace has two main areas:
* The **generation panel** on the left, where you provide your inputs and configure the result.
* The **document editor** on the right, where the article is created and edited.
## Step 2: Name your document
When a new article is opened, the document is initially named **New Document**.
Rename the document so you can easily identify your work later.
For this tutorial, use:
> **How AI Can Help Small Businesses Save Time**
The document name identifies the article in the editor. It is separate from the **Article Title** field used to generate the content.
The Article Generator workspace has two main areas:
* The **generation panel** on the left, where you provide your inputs and configure the result.
* The **document editor** on the right, where the article is created and edited.
## Step 2: Name your document
When a new article is opened, the document is initially named **New Document**.
Rename the document so you can easily identify your work later.
For this tutorial, use:
> **How AI Can Help Small Businesses Save Time**
The document name identifies the article in the editor. It is separate from the **Article Title** field used to generate the content.
 ## Step 3: Choose the language
The **Language** field controls the language used for the generated article.
For this tutorial, select:
> **English (USA)**
Choose the language that matches your intended audience.
## Step 4: Enter the article title
Enter the topic you want the article to cover in **Article Title**.
For this tutorial, use:
> **How AI Can Help Small Businesses Save Time**
The Article Title field accepts up to 200 characters.
A clear title gives AI Writer a strong starting point for the article.
## Step 5: Add focus keywords
Use **Focus Keywords** to tell AI Writer which terms are important to the article.
Enter keywords separated by commas.
For this tutorial, use:
> **AI for small businesses, AI tools for business, business automation**
The Focus Keywords field accepts up to 600 characters.
Use keywords that are genuinely relevant to the topic. Focus keywords should help describe what the article needs to cover, not simply fill the field with unrelated search terms.
## Step 6: Choose an AI model
AI Writer lets you choose from leading AI models from providers including:
* OpenAI
* Anthropic
* Google
* xAI
* Perplexity
For this tutorial, use:
> **OpenAI | GPT 4o mini**
You do not need to understand every model before creating content. Start with the model that fits your workflow and focus on the quality of the result.
AI model availability can change as Klyra AI adds or updates supported models.
## Step 7: Choose the creativity level
The **Creativity** setting controls how varied and creative the generated writing should be.
Available levels include:
* Repetitive
* Deterministic
* Original
* Creative
* Imaginative
For this tutorial, use:
> **Original**
A practical way to think about the setting is:
* **Repetitive** or **Deterministic** when consistency is more important.
* **Original** for a balanced starting point.
* **Creative** or **Imaginative** when you want more variation and creative ideas.
These are writing preferences rather than requirements. Try different levels when the first result does not match the style you need.
## Step 8: Choose the tone of voice
The **Tone of Voice** setting determines how the generated content should sound.
AI Writer provides many tone options, including:
* Professional
* Exciting
* Friendly
* Witty
* Humorous
* Convincing
* Inspiring
* Supportive
* Trusting
* Positive
* Negative
* Engaging
* Passionate
* Informative
* Funny
Additional tone options may also be available.
For this tutorial, use:
> **Professional**
Choose a tone that fits your audience and the purpose of your content.
For example:
* Use **Professional** for business articles.
* Use **Friendly** for approachable customer content.
* Use **Informative** for educational content.
* Use **Convincing** for persuasive marketing content.
* Use **Humorous** or **Funny** when the subject and audience call for a lighter style.
## Step 9: Choose the number of results
**Number of Results** controls how many results AI Writer should generate.
For this tutorial, use:
> **1**
Generating one result is a simple way to start. If you want to compare multiple versions, increase the number of results when appropriate.
## Step 10: Set the estimated result length
**Estimated Result Length** lets you specify the approximate length of the generated content.
For this tutorial, use:
> **2000**
Treat this as an approximate target rather than a guarantee of an exact word count.
## Step 11: Decide whether to use Internet Access
Article Generator includes an **Internet Access** option.
Turn it on when your article needs current information from the Internet.
For example, Internet Access can be useful when you're writing about:
* Recent developments
* Current trends
* Up-to-date information
* Topics where information may have changed recently
For this tutorial, leave **Internet Access off** because our example does not require current web information.
If the accuracy of your article depends on information that may have changed recently, consider enabling Internet Access before generating the article.
## Step 12: Decide whether to include your brand
Article Generator also provides an **Include Your Brand** option.
Use this option when you want your content generation workflow to incorporate your brand information.
For this first tutorial, leave it off so you can focus on the core article-generation workflow.
Brand-specific workflows can be explored separately once you are comfortable with the basics.
## Step 13: Review your settings
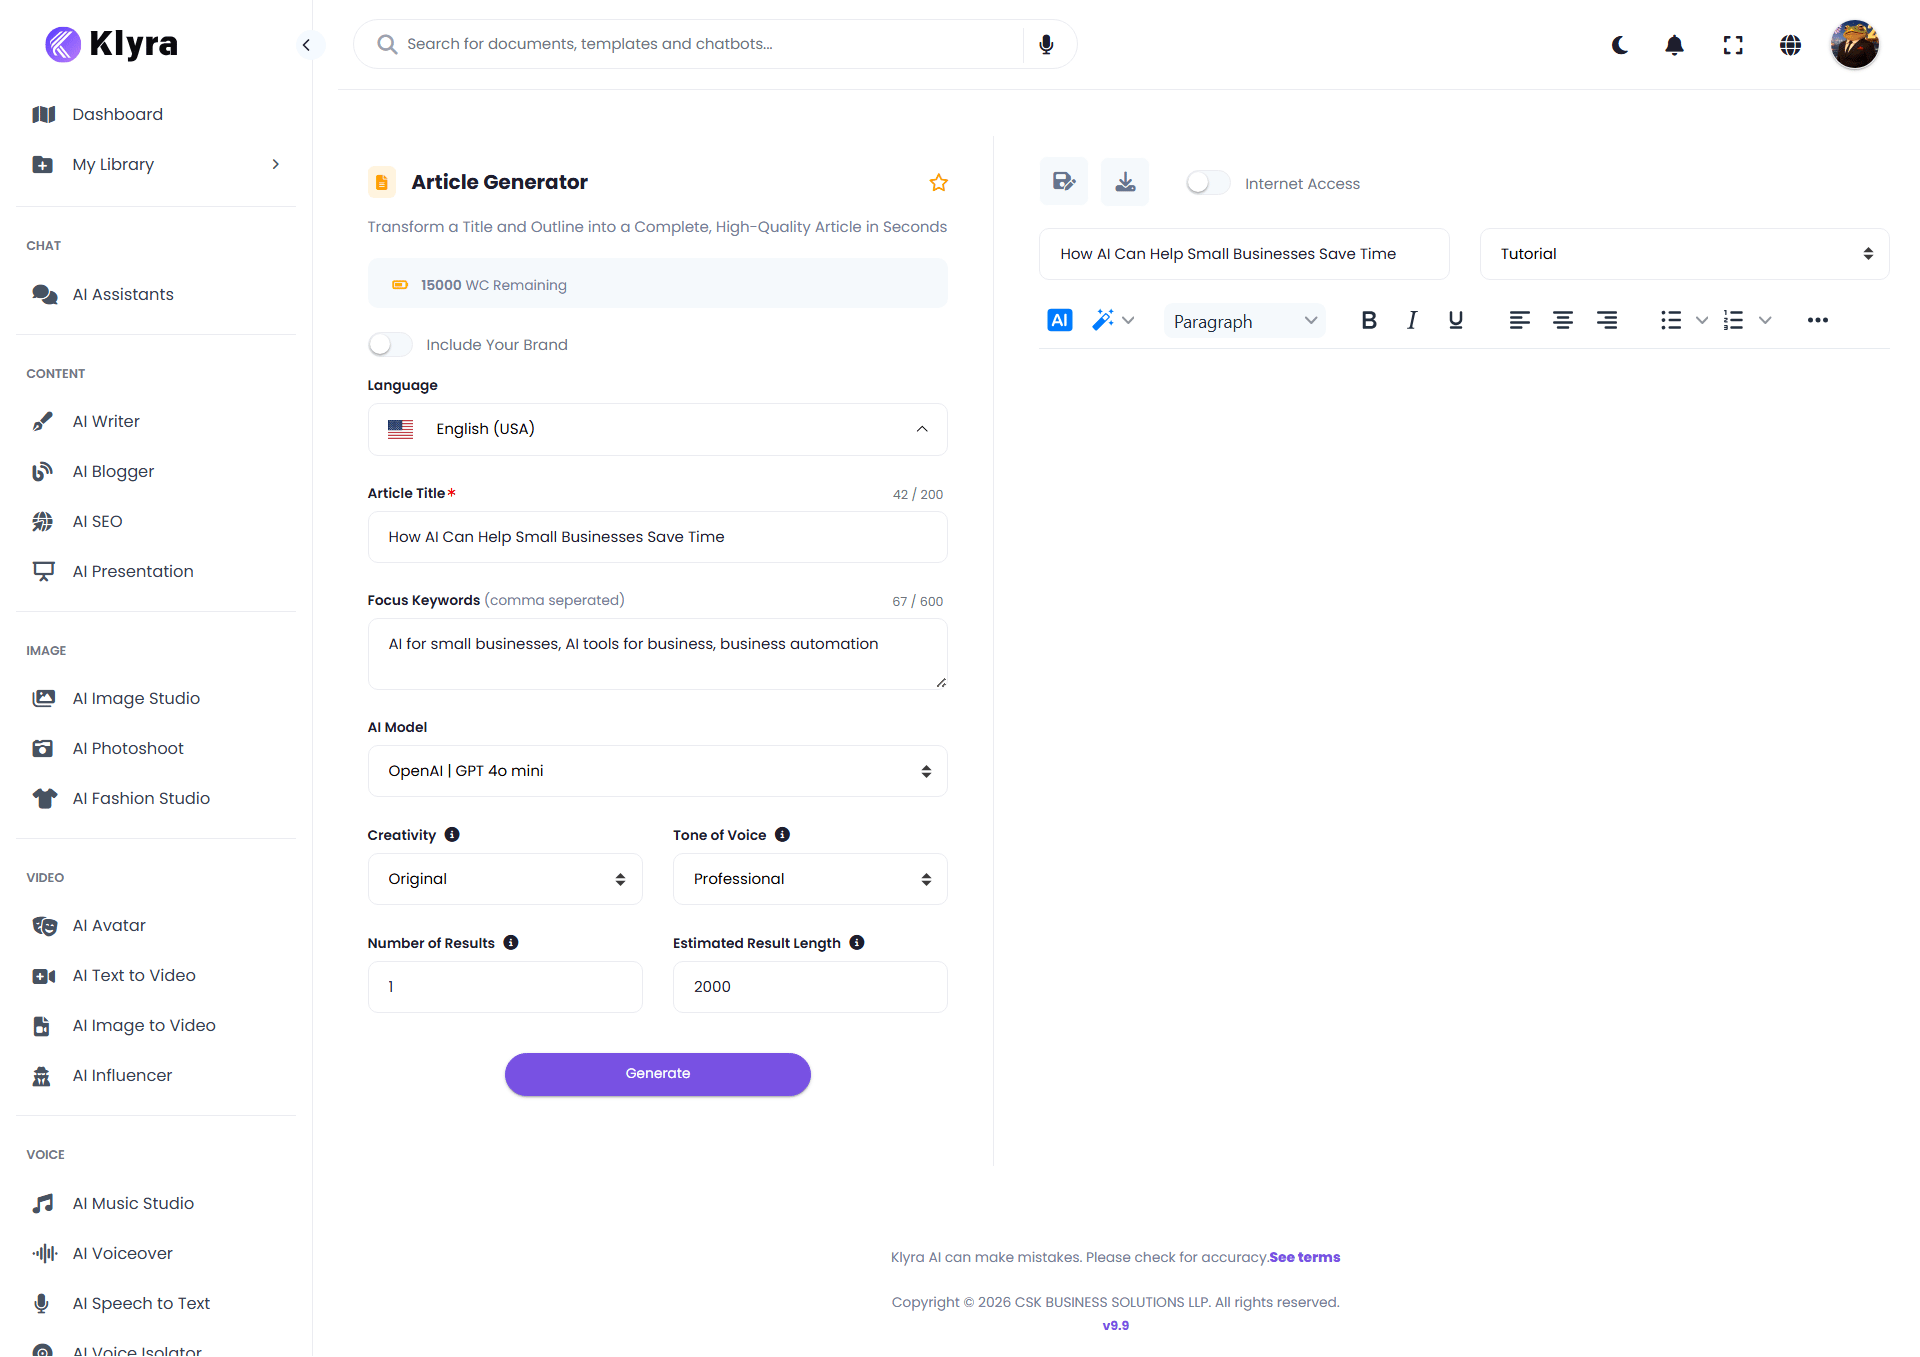
Before generating, your example should look like this:
| Setting | Example |
| ----------------------- | ------------------------------------------------------------------- |
| Document name | How AI Can Help Small Businesses Save Time |
| Language | English (USA) |
| Article Title | How AI Can Help Small Businesses Save Time |
| Focus Keywords | AI for small businesses, AI tools for business, business automation |
| AI Model | OpenAI \| GPT 4o mini |
| Creativity | Original |
| Tone of Voice | Professional |
| Number of Results | 1 |
| Estimated Result Length | 2000 |
| Internet Access | Off |
| Include Your Brand | Off |
## Step 14: Generate the article
When your settings are ready, select **Generate**.
AI Writer processes your inputs and creates the article in the document editor.
You do not need to leave the workspace to review the result.
## Review your generated article
After generation, the article appears directly in the built-in editor.
## Step 3: Choose the language
The **Language** field controls the language used for the generated article.
For this tutorial, select:
> **English (USA)**
Choose the language that matches your intended audience.
## Step 4: Enter the article title
Enter the topic you want the article to cover in **Article Title**.
For this tutorial, use:
> **How AI Can Help Small Businesses Save Time**
The Article Title field accepts up to 200 characters.
A clear title gives AI Writer a strong starting point for the article.
## Step 5: Add focus keywords
Use **Focus Keywords** to tell AI Writer which terms are important to the article.
Enter keywords separated by commas.
For this tutorial, use:
> **AI for small businesses, AI tools for business, business automation**
The Focus Keywords field accepts up to 600 characters.
Use keywords that are genuinely relevant to the topic. Focus keywords should help describe what the article needs to cover, not simply fill the field with unrelated search terms.
## Step 6: Choose an AI model
AI Writer lets you choose from leading AI models from providers including:
* OpenAI
* Anthropic
* Google
* xAI
* Perplexity
For this tutorial, use:
> **OpenAI | GPT 4o mini**
You do not need to understand every model before creating content. Start with the model that fits your workflow and focus on the quality of the result.
AI model availability can change as Klyra AI adds or updates supported models.
## Step 7: Choose the creativity level
The **Creativity** setting controls how varied and creative the generated writing should be.
Available levels include:
* Repetitive
* Deterministic
* Original
* Creative
* Imaginative
For this tutorial, use:
> **Original**
A practical way to think about the setting is:
* **Repetitive** or **Deterministic** when consistency is more important.
* **Original** for a balanced starting point.
* **Creative** or **Imaginative** when you want more variation and creative ideas.
These are writing preferences rather than requirements. Try different levels when the first result does not match the style you need.
## Step 8: Choose the tone of voice
The **Tone of Voice** setting determines how the generated content should sound.
AI Writer provides many tone options, including:
* Professional
* Exciting
* Friendly
* Witty
* Humorous
* Convincing
* Inspiring
* Supportive
* Trusting
* Positive
* Negative
* Engaging
* Passionate
* Informative
* Funny
Additional tone options may also be available.
For this tutorial, use:
> **Professional**
Choose a tone that fits your audience and the purpose of your content.
For example:
* Use **Professional** for business articles.
* Use **Friendly** for approachable customer content.
* Use **Informative** for educational content.
* Use **Convincing** for persuasive marketing content.
* Use **Humorous** or **Funny** when the subject and audience call for a lighter style.
## Step 9: Choose the number of results
**Number of Results** controls how many results AI Writer should generate.
For this tutorial, use:
> **1**
Generating one result is a simple way to start. If you want to compare multiple versions, increase the number of results when appropriate.
## Step 10: Set the estimated result length
**Estimated Result Length** lets you specify the approximate length of the generated content.
For this tutorial, use:
> **2000**
Treat this as an approximate target rather than a guarantee of an exact word count.
## Step 11: Decide whether to use Internet Access
Article Generator includes an **Internet Access** option.
Turn it on when your article needs current information from the Internet.
For example, Internet Access can be useful when you're writing about:
* Recent developments
* Current trends
* Up-to-date information
* Topics where information may have changed recently
For this tutorial, leave **Internet Access off** because our example does not require current web information.
If the accuracy of your article depends on information that may have changed recently, consider enabling Internet Access before generating the article.
## Step 12: Decide whether to include your brand
Article Generator also provides an **Include Your Brand** option.
Use this option when you want your content generation workflow to incorporate your brand information.
For this first tutorial, leave it off so you can focus on the core article-generation workflow.
Brand-specific workflows can be explored separately once you are comfortable with the basics.
## Step 13: Review your settings
Before generating, your example should look like this:
| Setting | Example |
| ----------------------- | ------------------------------------------------------------------- |
| Document name | How AI Can Help Small Businesses Save Time |
| Language | English (USA) |
| Article Title | How AI Can Help Small Businesses Save Time |
| Focus Keywords | AI for small businesses, AI tools for business, business automation |
| AI Model | OpenAI \| GPT 4o mini |
| Creativity | Original |
| Tone of Voice | Professional |
| Number of Results | 1 |
| Estimated Result Length | 2000 |
| Internet Access | Off |
| Include Your Brand | Off |
## Step 14: Generate the article
When your settings are ready, select **Generate**.
AI Writer processes your inputs and creates the article in the document editor.
You do not need to leave the workspace to review the result.
## Review your generated article
After generation, the article appears directly in the built-in editor.
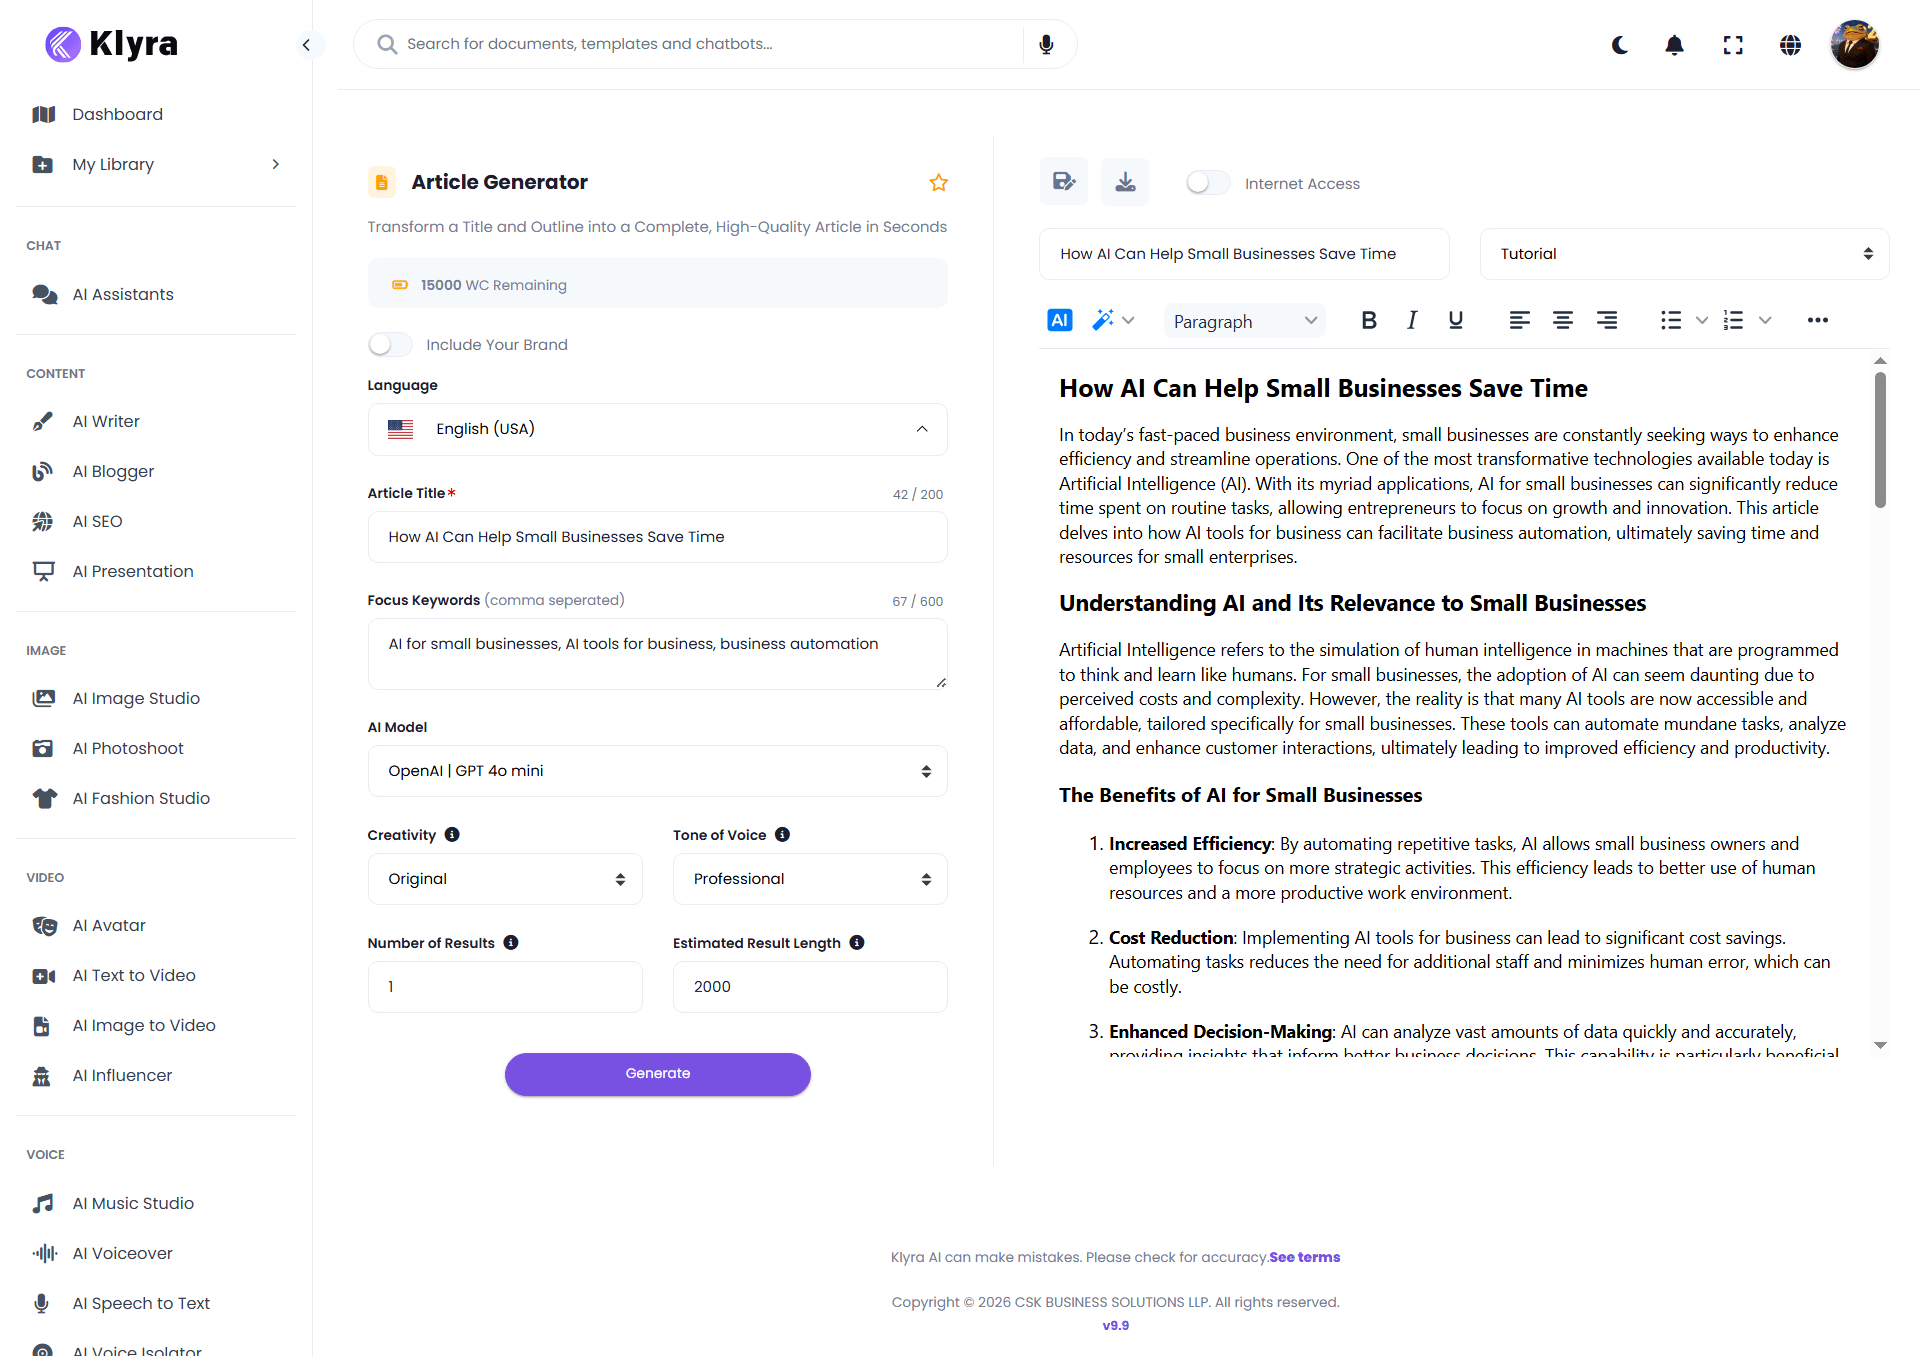 The generated result includes structured content with a title, section headings, paragraphs, and lists where appropriate.
The editor remains available so you can review and refine the content.
### What to review
Before using the article, check:
* Is the information accurate?
* Does the article address the intended topic?
* Are the focus keywords used naturally?
* Does the tone match your audience?
* Are the headings useful and easy to scan?
* Are there any claims that need verification?
* Does the article reflect your intended message?
AI-generated content can contain mistakes. Review important facts, claims, names, figures, and other information before publishing or relying on the content.
## Edit the article
The generated article opens in an editable document.
Use the editor to make changes such as:
* Correcting information
* Rewriting sentences
* Adjusting headings
* Adding or removing sections
* Improving clarity
* Adapting the content to your brand
* Making the article shorter or longer
The editor provides common formatting controls, including paragraph formatting, bold, italic, underline, alignment, and lists.
You remain in control of the final content.
## Improve your result
Your first generation does not need to be perfect.
If the result is not what you expected, first identify what needs to change.
### If the article is too generic
Provide more context.
Instead of:
> Write an article about AI for small businesses.
Try:
> Write an article for small business owners explaining how AI can reduce repetitive work, improve productivity, and support business growth. Use practical examples and a professional, easy-to-understand tone.
### If the tone is wrong
Change the **Tone of Voice** setting.
For example, move from **Professional** to **Friendly** when the content needs to feel more approachable.
### If the writing is too predictable
Try a more creative setting.
For example, move from **Original** to **Creative** or **Imaginative** when the subject benefits from more variation.
### If the article needs current information
Enable **Internet Access** and generate the article again.
### If important topics are missing
Add relevant **Focus Keywords** or provide more context in the information you give the AI.
Better results usually start with better direction. Give AI Writer enough context to understand the audience, purpose, subject, and desired style.
## A better article brief
Compare a short instruction:
> Write about AI for small businesses.
with a more useful brief:
> Write an article for small business owners explaining how AI can help reduce repetitive work and improve productivity. Cover practical examples such as content creation, customer communication, research, and business automation. Use a professional and informative tone, keep the explanations easy to understand, and focus on practical business outcomes.
The second brief gives AI Writer more context about:
* Audience
* Purpose
* Topic
* Scope
* Examples
* Tone
* Desired outcome
This gives the AI a clearer direction.
## Active recall
Before moving on, see if you can answer these questions.
Decide what you want to create. Then choose the template that matches that outcome.
Focus Keywords tell AI Writer which relevant terms should be considered when generating the content.
Enable it when the article needs current information from the Internet.
It controls how varied and creative the generated writing should be.
It controls how the generated content should sound.
Review the content for accuracy, relevance, tone, clarity, and any claims that require verification.
## Explore more AI Writer templates
Once you're comfortable creating an article, try another workflow.
### Content creation
Use templates such as:
* Article Generator
* Paragraph Generator
* Text Extender
* Creative Stories
* Content Rewriter
* Summarize Text
### Ecommerce
Create content such as:
* Product Description
* Amazon Product Description
* Product Benefits
* Product Characteristics
* Product Comparisons
* Selling Product Titles
### Marketing and advertising
Explore:
* Facebook Ads
* Google Ads Headlines & Description
* Ad Headlines
* AIDA
* BAB
* PPPP Frameworks
* Problem-Agitate-Solution
### Social media
Create:
* Social Media Posts
* Instagram Captions
* Instagram Hashtags
* LinkedIn Posts
* Twitter Tweets
* TikTok Video Scripts
### Email
Create:
* Welcome Emails
* Cold Emails
* Follow-up Emails
* Email Subject Lines
* Newsletters
### Video
Create:
* Video Scripts
* Video Descriptions
* Video Titles
* YouTube Tags
* TikTok Video Scripts
### SEO and website content
Explore templates such as:
* Meta Description
* Rewrite with Keywords
* FAQs
* FAQ Answers
* Company Bio
AI Writer's template library contains many additional workflows beyond these examples.
## Common mistakes to avoid
### Starting without a clear outcome
Don't begin with the question:
> Which AI model should I use?
Start with:
> What do I want to create?
Then choose the appropriate template and settings.
### Providing too little context
A vague instruction can produce generic content.
Give AI Writer enough information about your topic, audience, purpose, and desired result.
### Adding unrelated keywords
Focus Keywords should be relevant to the article.
Use a focused set of meaningful terms rather than adding keywords simply to fill the field.
### Treating generated content as final
AI Writer can accelerate content creation, but generated content still needs review.
Check facts, claims, tone, and relevance before publishing.
### Using Internet Access when it isn't needed
Internet Access is useful when current information matters. It does not need to be enabled for every article.
### Trying to optimize every setting immediately
You don't need to adjust every option for every generation.
Start with a clear topic, appropriate template, useful context, and sensible defaults. Experiment with advanced settings as you learn what works for your content.
## Your AI Writer workflow
You now know the complete basic workflow:
Decide what you need to create.
Find the AI Writer workflow that matches your goal.
Enter the information the AI needs to understand the task.
Choose the language, model, creativity, tone, number of results, and approximate result length.
Enable Internet Access when current information from the web is important to the article.
Create your content.
Check the result, edit it, and generate another version when necessary.
## What's next?
You've learned the fundamentals of AI Writer.
From here, you can move into more focused workflows such as:
* Creating blog content
* Writing product descriptions
* Creating social media content
* Writing marketing copy
* Rewriting existing content
* Creating video scripts
* Summarizing information
* Using current web information
* Building repeatable content workflows
As you become more comfortable with AI Writer, experiment with different templates, tones, creativity levels, and inputs to find the workflow that works best for your needs.
Start with the outcome you want, provide useful context, and refine the result. You don't need to master every AI Writer setting before you can create useful content.
The generated result includes structured content with a title, section headings, paragraphs, and lists where appropriate.
The editor remains available so you can review and refine the content.
### What to review
Before using the article, check:
* Is the information accurate?
* Does the article address the intended topic?
* Are the focus keywords used naturally?
* Does the tone match your audience?
* Are the headings useful and easy to scan?
* Are there any claims that need verification?
* Does the article reflect your intended message?
AI-generated content can contain mistakes. Review important facts, claims, names, figures, and other information before publishing or relying on the content.
## Edit the article
The generated article opens in an editable document.
Use the editor to make changes such as:
* Correcting information
* Rewriting sentences
* Adjusting headings
* Adding or removing sections
* Improving clarity
* Adapting the content to your brand
* Making the article shorter or longer
The editor provides common formatting controls, including paragraph formatting, bold, italic, underline, alignment, and lists.
You remain in control of the final content.
## Improve your result
Your first generation does not need to be perfect.
If the result is not what you expected, first identify what needs to change.
### If the article is too generic
Provide more context.
Instead of:
> Write an article about AI for small businesses.
Try:
> Write an article for small business owners explaining how AI can reduce repetitive work, improve productivity, and support business growth. Use practical examples and a professional, easy-to-understand tone.
### If the tone is wrong
Change the **Tone of Voice** setting.
For example, move from **Professional** to **Friendly** when the content needs to feel more approachable.
### If the writing is too predictable
Try a more creative setting.
For example, move from **Original** to **Creative** or **Imaginative** when the subject benefits from more variation.
### If the article needs current information
Enable **Internet Access** and generate the article again.
### If important topics are missing
Add relevant **Focus Keywords** or provide more context in the information you give the AI.
Better results usually start with better direction. Give AI Writer enough context to understand the audience, purpose, subject, and desired style.
## A better article brief
Compare a short instruction:
> Write about AI for small businesses.
with a more useful brief:
> Write an article for small business owners explaining how AI can help reduce repetitive work and improve productivity. Cover practical examples such as content creation, customer communication, research, and business automation. Use a professional and informative tone, keep the explanations easy to understand, and focus on practical business outcomes.
The second brief gives AI Writer more context about:
* Audience
* Purpose
* Topic
* Scope
* Examples
* Tone
* Desired outcome
This gives the AI a clearer direction.
## Active recall
Before moving on, see if you can answer these questions.
Decide what you want to create. Then choose the template that matches that outcome.
Focus Keywords tell AI Writer which relevant terms should be considered when generating the content.
Enable it when the article needs current information from the Internet.
It controls how varied and creative the generated writing should be.
It controls how the generated content should sound.
Review the content for accuracy, relevance, tone, clarity, and any claims that require verification.
## Explore more AI Writer templates
Once you're comfortable creating an article, try another workflow.
### Content creation
Use templates such as:
* Article Generator
* Paragraph Generator
* Text Extender
* Creative Stories
* Content Rewriter
* Summarize Text
### Ecommerce
Create content such as:
* Product Description
* Amazon Product Description
* Product Benefits
* Product Characteristics
* Product Comparisons
* Selling Product Titles
### Marketing and advertising
Explore:
* Facebook Ads
* Google Ads Headlines & Description
* Ad Headlines
* AIDA
* BAB
* PPPP Frameworks
* Problem-Agitate-Solution
### Social media
Create:
* Social Media Posts
* Instagram Captions
* Instagram Hashtags
* LinkedIn Posts
* Twitter Tweets
* TikTok Video Scripts
### Email
Create:
* Welcome Emails
* Cold Emails
* Follow-up Emails
* Email Subject Lines
* Newsletters
### Video
Create:
* Video Scripts
* Video Descriptions
* Video Titles
* YouTube Tags
* TikTok Video Scripts
### SEO and website content
Explore templates such as:
* Meta Description
* Rewrite with Keywords
* FAQs
* FAQ Answers
* Company Bio
AI Writer's template library contains many additional workflows beyond these examples.
## Common mistakes to avoid
### Starting without a clear outcome
Don't begin with the question:
> Which AI model should I use?
Start with:
> What do I want to create?
Then choose the appropriate template and settings.
### Providing too little context
A vague instruction can produce generic content.
Give AI Writer enough information about your topic, audience, purpose, and desired result.
### Adding unrelated keywords
Focus Keywords should be relevant to the article.
Use a focused set of meaningful terms rather than adding keywords simply to fill the field.
### Treating generated content as final
AI Writer can accelerate content creation, but generated content still needs review.
Check facts, claims, tone, and relevance before publishing.
### Using Internet Access when it isn't needed
Internet Access is useful when current information matters. It does not need to be enabled for every article.
### Trying to optimize every setting immediately
You don't need to adjust every option for every generation.
Start with a clear topic, appropriate template, useful context, and sensible defaults. Experiment with advanced settings as you learn what works for your content.
## Your AI Writer workflow
You now know the complete basic workflow:
Decide what you need to create.
Find the AI Writer workflow that matches your goal.
Enter the information the AI needs to understand the task.
Choose the language, model, creativity, tone, number of results, and approximate result length.
Enable Internet Access when current information from the web is important to the article.
Create your content.
Check the result, edit it, and generate another version when necessary.
## What's next?
You've learned the fundamentals of AI Writer.
From here, you can move into more focused workflows such as:
* Creating blog content
* Writing product descriptions
* Creating social media content
* Writing marketing copy
* Rewriting existing content
* Creating video scripts
* Summarizing information
* Using current web information
* Building repeatable content workflows
As you become more comfortable with AI Writer, experiment with different templates, tones, creativity levels, and inputs to find the workflow that works best for your needs.
Start with the outcome you want, provide useful context, and refine the result. You don't need to master every AI Writer setting before you can create useful content.