> ## Documentation Index
> Fetch the complete documentation index at: https://docs.klyra.ai/llms.txt
> Use this file to discover all available pages before exploring further.
# AI Voiceover
> Learn how to create, preview, generate, and manage AI voiceovers with Klyra AI.
[AI Voiceover](https://klyra.ai/apps/ai-voiceover) lets you choose a language and voice, prepare a script, add voice effects, preview the result, and generate an audio file from one workspace. Generated voiceovers can then be reviewed and managed from your Voiceover Results library.
## What you'll learn
In this tutorial, you'll learn how to:
* Open AI Voiceover
* Choose a language and voice
* Name your voiceover
* Select an output format
* Enter a voiceover script
* Use Voice Effects
* Use Say as
* Add Emphasis
* Adjust Volume and Pitch
* Add Pauses
* Understand the voiceover editor
* Preview your script
* Generate a voiceover
* Review generated results
* Play and download generated audio
* Find previous voiceovers in the library
* Improve voiceover results with clearer scripts and intentional pacing
## How AI Voiceover works
AI Voiceover follows a simple workflow:
Write or paste the text you want to turn into spoken audio.
Select the language and voice that best fit your intended audience and content.
Use Voice Effects, Say as, Emphasis, Volume, Pitch, and Pauses when you need more control over how the script is spoken.
Listen to the voiceover before generating the final audio so you can check pacing, pronunciation, and delivery.
Generate the voiceover in your selected output format.
Play, download, and manage the generated voiceover from the results area or Voiceover Results library.
The goal is not simply to convert text to speech. The goal is to create voice audio that fits the purpose, pacing, and tone of your content.
## Open AI Voiceover
From your Klyra AI workspace, open **AI Voiceover** from the **Voice** section.
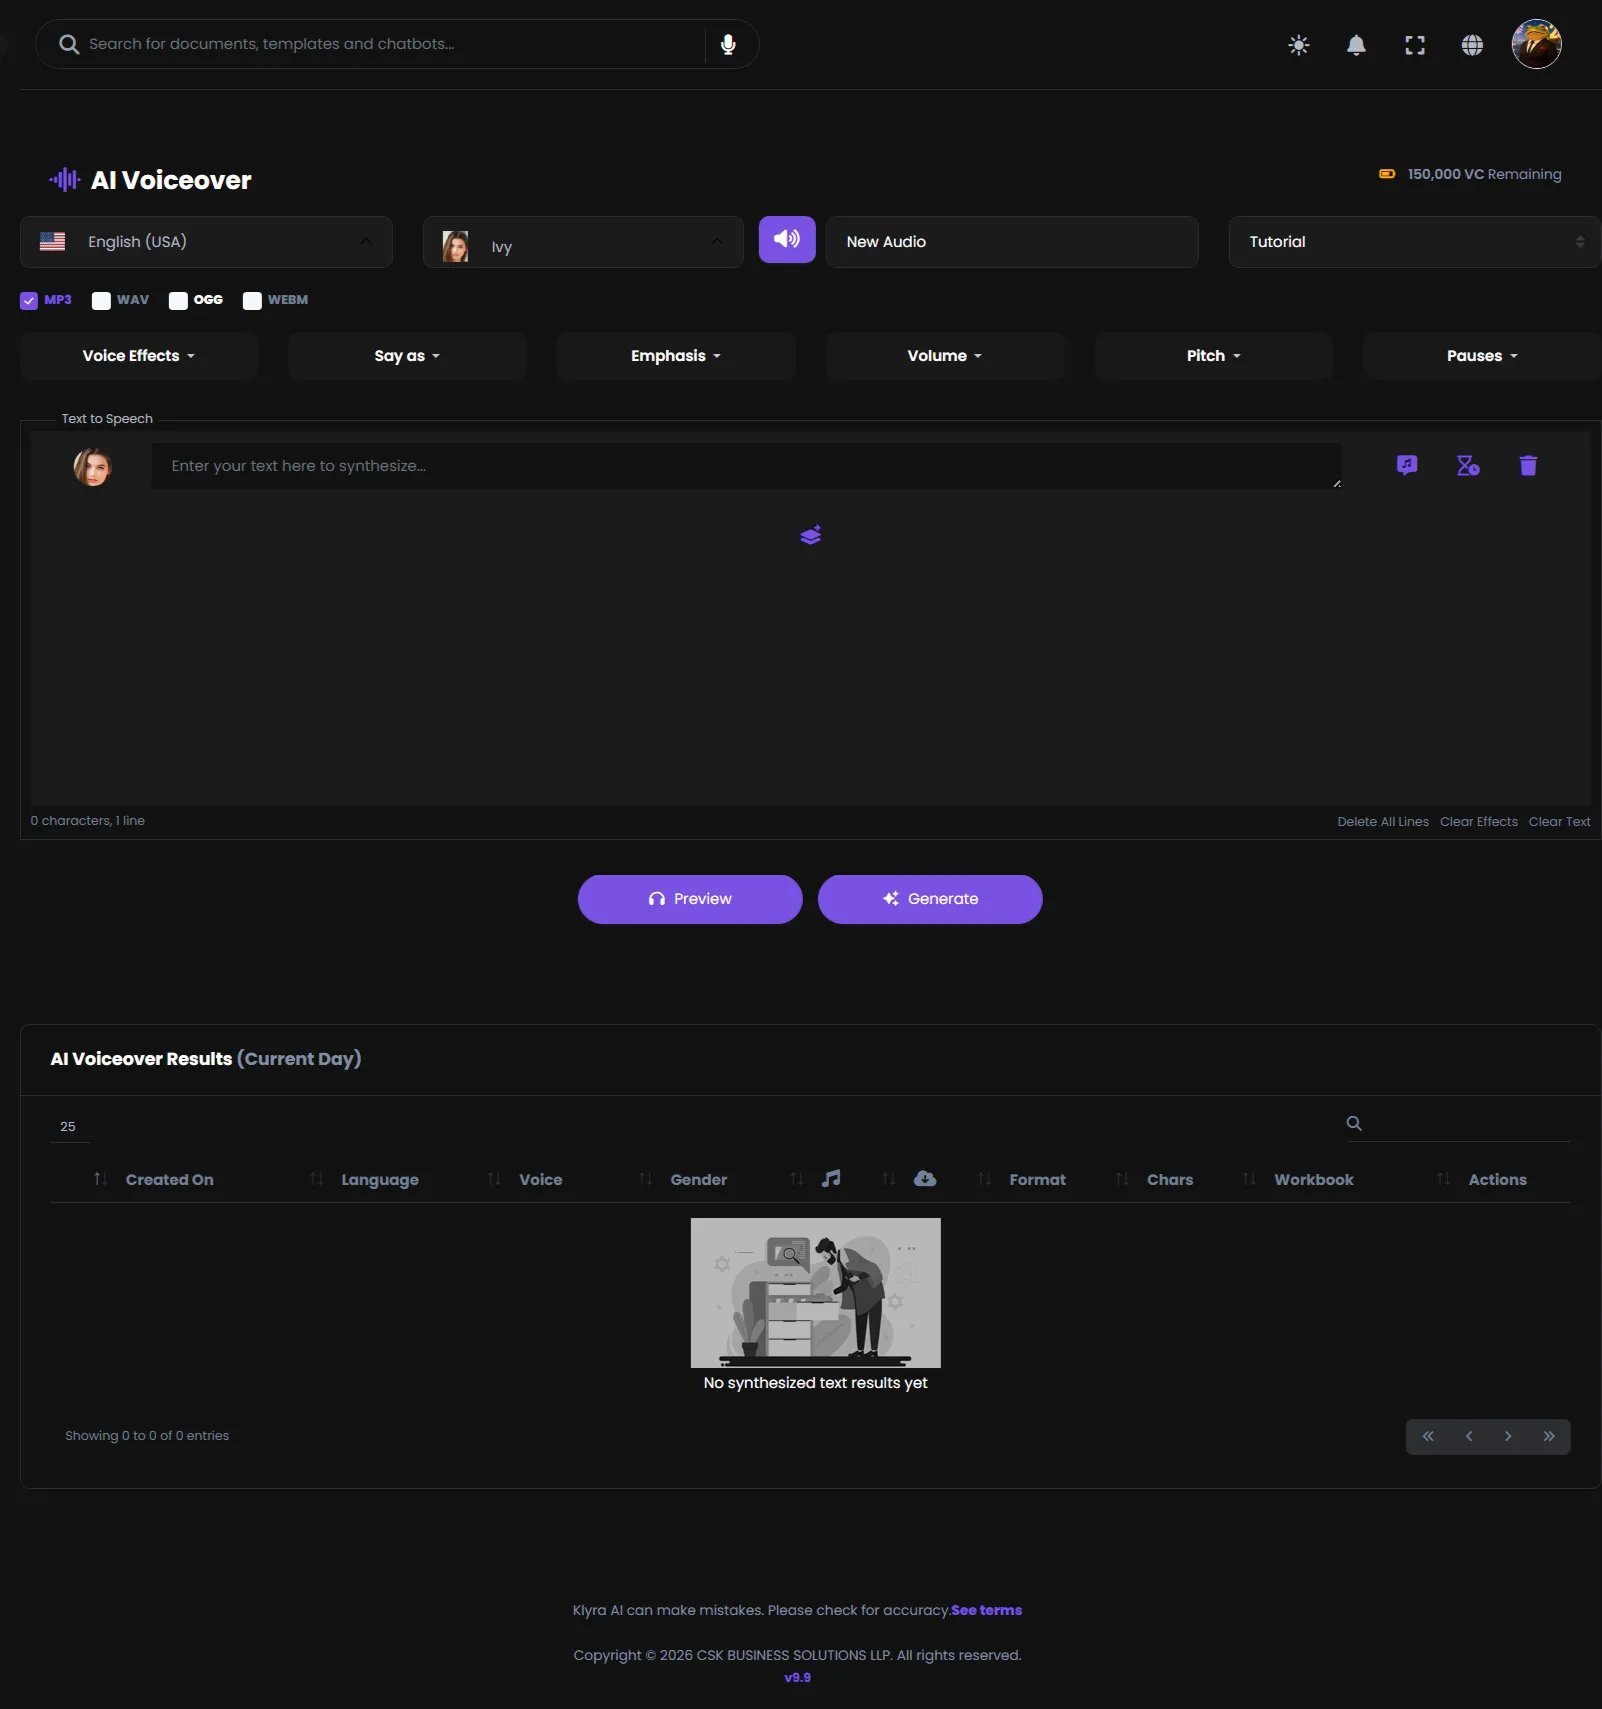 The AI Voiceover workspace is organized around four areas:
* **Voice setup**, where you choose language and voice.
* **Audio settings**, where you choose output format and the available voice controls.
* **Text to Speech**, where you enter and refine your script.
* **Results**, where generated voiceovers can be reviewed.
The interface may change as Klyra AI adds voices, formats, and voice capabilities. The workflow in this guide focuses on the core experience shown in the current workspace.
## Set up your voiceover
Before writing the script, configure the basic voiceover settings.
### Step 1: Choose the language
Use the **Language** selector to choose the language and regional variant for your voiceover.
For this tutorial, select:
> **English (USA)**
Choose the language that matches your audience and the language of your script.
### Step 2: Choose a voice
Use the **Voice** selector to choose the voice that will read your script.
For this tutorial, select:
> **Ivy**
The selected voice is shown beside the language selector and is also reflected in the generated result.
Choose a voice based on the role of the audio, the audience, and the tone you want the narration to have. A clear, natural voice is usually a good starting point for tutorials and business content.
### Step 3: Name the voiceover
The title field identifies the audio project.
For this tutorial, use:
> **Klyra AI - The AI Operating System**
A useful title makes generated audio easier to recognize later in the results library.
### Step 4: Choose the workbook
The workbook selector lets you associate the voiceover with a workbook.
For this tutorial, use:
> **Tutorial**
The selected workbook appears in the generated result so you can identify where the voiceover belongs.
## Choose an output format
AI Voiceover provides output format options for:
* **MP3**
* **WAV**
* **OGG**
* **WEBM**
For this tutorial, select:
> **MP3**
MP3 is a practical choice when you need a widely supported audio file for general use.
If your workflow requires another format, select the format that best fits your downstream application.
The available output formats can affect how you use the generated audio. Choose the format based on where the file will be played, edited, or published.
## Enter your script
The **Text to Speech** editor is where you enter the text that will become the voiceover.
The AI Voiceover workspace is organized around four areas:
* **Voice setup**, where you choose language and voice.
* **Audio settings**, where you choose output format and the available voice controls.
* **Text to Speech**, where you enter and refine your script.
* **Results**, where generated voiceovers can be reviewed.
The interface may change as Klyra AI adds voices, formats, and voice capabilities. The workflow in this guide focuses on the core experience shown in the current workspace.
## Set up your voiceover
Before writing the script, configure the basic voiceover settings.
### Step 1: Choose the language
Use the **Language** selector to choose the language and regional variant for your voiceover.
For this tutorial, select:
> **English (USA)**
Choose the language that matches your audience and the language of your script.
### Step 2: Choose a voice
Use the **Voice** selector to choose the voice that will read your script.
For this tutorial, select:
> **Ivy**
The selected voice is shown beside the language selector and is also reflected in the generated result.
Choose a voice based on the role of the audio, the audience, and the tone you want the narration to have. A clear, natural voice is usually a good starting point for tutorials and business content.
### Step 3: Name the voiceover
The title field identifies the audio project.
For this tutorial, use:
> **Klyra AI - The AI Operating System**
A useful title makes generated audio easier to recognize later in the results library.
### Step 4: Choose the workbook
The workbook selector lets you associate the voiceover with a workbook.
For this tutorial, use:
> **Tutorial**
The selected workbook appears in the generated result so you can identify where the voiceover belongs.
## Choose an output format
AI Voiceover provides output format options for:
* **MP3**
* **WAV**
* **OGG**
* **WEBM**
For this tutorial, select:
> **MP3**
MP3 is a practical choice when you need a widely supported audio file for general use.
If your workflow requires another format, select the format that best fits your downstream application.
The available output formats can affect how you use the generated audio. Choose the format based on where the file will be played, edited, or published.
## Enter your script
The **Text to Speech** editor is where you enter the text that will become the voiceover.
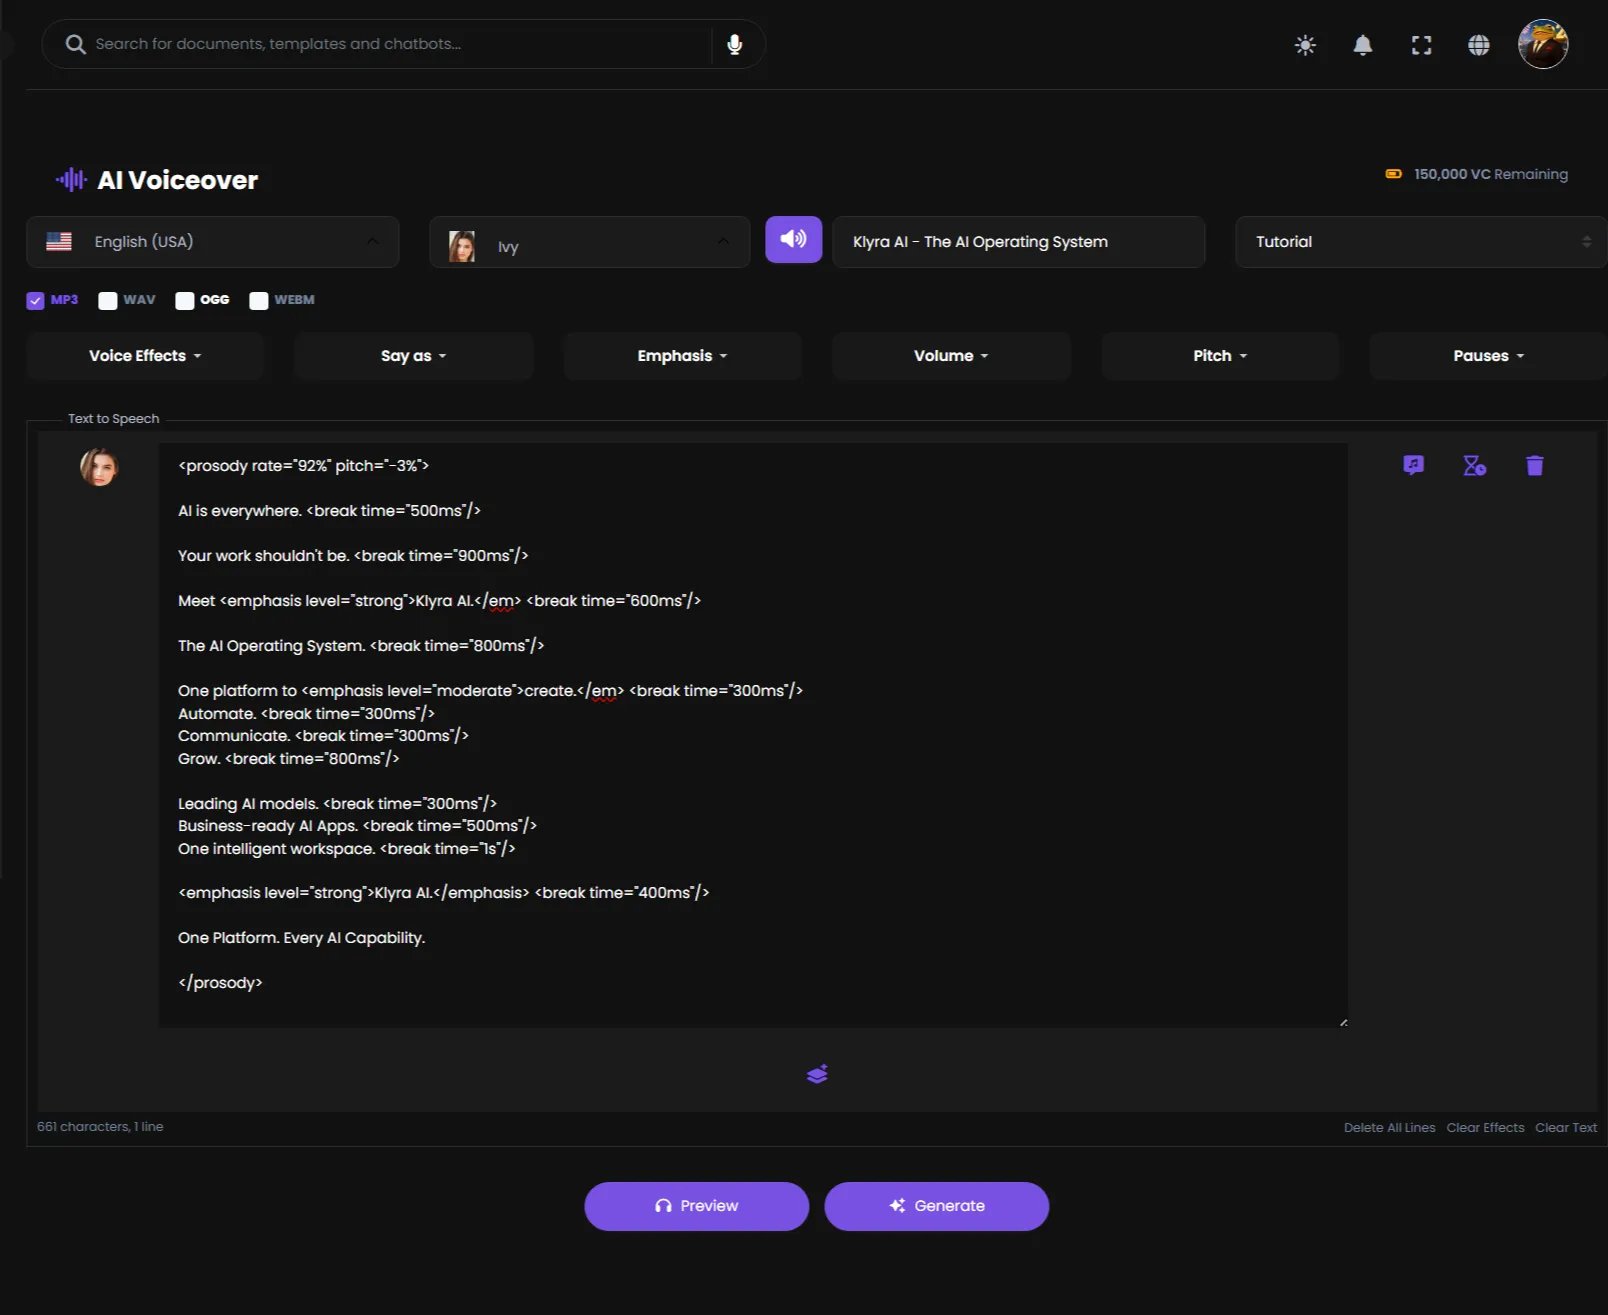 For this tutorial, you can use the following short script:
> AI is everywhere. Your work shouldn't be. Meet Klyra AI, The AI Operating System. One platform to create, automate, communicate, and grow. One intelligent workspace. One platform. Every AI capability.
You can enter plain text, or use the supported voice markup shown in the workspace when you need more control over delivery.
AI-generated speech should be reviewed before publishing. Listen for pronunciation, pacing, emphasis, and any wording that could be interpreted incorrectly.
## Understand the Text to Speech editor
The editor provides a large text area for your script and controls for shaping delivery.
You may also see:
* The selected voice avatar
* A character counter
* A line counter
* Voice control shortcuts
* Controls for deleting lines
* Controls for clearing effects
* A control for clearing text
The character counter helps you keep track of the amount of text being processed.
### Text and effect markup
The workspace can display voice instructions directly inside the script. In the supplied example, the editor shows markup such as:
* ``
* ``
* ``
* ``
These instructions can be used to influence delivery, emphasis, pauses, or vocal character when supported by the selected voice engine.
For example:
```xml theme={null}
AI is everywhere.
Your work shouldn't be.
Meet Klyra AI.
The AI Operating System.
```
The exact supported effects can depend on the current voice and voice engine. Use the controls available in your workspace rather than assuming that every voice supports every effect.
## Add Voice Effects
Open **Voice Effects** to access the available voice-effect controls.
Voice effects are useful when you want to change the character or delivery of the narration.
Use effects intentionally. A voiceover usually sounds better when effects support the message rather than being applied to every sentence.
Start with a clean voice and add effects only where they improve the listening experience.
## Use Say as
The **Say as** control can be used when a part of your script needs to be spoken in a particular way.
This can be useful for content where the written form and spoken form are different.
For example, a script may contain an abbreviation, number, date, or other text that needs deliberate pronunciation.
Use the options available in the **Say as** menu for the selected voice and voice engine.
## Add Emphasis
Use **Emphasis** when a particular word or phrase needs more attention.
The workspace supports emphasis markup such as:
```xml theme={null}
Klyra AI
```
In the example above, the selected phrase is marked for stronger delivery.
Use emphasis sparingly. Too much emphasis can make narration sound unnatural.
## Adjust Volume
Use **Volume** when you need to adjust the loudness of a selected portion of the voiceover or the available voice setting.
If your narration already has a comfortable level, avoid making unnecessary changes.
## Adjust Pitch
Use **Pitch** when you want to change how high or low the voice sounds.
The workspace can also display pitch instructions inside the script, for example:
```xml theme={null}
The AI Operating System.
```
Small changes are generally easier to integrate naturally than large changes.
## Add Pauses
Use **Pauses** when you need more space between words, phrases, or ideas.
The workspace shows pause instructions such as:
```xml theme={null}
```
Pauses are especially useful for:
* Separating ideas
* Creating a deliberate rhythm
* Giving listeners time to process a statement
* Making an important phrase stand out
* Improving the pacing of short marketing or tutorial scripts
For example:
```xml theme={null}
AI is everywhere.
Your work shouldn't be.
```
Use pauses to improve comprehension and rhythm, not simply to make the script longer.
## Build a polished voiceover
A strong voiceover usually has a clear rhythm.
A useful structure is:
Open with a sentence that immediately tells the listener what the audio is about.
Add short pauses between important ideas.
Use emphasis on a small number of important words or phrases.
Avoid frequent changes to pitch, volume, or voice effects unless the content calls for them.
Listen to the complete script and make corrections before creating the final audio.
## Preview the voiceover
Once your script is ready, select **Preview**.
Preview is useful for checking the spoken result before generating the final voiceover.
Listen for:
* Pronunciation
* Pacing
* Pauses
* Emphasis
* Volume
* Pitch
* Overall naturalness
* Whether the delivery matches the purpose of the content
If something does not sound right, return to the editor and adjust the relevant text or effect.
Preview is part of the refinement process. You do not need to generate the final audio every time you make a small script or delivery change.
## Generate the voiceover
When the script and settings are ready, select **Generate**.
Depending on the current interface or workspace state, the generation action may also appear as **Synthesize**.
For this tutorial, you can use the following short script:
> AI is everywhere. Your work shouldn't be. Meet Klyra AI, The AI Operating System. One platform to create, automate, communicate, and grow. One intelligent workspace. One platform. Every AI capability.
You can enter plain text, or use the supported voice markup shown in the workspace when you need more control over delivery.
AI-generated speech should be reviewed before publishing. Listen for pronunciation, pacing, emphasis, and any wording that could be interpreted incorrectly.
## Understand the Text to Speech editor
The editor provides a large text area for your script and controls for shaping delivery.
You may also see:
* The selected voice avatar
* A character counter
* A line counter
* Voice control shortcuts
* Controls for deleting lines
* Controls for clearing effects
* A control for clearing text
The character counter helps you keep track of the amount of text being processed.
### Text and effect markup
The workspace can display voice instructions directly inside the script. In the supplied example, the editor shows markup such as:
* ``
* ``
* ``
* ``
These instructions can be used to influence delivery, emphasis, pauses, or vocal character when supported by the selected voice engine.
For example:
```xml theme={null}
AI is everywhere.
Your work shouldn't be.
Meet Klyra AI.
The AI Operating System.
```
The exact supported effects can depend on the current voice and voice engine. Use the controls available in your workspace rather than assuming that every voice supports every effect.
## Add Voice Effects
Open **Voice Effects** to access the available voice-effect controls.
Voice effects are useful when you want to change the character or delivery of the narration.
Use effects intentionally. A voiceover usually sounds better when effects support the message rather than being applied to every sentence.
Start with a clean voice and add effects only where they improve the listening experience.
## Use Say as
The **Say as** control can be used when a part of your script needs to be spoken in a particular way.
This can be useful for content where the written form and spoken form are different.
For example, a script may contain an abbreviation, number, date, or other text that needs deliberate pronunciation.
Use the options available in the **Say as** menu for the selected voice and voice engine.
## Add Emphasis
Use **Emphasis** when a particular word or phrase needs more attention.
The workspace supports emphasis markup such as:
```xml theme={null}
Klyra AI
```
In the example above, the selected phrase is marked for stronger delivery.
Use emphasis sparingly. Too much emphasis can make narration sound unnatural.
## Adjust Volume
Use **Volume** when you need to adjust the loudness of a selected portion of the voiceover or the available voice setting.
If your narration already has a comfortable level, avoid making unnecessary changes.
## Adjust Pitch
Use **Pitch** when you want to change how high or low the voice sounds.
The workspace can also display pitch instructions inside the script, for example:
```xml theme={null}
The AI Operating System.
```
Small changes are generally easier to integrate naturally than large changes.
## Add Pauses
Use **Pauses** when you need more space between words, phrases, or ideas.
The workspace shows pause instructions such as:
```xml theme={null}
```
Pauses are especially useful for:
* Separating ideas
* Creating a deliberate rhythm
* Giving listeners time to process a statement
* Making an important phrase stand out
* Improving the pacing of short marketing or tutorial scripts
For example:
```xml theme={null}
AI is everywhere.
Your work shouldn't be.
```
Use pauses to improve comprehension and rhythm, not simply to make the script longer.
## Build a polished voiceover
A strong voiceover usually has a clear rhythm.
A useful structure is:
Open with a sentence that immediately tells the listener what the audio is about.
Add short pauses between important ideas.
Use emphasis on a small number of important words or phrases.
Avoid frequent changes to pitch, volume, or voice effects unless the content calls for them.
Listen to the complete script and make corrections before creating the final audio.
## Preview the voiceover
Once your script is ready, select **Preview**.
Preview is useful for checking the spoken result before generating the final voiceover.
Listen for:
* Pronunciation
* Pacing
* Pauses
* Emphasis
* Volume
* Pitch
* Overall naturalness
* Whether the delivery matches the purpose of the content
If something does not sound right, return to the editor and adjust the relevant text or effect.
Preview is part of the refinement process. You do not need to generate the final audio every time you make a small script or delivery change.
## Generate the voiceover
When the script and settings are ready, select **Generate**.
Depending on the current interface or workspace state, the generation action may also appear as **Synthesize**.
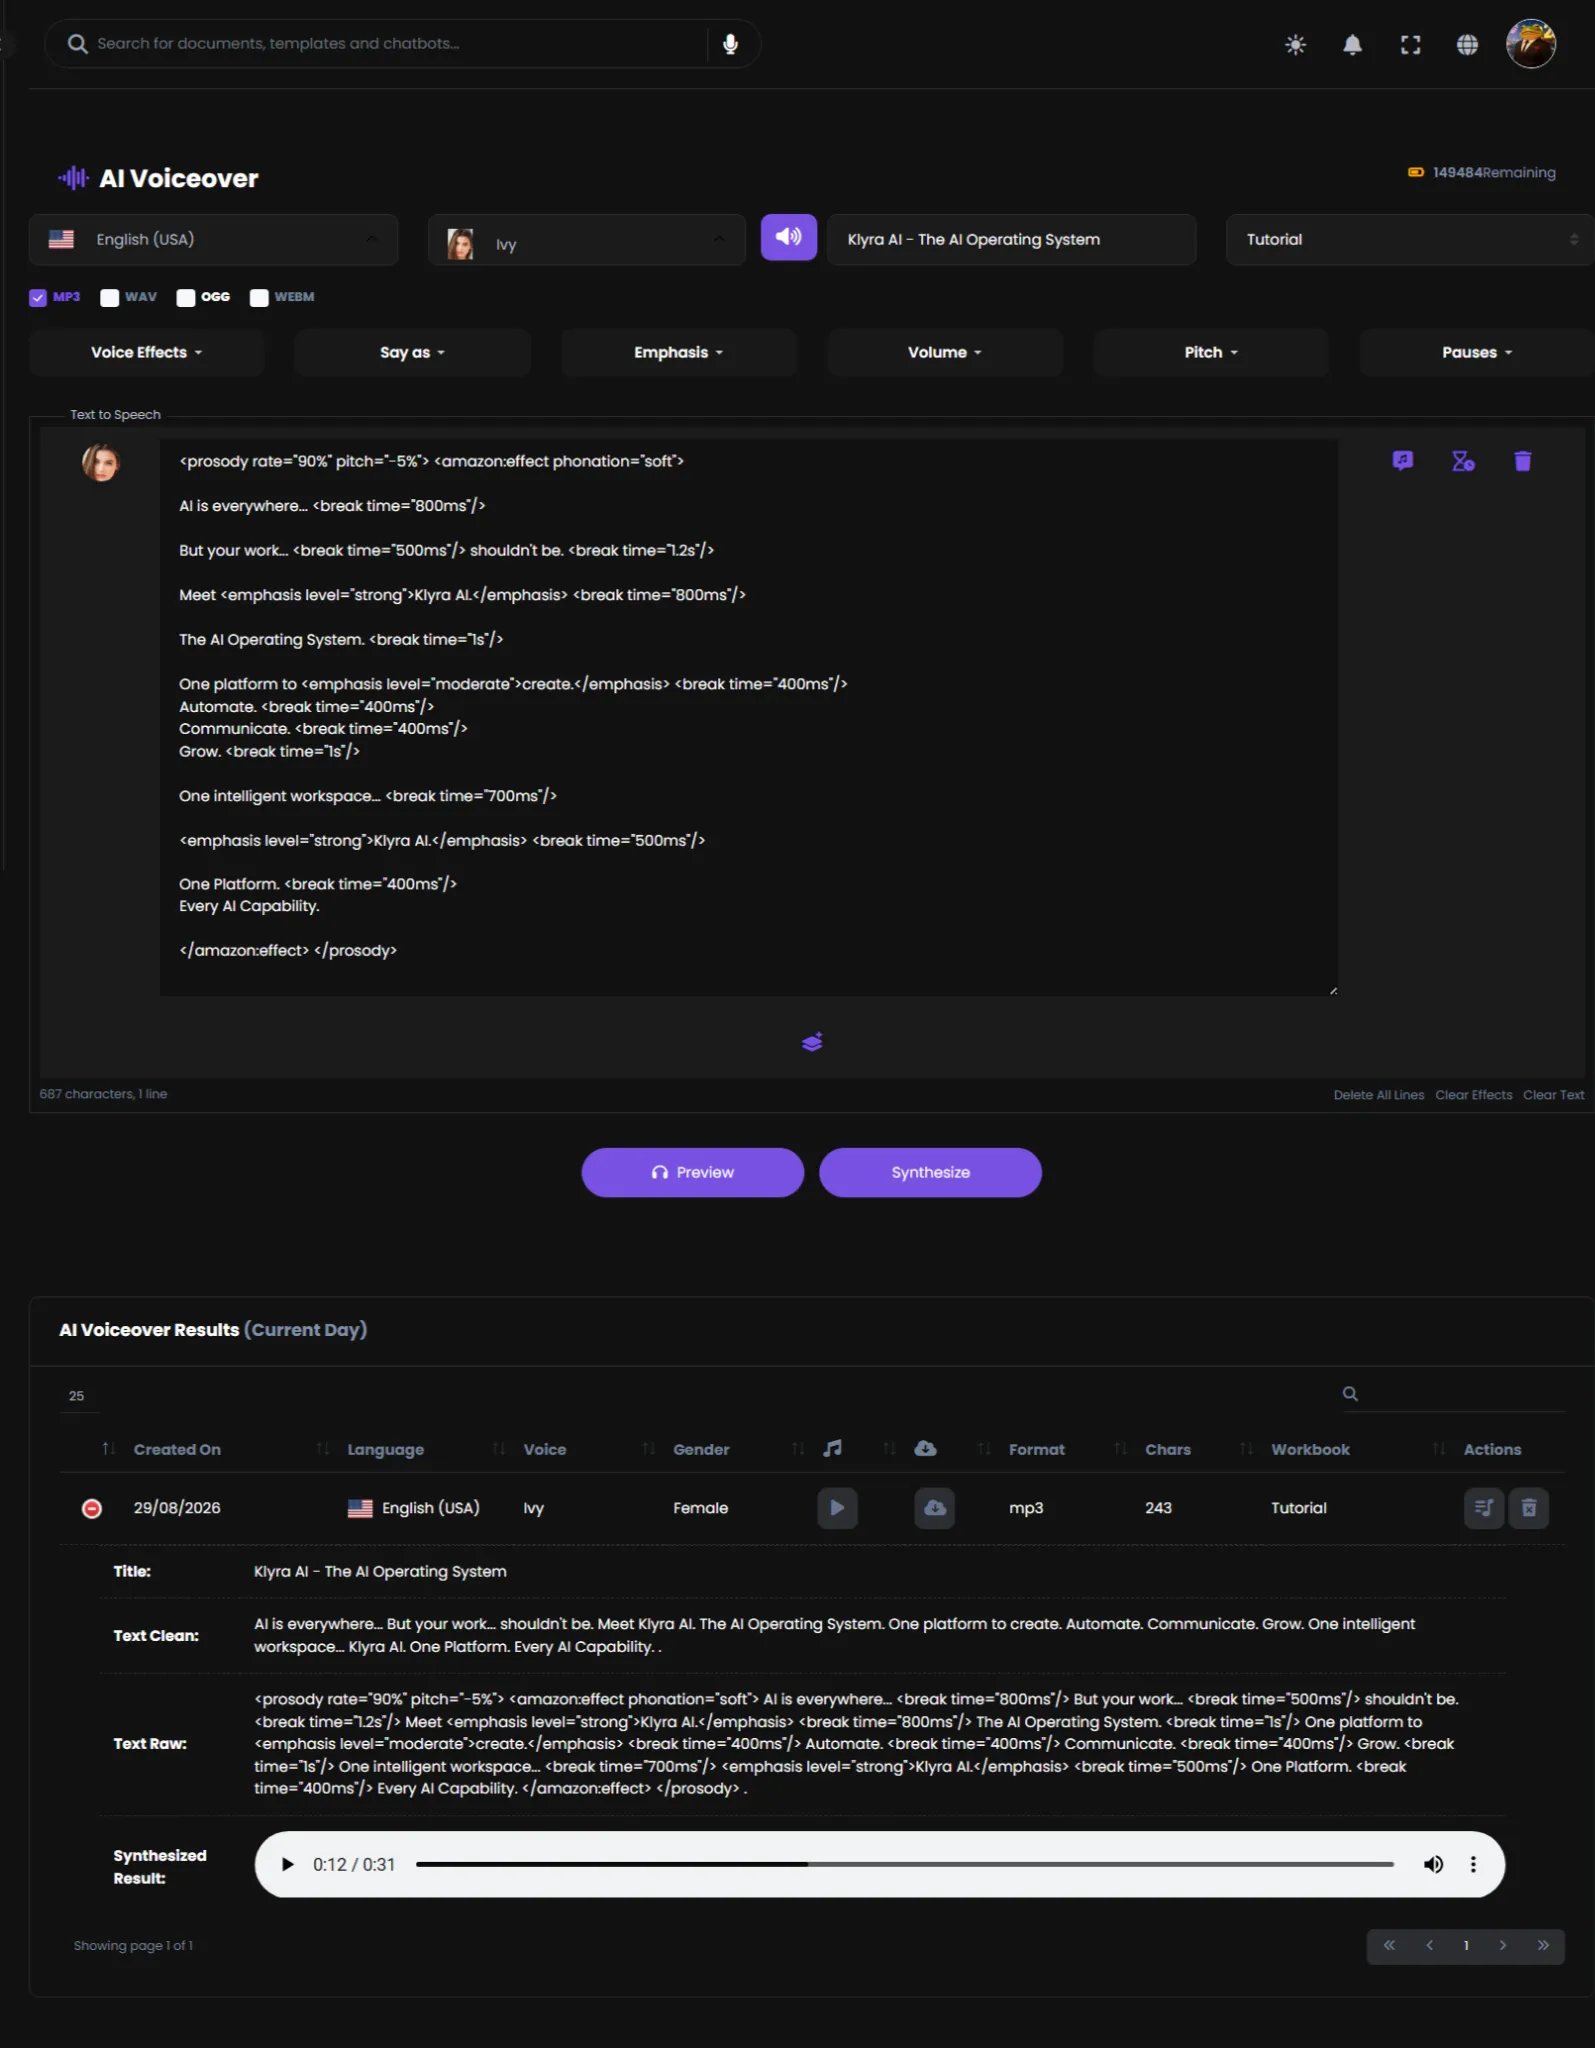 Klyra AI processes the script using the selected voice and creates the audio in the selected format.
After generation, the result becomes available in the voiceover results area.
Generation consumes AI Voice Capacity. Keep your script focused and preview meaningful changes before generating the final version.
## Review your generated result
After generation, the **AI Voiceover Results** section shows the voiceover created from your script.
A generated result can include information such as:
* Created date
* Language
* Voice
* Gender
* Voice engine
* Audio playback
* Download action
* Format
* Character count
* Workbook
* Actions for managing the result
In the example shown in this tutorial, the generated result uses:
| Setting | Example |
| -------- | ---------------------------------- |
| Title | Klyra AI - The AI Operating System |
| Language | English (USA) |
| Voice | Ivy |
| Workbook | Tutorial |
| Format | MP3 |
The character count shown in the result reflects the amount of text associated with that generated voiceover.
## Play your audio
Use the **Play** control in the results area to listen to the generated audio.
Playback lets you verify the final result without downloading the file first.
When reviewing the audio, listen again for:
* Correct wording
* Natural pacing
* Correct pronunciation
* Appropriate pauses
* Clear emphasis
* Consistent delivery
If the result needs improvement, return to the editor, make the required changes, preview again, and generate a new version.
## Download your audio
Use the **Download** control associated with the generated result when you need the audio file outside Klyra AI.
This is useful when you want to:
* Add narration to a video
* Use voiceover in a presentation
* Publish audio content
* Continue editing the audio in another application
* Store the final asset for later use
The downloaded file uses the output format selected during generation.
## View Voiceover Results in My Library
Generated voiceovers can also be managed from **My Library**.
Open:
**My Library → Voiceover Results**
Klyra AI processes the script using the selected voice and creates the audio in the selected format.
After generation, the result becomes available in the voiceover results area.
Generation consumes AI Voice Capacity. Keep your script focused and preview meaningful changes before generating the final version.
## Review your generated result
After generation, the **AI Voiceover Results** section shows the voiceover created from your script.
A generated result can include information such as:
* Created date
* Language
* Voice
* Gender
* Voice engine
* Audio playback
* Download action
* Format
* Character count
* Workbook
* Actions for managing the result
In the example shown in this tutorial, the generated result uses:
| Setting | Example |
| -------- | ---------------------------------- |
| Title | Klyra AI - The AI Operating System |
| Language | English (USA) |
| Voice | Ivy |
| Workbook | Tutorial |
| Format | MP3 |
The character count shown in the result reflects the amount of text associated with that generated voiceover.
## Play your audio
Use the **Play** control in the results area to listen to the generated audio.
Playback lets you verify the final result without downloading the file first.
When reviewing the audio, listen again for:
* Correct wording
* Natural pacing
* Correct pronunciation
* Appropriate pauses
* Clear emphasis
* Consistent delivery
If the result needs improvement, return to the editor, make the required changes, preview again, and generate a new version.
## Download your audio
Use the **Download** control associated with the generated result when you need the audio file outside Klyra AI.
This is useful when you want to:
* Add narration to a video
* Use voiceover in a presentation
* Publish audio content
* Continue editing the audio in another application
* Store the final asset for later use
The downloaded file uses the output format selected during generation.
## View Voiceover Results in My Library
Generated voiceovers can also be managed from **My Library**.
Open:
**My Library → Voiceover Results**
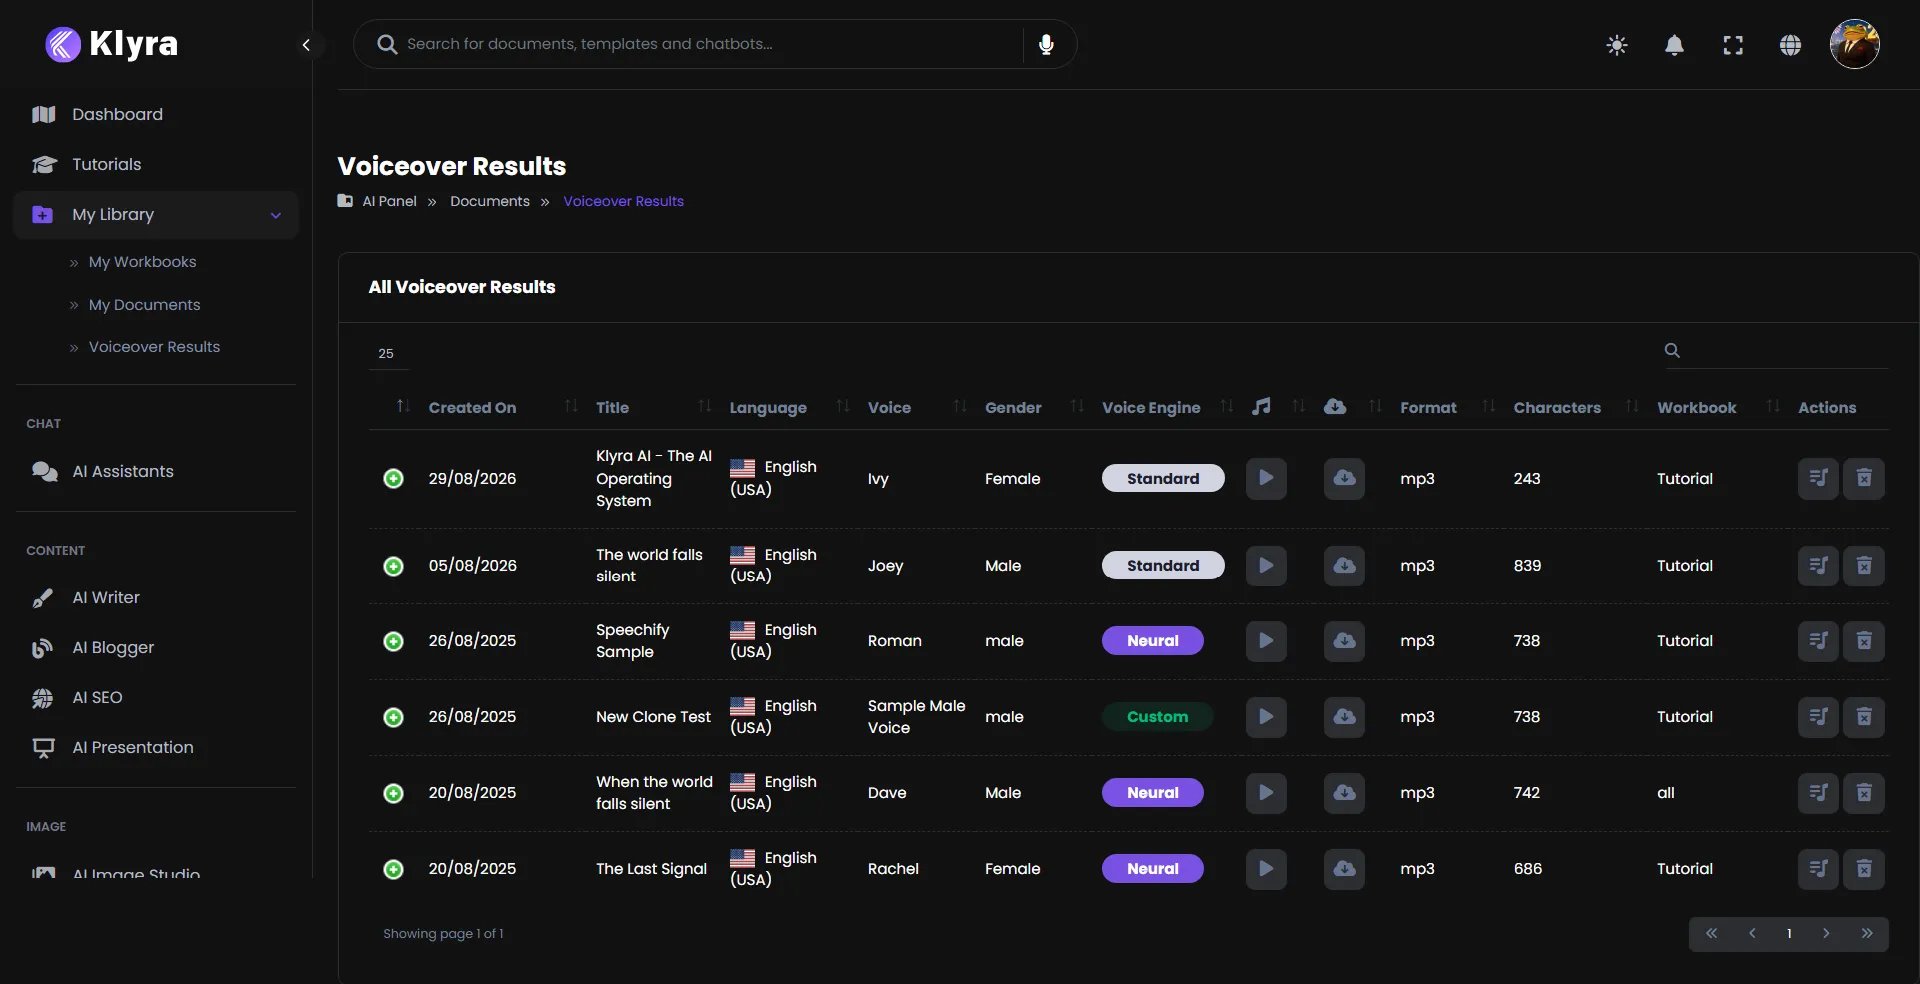 The Voiceover Results library provides a broader view of previously generated voiceovers.
The table can show columns such as:
* Created On
* Title
* Language
* Voice
* Gender
* Voice Engine
* Playback
* Download
* Format
* Characters
* Workbook
* Actions
This makes it easier to find, play, download, and manage previously generated voiceovers.
## Manage generated voiceovers
The results area provides actions for working with existing voiceovers.
Depending on the current interface, available actions may include:
* Playing the audio
* Downloading the audio
* Opening or viewing the associated content
* Deleting a result
Before deleting a result, make sure you no longer need the generated audio.
Generated audio can be difficult to recreate exactly. If a voiceover is important, download and store the final file before deleting it from your library.
## Improve your voiceover results
Your first generation does not need to be perfect.
Use the result to identify what needs improvement.
### If the narration sounds too fast
Add appropriate pauses or adjust the delivery settings available in the workspace.
For example:
```xml theme={null}
AI is everywhere.
Meet Klyra AI.
```
### If important words are not standing out
Use **Emphasis** on the most important words rather than emphasizing entire sentences.
### If the voice sounds unnatural
Reduce the number of effects and use a simpler script.
Too many changes to pitch, volume, effects, and pauses can make a voiceover feel less natural.
### If pronunciation needs attention
Use the **Say as** controls available for the selected voice and voice engine, or rewrite the text so the intended pronunciation is clearer.
### If the script feels flat
Introduce deliberate pauses and selective emphasis.
A short sentence followed by a pause can create more impact than adding effects everywhere.
### If the result is too long
Remove unnecessary words and keep the script focused on the listener's intended outcome.
## A practical voiceover example
The following example combines pacing, emphasis, and pauses:
```xml theme={null}
AI is everywhere.
Your work shouldn't be.
Meet Klyra AI.
The AI Operating System.
One platform to create.
Automate.
Communicate.
Grow.
One intelligent workspace.
One Platform. Every AI Capability.
```
The example demonstrates an important principle: use voice controls to reinforce the structure of the message.
You can adapt the same approach for:
* Product introductions
* Explainer videos
* Social media videos
* Tutorials
* Training content
* Presentations
* Marketing videos
* Short announcements
## Common mistakes to avoid
### Starting without a clear script
Voiceover quality starts with the words being spoken.
Write a concise script before adding effects.
### Using too many effects
Adding effects to every line can make narration sound artificial.
Use effects selectively.
### Skipping the preview
Do not assume the generated result will sound exactly as expected from the text alone.
Preview the script and listen carefully before final generation.
### Making every pause the same length
Different ideas may need different amounts of space.
Use shorter pauses for normal transitions and longer pauses when you want to separate major ideas.
### Overusing emphasis
If every sentence is emphasized, nothing sounds especially important.
Reserve emphasis for the words that matter most.
### Ignoring pronunciation
Names, abbreviations, numbers, and unusual terms may need additional attention.
Use the available pronunciation controls or rewrite the text when necessary.
### Treating the generated audio as final without listening
Always listen to the generated file before publishing or sharing it.
Klyra AI can make mistakes. Review generated audio for accuracy and suitability before using it in published or important content.
## Your AI Voiceover workflow
You now know the complete basic workflow:
Select the language and voice that fit your audience and content.
Give the audio project a clear title and select the appropriate workbook.
Select MP3, WAV, OGG, or WEBM based on how you will use the audio.
Enter the text you want to convert into speech.
Use Voice Effects, Say as, Emphasis, Volume, Pitch, and Pauses when needed.
Listen to the voiceover and refine the script or delivery.
Create the final voiceover.
Play, download, and manage the generated result from the results area or Voiceover Results library.
## Active recall
Before moving on, see if you can answer these questions.
Prepare a clear script that contains the words you want the selected voice to speak.
Previewing helps you check pronunciation, pacing, pauses, emphasis, and overall delivery before generating the final audio.
It can mark important words or phrases for stronger delivery when supported by the selected voice engine.
Pauses create space between ideas and help control the rhythm and pacing of the narration.
MP3, WAV, OGG, and WEBM.
Open My Library and select Voiceover Results.
Yes. Listen to the final audio and check the wording, pronunciation, pacing, and suitability for the intended use.
## What's next?
You've learned the fundamentals of AI Voiceover.
From here, you can use the same workflow to create narration for:
* Videos
* Tutorials
* Presentations
* Social media content
* Product demonstrations
* Training materials
* Marketing content
* Audio-first content
As you become more comfortable with AI Voiceover, experiment with different voices, pacing, emphasis, pauses, and output formats to find the delivery that fits each project.
Start with a clear script, choose a suitable voice, use effects intentionally, preview the result, and review the final audio before publishing.
The Voiceover Results library provides a broader view of previously generated voiceovers.
The table can show columns such as:
* Created On
* Title
* Language
* Voice
* Gender
* Voice Engine
* Playback
* Download
* Format
* Characters
* Workbook
* Actions
This makes it easier to find, play, download, and manage previously generated voiceovers.
## Manage generated voiceovers
The results area provides actions for working with existing voiceovers.
Depending on the current interface, available actions may include:
* Playing the audio
* Downloading the audio
* Opening or viewing the associated content
* Deleting a result
Before deleting a result, make sure you no longer need the generated audio.
Generated audio can be difficult to recreate exactly. If a voiceover is important, download and store the final file before deleting it from your library.
## Improve your voiceover results
Your first generation does not need to be perfect.
Use the result to identify what needs improvement.
### If the narration sounds too fast
Add appropriate pauses or adjust the delivery settings available in the workspace.
For example:
```xml theme={null}
AI is everywhere.
Meet Klyra AI.
```
### If important words are not standing out
Use **Emphasis** on the most important words rather than emphasizing entire sentences.
### If the voice sounds unnatural
Reduce the number of effects and use a simpler script.
Too many changes to pitch, volume, effects, and pauses can make a voiceover feel less natural.
### If pronunciation needs attention
Use the **Say as** controls available for the selected voice and voice engine, or rewrite the text so the intended pronunciation is clearer.
### If the script feels flat
Introduce deliberate pauses and selective emphasis.
A short sentence followed by a pause can create more impact than adding effects everywhere.
### If the result is too long
Remove unnecessary words and keep the script focused on the listener's intended outcome.
## A practical voiceover example
The following example combines pacing, emphasis, and pauses:
```xml theme={null}
AI is everywhere.
Your work shouldn't be.
Meet Klyra AI.
The AI Operating System.
One platform to create.
Automate.
Communicate.
Grow.
One intelligent workspace.
One Platform. Every AI Capability.
```
The example demonstrates an important principle: use voice controls to reinforce the structure of the message.
You can adapt the same approach for:
* Product introductions
* Explainer videos
* Social media videos
* Tutorials
* Training content
* Presentations
* Marketing videos
* Short announcements
## Common mistakes to avoid
### Starting without a clear script
Voiceover quality starts with the words being spoken.
Write a concise script before adding effects.
### Using too many effects
Adding effects to every line can make narration sound artificial.
Use effects selectively.
### Skipping the preview
Do not assume the generated result will sound exactly as expected from the text alone.
Preview the script and listen carefully before final generation.
### Making every pause the same length
Different ideas may need different amounts of space.
Use shorter pauses for normal transitions and longer pauses when you want to separate major ideas.
### Overusing emphasis
If every sentence is emphasized, nothing sounds especially important.
Reserve emphasis for the words that matter most.
### Ignoring pronunciation
Names, abbreviations, numbers, and unusual terms may need additional attention.
Use the available pronunciation controls or rewrite the text when necessary.
### Treating the generated audio as final without listening
Always listen to the generated file before publishing or sharing it.
Klyra AI can make mistakes. Review generated audio for accuracy and suitability before using it in published or important content.
## Your AI Voiceover workflow
You now know the complete basic workflow:
Select the language and voice that fit your audience and content.
Give the audio project a clear title and select the appropriate workbook.
Select MP3, WAV, OGG, or WEBM based on how you will use the audio.
Enter the text you want to convert into speech.
Use Voice Effects, Say as, Emphasis, Volume, Pitch, and Pauses when needed.
Listen to the voiceover and refine the script or delivery.
Create the final voiceover.
Play, download, and manage the generated result from the results area or Voiceover Results library.
## Active recall
Before moving on, see if you can answer these questions.
Prepare a clear script that contains the words you want the selected voice to speak.
Previewing helps you check pronunciation, pacing, pauses, emphasis, and overall delivery before generating the final audio.
It can mark important words or phrases for stronger delivery when supported by the selected voice engine.
Pauses create space between ideas and help control the rhythm and pacing of the narration.
MP3, WAV, OGG, and WEBM.
Open My Library and select Voiceover Results.
Yes. Listen to the final audio and check the wording, pronunciation, pacing, and suitability for the intended use.
## What's next?
You've learned the fundamentals of AI Voiceover.
From here, you can use the same workflow to create narration for:
* Videos
* Tutorials
* Presentations
* Social media content
* Product demonstrations
* Training materials
* Marketing content
* Audio-first content
As you become more comfortable with AI Voiceover, experiment with different voices, pacing, emphasis, pauses, and output formats to find the delivery that fits each project.
Start with a clear script, choose a suitable voice, use effects intentionally, preview the result, and review the final audio before publishing.