> ## Documentation Index
> Fetch the complete documentation index at: https://docs.klyra.ai/llms.txt
> Use this file to discover all available pages before exploring further.
# AI Photoshoot
> Create studio-quality product photos with Klyra AI using custom prompts, curated templates, and product images.
[AI Photoshoot](https://klyra.ai/apps/ai-photoshoot) helps you turn product images into polished, marketing-ready visuals without needing a traditional photoshoot.
You can start with a custom creative direction or use a professionally designed template. Choose your product, control the aspect ratio and number of images, then generate a set of product visuals you can review and manage from **My Photoshoots**.
AI Photoshoot is designed around outcomes. You do not need to understand the underlying image model or technical generation settings to create professional-looking product visuals.
## What you can create
AI Photoshoot provides three creation modes:
* **Custom Photoshoot**: describe the scene and creative direction in your own words.
* **Template-Based Generation**: choose from curated templates and generate product photos quickly.
* **Background Replacement**: replace a product background with a new scene while preserving the product.
This tutorial focuses on the two creation workflows shown in the current Klyra AI interface: **Template-Based Generation** and **Custom Photoshoot**.
## Before you start
You will need:
1. A Klyra AI account.
2. A product image in your product library, or a product image you can upload.
3. A clear idea of the type of product visual you want to create.
For best results, use a clear product image where the product is easy to see. A clean source image gives the generation system more information to work with.
## Open AI Photoshoot
From the Klyra AI workspace, open **AI Photoshoot**.
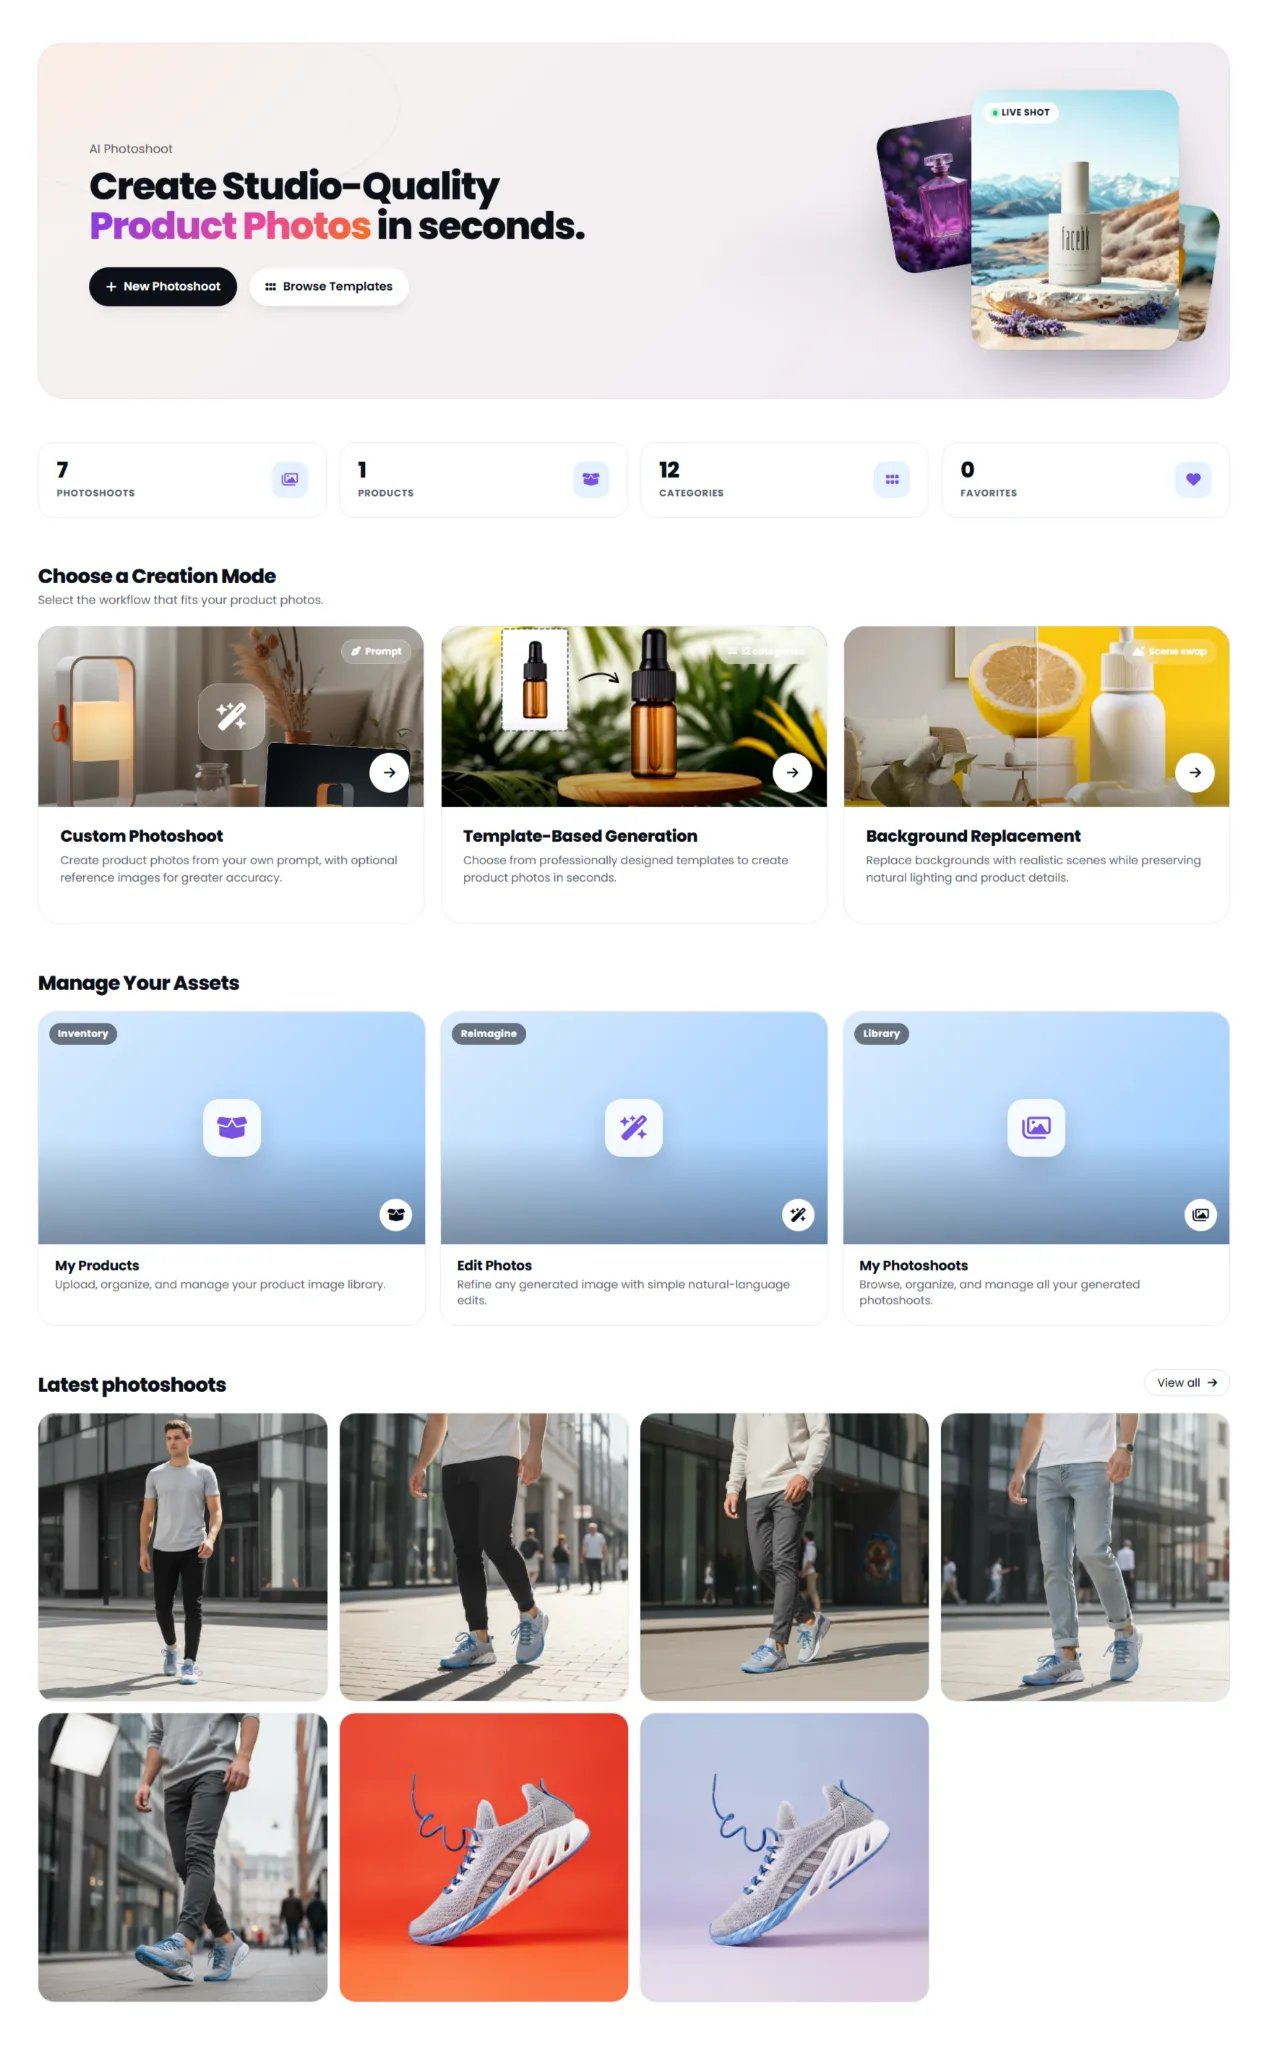
The AI Photoshoot home page gives you a quick overview of your photoshoots, products, categories, and favorites. It also provides shortcuts to the three creation modes and your generated photos.
 ### Choose a creation mode
Under **Choose a Creation Mode**, you can select:
| Mode | Best for |
| ----------------------------- | ------------------------------------------------ |
| **Custom Photoshoot** | Full creative control using your own prompt |
| **Template-Based Generation** | Fast product visuals using curated templates |
| **Background Replacement** | Changing the product's environment or background |
If you already know the exact scene you want, use **Custom Photoshoot**. If you want a faster, more structured workflow, use **Template-Based Generation**.
***
## Template-Based Generation
Template-Based Generation lets you select a product and then choose a visual template designed for a specific marketing scenario.
### Step 1: Start a new photoshoot
Open **Template-Based Generation** from the AI Photoshoot home page.
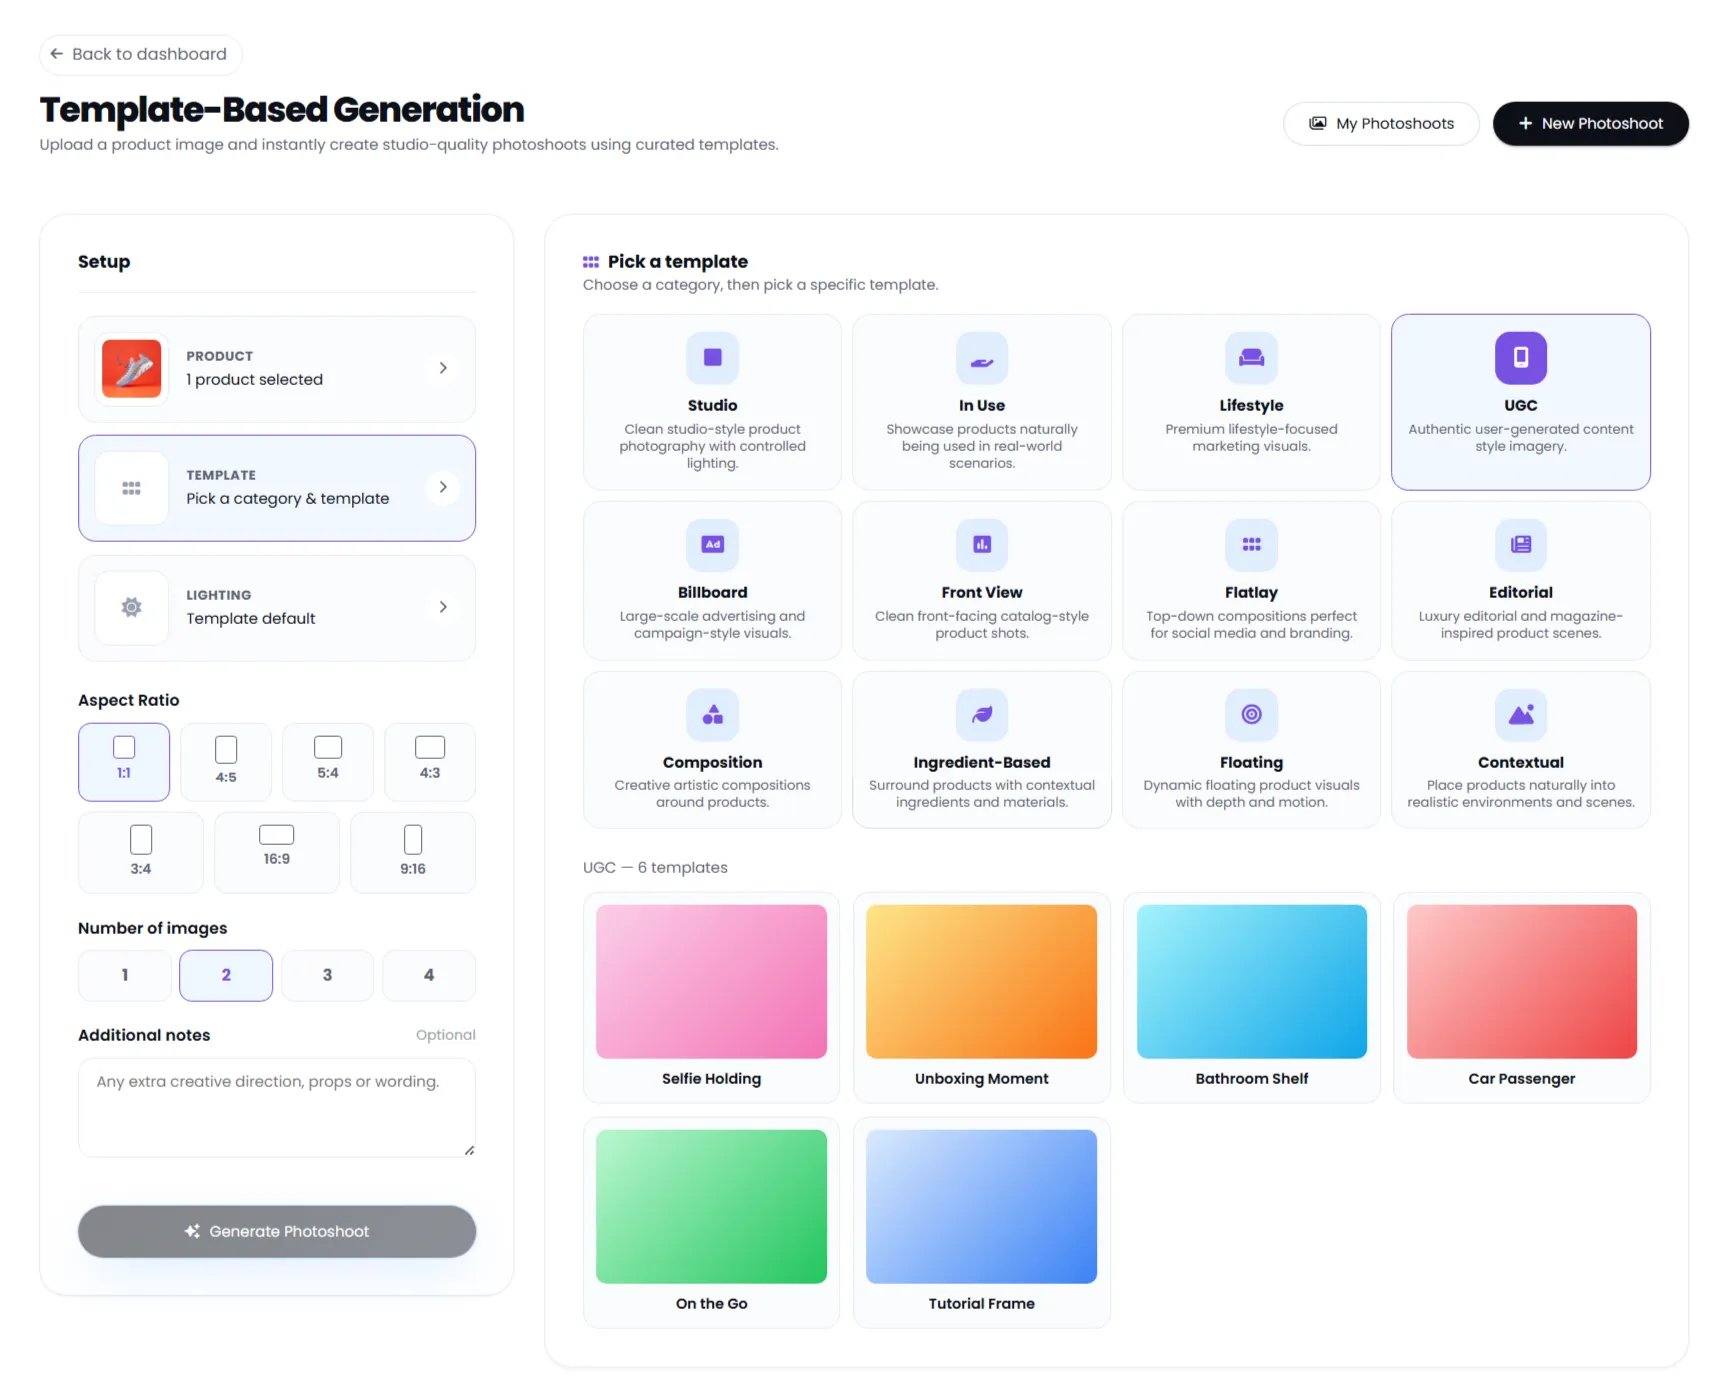
The setup panel appears on the left, while available template categories and templates appear on the right.
### Choose a creation mode
Under **Choose a Creation Mode**, you can select:
| Mode | Best for |
| ----------------------------- | ------------------------------------------------ |
| **Custom Photoshoot** | Full creative control using your own prompt |
| **Template-Based Generation** | Fast product visuals using curated templates |
| **Background Replacement** | Changing the product's environment or background |
If you already know the exact scene you want, use **Custom Photoshoot**. If you want a faster, more structured workflow, use **Template-Based Generation**.
***
## Template-Based Generation
Template-Based Generation lets you select a product and then choose a visual template designed for a specific marketing scenario.
### Step 1: Start a new photoshoot
Open **Template-Based Generation** from the AI Photoshoot home page.
The setup panel appears on the left, while available template categories and templates appear on the right.
 ### Step 2: Select your product
In the **Setup** panel, select **Product**.
The selected product is displayed in the setup panel. The product becomes the visual reference for the generated photos.
If the correct product is not selected, choose the product before selecting the final template so you can preview the workflow with the intended product context.
### Step 3: Choose a template category
The template picker includes categories such as:
* **Studio**
* **In Use**
* **Lifestyle**
* **UGC**
* **Billboard**
* **Front View**
* **Flatlay**
* **Editorial**
* **Composition**
* **Ingredient-Based**
* **Floating**
* **Contextual**
Each category is intended for a different visual outcome.
For example:
* **Studio** works well for clean product photography.
* **In Use** places the product into a realistic usage scenario.
* **Lifestyle** is useful for marketing visuals with a more natural, aspirational setting.
* **UGC** is suited to authentic user-generated-content style imagery.
* **Billboard** is designed for large-scale advertising visuals.
* **Flatlay** works well for top-down product compositions.
* **Editorial** is suited to premium magazine-style product imagery.
### Step 4: Pick a specific template
After selecting a category, choose one of the available templates.
The template cards show the visual concept before generation. In the example screenshot, the **UGC** category contains templates such as:
* **Selfie Holding**
* **Unboxing Moment**
* **Bathroom Shelf**
* **Car Passenger**
* **On the Go**
* **Tutorial Frame**
Select the template that best matches the marketing context you want.
### Step 5: Choose the aspect ratio
AI Photoshoot supports these aspect ratios:
* **1:1**
* **4:5**
* **5:4**
* **4:3**
* **3:4**
* **16:9**
* **9:16**
Choose the ratio based on where you intend to use the image.
A practical rule is to choose the output format before generating. Portrait ratios are useful for vertical placements, while landscape ratios are better suited to wider layouts. Use 1:1 when you want a flexible square asset.
### Step 6: Choose the number of images
You can generate:
* **1** image
* **2** images
* **3** images
* **4** images
Generating multiple images gives you more creative variations to choose from.
### Step 7: Add additional notes
The **Additional notes** field is optional.
Use it when you want to provide extra creative direction, props, wording, or other context that should influence the result.
For example:
> Keep the product clearly visible and use natural lighting with a realistic everyday setting.
Keep notes focused on the outcome you want.
### Step 8: Generate the photoshoot
Once the product, template, aspect ratio, image count, and optional notes are ready, select **Generate Photoshoot**.
Klyra AI generates the requested product visuals and displays them in the results area.
Generation time can vary depending on the selected workflow and current processing load.
***
## Custom Photoshoot
Custom Photoshoot gives you more control over the scene because you describe the desired visual directly.
### Step 1: Open Custom Photoshoot
From the AI Photoshoot home page, select **Custom Photoshoot**.
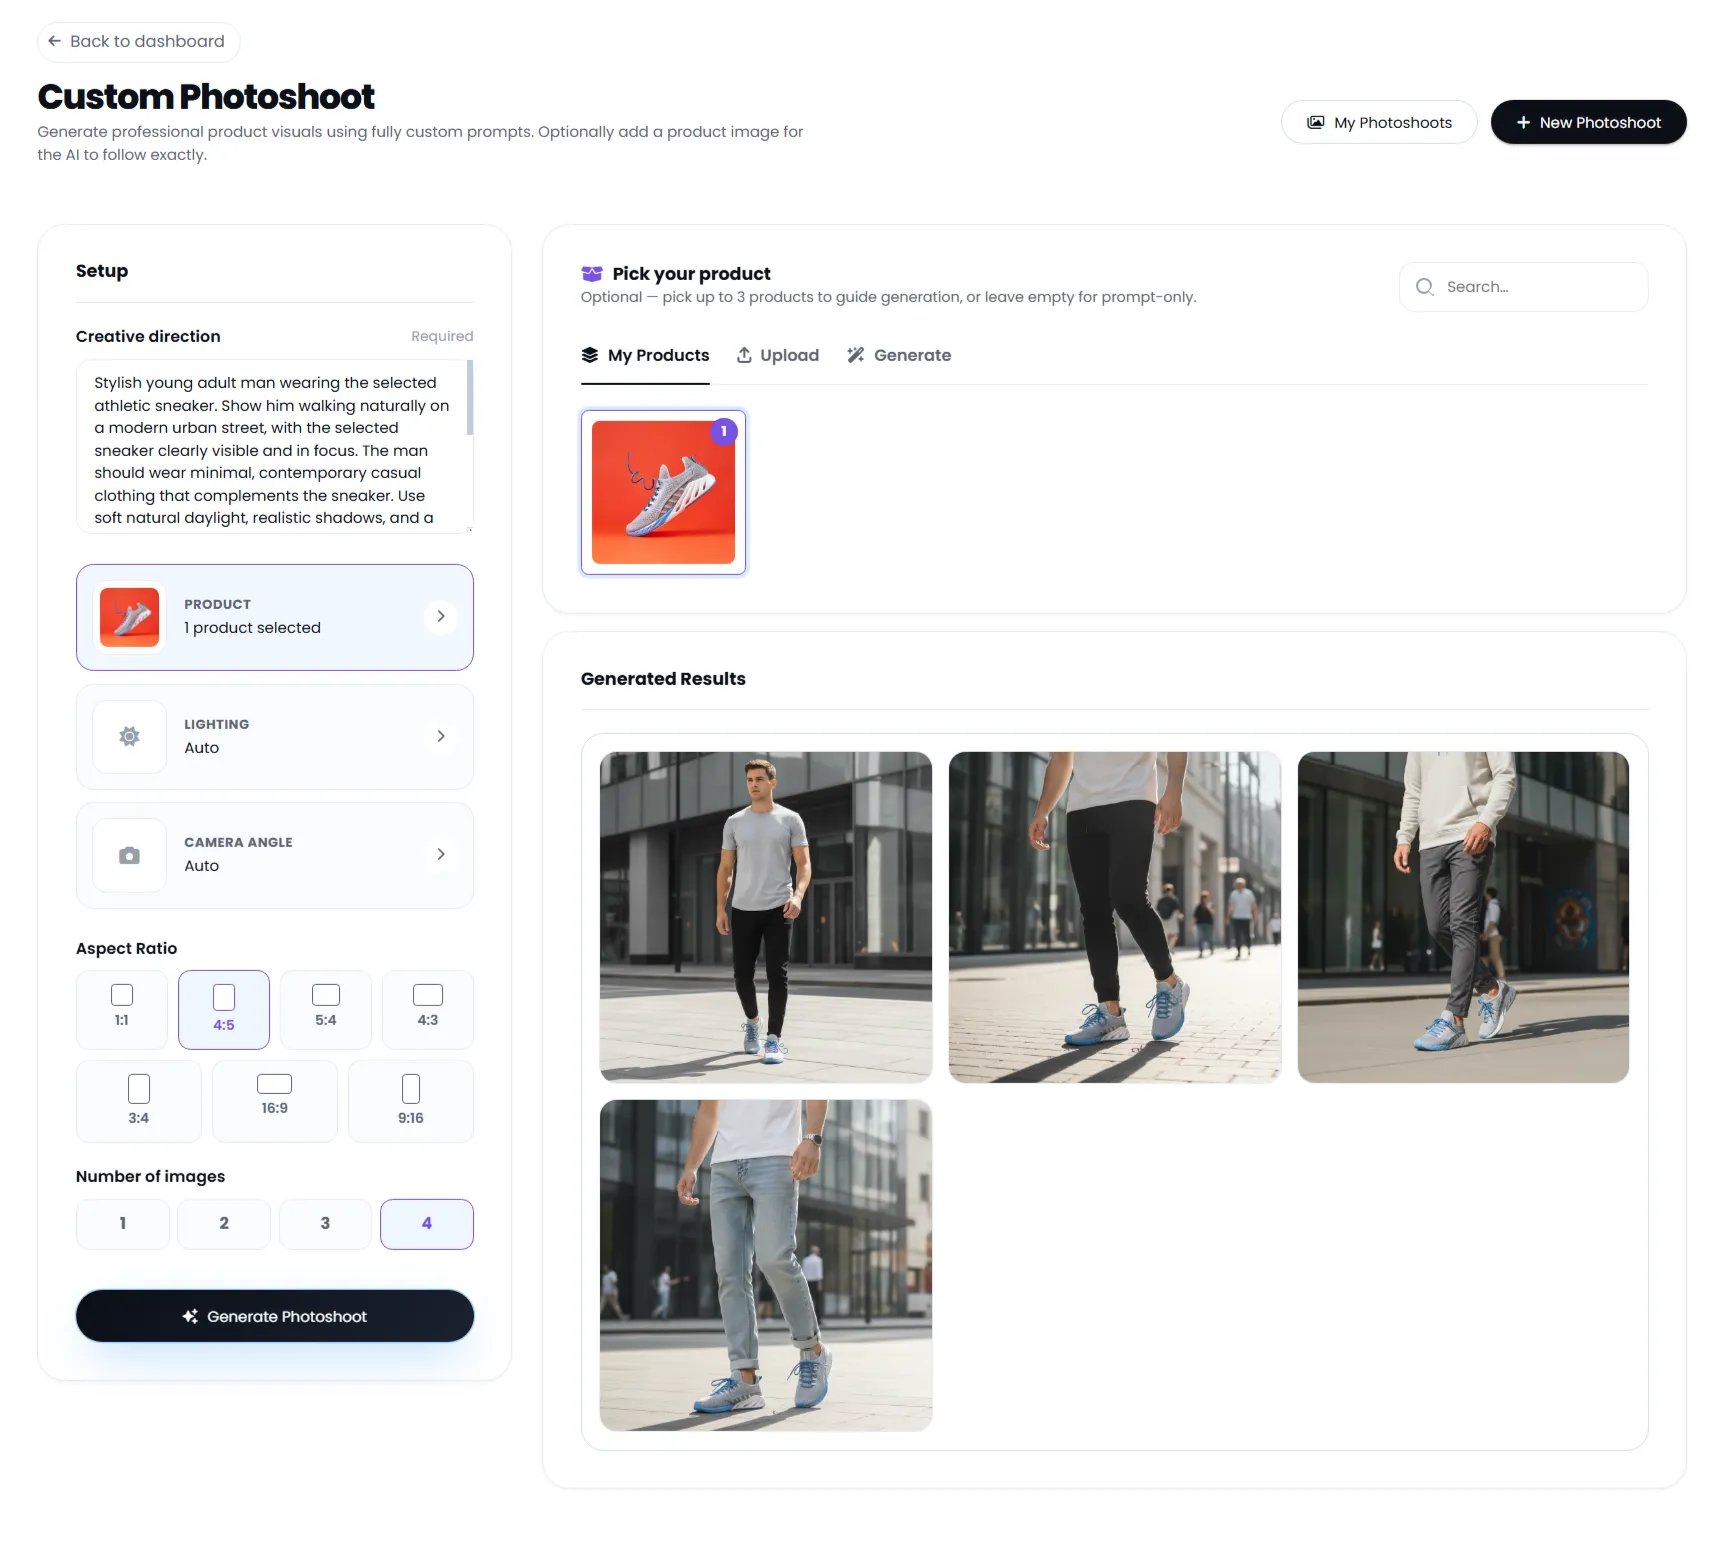
The page is divided into two main areas:
* **Setup** on the left
* **Generated Results** on the right
### Step 2: Select your product
In the **Setup** panel, select **Product**.
The selected product is displayed in the setup panel. The product becomes the visual reference for the generated photos.
If the correct product is not selected, choose the product before selecting the final template so you can preview the workflow with the intended product context.
### Step 3: Choose a template category
The template picker includes categories such as:
* **Studio**
* **In Use**
* **Lifestyle**
* **UGC**
* **Billboard**
* **Front View**
* **Flatlay**
* **Editorial**
* **Composition**
* **Ingredient-Based**
* **Floating**
* **Contextual**
Each category is intended for a different visual outcome.
For example:
* **Studio** works well for clean product photography.
* **In Use** places the product into a realistic usage scenario.
* **Lifestyle** is useful for marketing visuals with a more natural, aspirational setting.
* **UGC** is suited to authentic user-generated-content style imagery.
* **Billboard** is designed for large-scale advertising visuals.
* **Flatlay** works well for top-down product compositions.
* **Editorial** is suited to premium magazine-style product imagery.
### Step 4: Pick a specific template
After selecting a category, choose one of the available templates.
The template cards show the visual concept before generation. In the example screenshot, the **UGC** category contains templates such as:
* **Selfie Holding**
* **Unboxing Moment**
* **Bathroom Shelf**
* **Car Passenger**
* **On the Go**
* **Tutorial Frame**
Select the template that best matches the marketing context you want.
### Step 5: Choose the aspect ratio
AI Photoshoot supports these aspect ratios:
* **1:1**
* **4:5**
* **5:4**
* **4:3**
* **3:4**
* **16:9**
* **9:16**
Choose the ratio based on where you intend to use the image.
A practical rule is to choose the output format before generating. Portrait ratios are useful for vertical placements, while landscape ratios are better suited to wider layouts. Use 1:1 when you want a flexible square asset.
### Step 6: Choose the number of images
You can generate:
* **1** image
* **2** images
* **3** images
* **4** images
Generating multiple images gives you more creative variations to choose from.
### Step 7: Add additional notes
The **Additional notes** field is optional.
Use it when you want to provide extra creative direction, props, wording, or other context that should influence the result.
For example:
> Keep the product clearly visible and use natural lighting with a realistic everyday setting.
Keep notes focused on the outcome you want.
### Step 8: Generate the photoshoot
Once the product, template, aspect ratio, image count, and optional notes are ready, select **Generate Photoshoot**.
Klyra AI generates the requested product visuals and displays them in the results area.
Generation time can vary depending on the selected workflow and current processing load.
***
## Custom Photoshoot
Custom Photoshoot gives you more control over the scene because you describe the desired visual directly.
### Step 1: Open Custom Photoshoot
From the AI Photoshoot home page, select **Custom Photoshoot**.
The page is divided into two main areas:
* **Setup** on the left
* **Generated Results** on the right
 ### Step 2: Write your creative direction
The **Creative direction** field is required.
Describe what you want the generated product photos to show.
A strong creative direction can include:
* Who or what is using the product
* The environment
* The action or pose
* Lighting
* Camera feel
* Mood
* Clothing or styling when relevant
* Product placement
* Important visual constraints
For a footwear product, for example:
> Stylish young adult man wearing the selected athletic sneaker. Show him walking naturally on a modern urban street, with the selected sneaker clearly visible and in focus. Use contemporary casual clothing, soft natural daylight, realistic shadows, and a premium commercial photography look.
When the product is the focus, explicitly tell the AI to keep it visible, recognizable, and in focus. This helps make the generated visual more useful for product marketing.
### Step 3: Select your product
Under **Pick your product**, choose the product that should guide generation.
The interface supports product selection from **My Products** and also provides options to **Upload** or **Generate** a product.
You can select up to three products when the workflow supports multiple product references.
For a single-product campaign, select the product you want to feature.
### Step 4: Configure lighting
Use the **Lighting** control to guide the lighting style.
The screenshot shows the default **Auto** setting.
Use the default when you want Klyra AI to determine suitable lighting automatically.
### Step 5: Configure the camera angle
Use **Camera Angle** to control the visual viewpoint.
The screenshot shows the default **Auto** setting.
Keep it on Auto when your creative direction already describes the desired scene and you want the system to choose an appropriate viewpoint.
### Step 6: Choose the aspect ratio
Select one of the available aspect ratios:
* **1:1**
* **4:5**
* **5:4**
* **4:3**
* **3:4**
* **16:9**
* **9:16**
In the example shown, **4:5** is selected for a portrait-oriented product campaign.
### Step 7: Choose the number of images
Select how many variations you want:
* **1**
* **2**
* **3**
* **4**
In the example screenshot, **4** images are selected, producing four variations in the generated results area.
### Step 8: Generate the photoshoot
When the setup is complete, select **Generate Photoshoot**.
The generated images appear under **Generated Results**.
Review the variations and choose the images that best match your intended campaign or content.
***
## How to write better creative directions
The quality of a custom photoshoot starts with the direction you provide.
A useful structure is:
```text theme={null}
Subject + action + environment + product focus + lighting + visual style
```
For example:
```text theme={null}
A stylish young adult man wearing the selected athletic sneaker,
walking naturally on a modern urban street. Keep the sneaker clearly
visible and in focus. Use soft natural daylight, realistic shadows,
and a premium commercial photography style.
```
### Be specific about the product
Instead of:
> Create a nice shoe photo.
Try:
> Create a premium lifestyle photo featuring the selected athletic sneaker. Keep the sneaker clearly visible and in sharp focus.
### Describe the environment
Instead of:
> Put the product outside.
Try:
> Place the subject on a modern urban street with contemporary buildings, natural pedestrian activity, and realistic daylight.
### Describe the intended visual outcome
Instead of:
> Make it look professional.
Try:
> Use a polished commercial photography aesthetic with realistic lighting, natural shadows, and a clean premium composition.
Avoid adding unnecessary instructions that do not contribute to the desired visual. Clear, focused directions are generally easier to translate into a consistent product image.
***
## Review generated results
After generation, the results appear in the **Generated Results** section.
For Custom Photoshoot, multiple variations can be displayed together so you can compare them quickly.
Look for:
* Accurate product appearance
* Clear product visibility
* Natural positioning
* Realistic lighting
* Appropriate composition
* Consistency with your creative direction
* Suitability for your intended marketing channel
If the result does not match your intent, adjust the creative direction or generation settings and create another photoshoot.
***
## Manage your photoshoots
The AI Photoshoot home page includes a **Manage Your Assets** section with shortcuts for:
* **My Products**
* **Edit Photos**
* **My Photoshoots**
Select **My Photoshoots** to browse previously generated photoshoots.
### Step 2: Write your creative direction
The **Creative direction** field is required.
Describe what you want the generated product photos to show.
A strong creative direction can include:
* Who or what is using the product
* The environment
* The action or pose
* Lighting
* Camera feel
* Mood
* Clothing or styling when relevant
* Product placement
* Important visual constraints
For a footwear product, for example:
> Stylish young adult man wearing the selected athletic sneaker. Show him walking naturally on a modern urban street, with the selected sneaker clearly visible and in focus. Use contemporary casual clothing, soft natural daylight, realistic shadows, and a premium commercial photography look.
When the product is the focus, explicitly tell the AI to keep it visible, recognizable, and in focus. This helps make the generated visual more useful for product marketing.
### Step 3: Select your product
Under **Pick your product**, choose the product that should guide generation.
The interface supports product selection from **My Products** and also provides options to **Upload** or **Generate** a product.
You can select up to three products when the workflow supports multiple product references.
For a single-product campaign, select the product you want to feature.
### Step 4: Configure lighting
Use the **Lighting** control to guide the lighting style.
The screenshot shows the default **Auto** setting.
Use the default when you want Klyra AI to determine suitable lighting automatically.
### Step 5: Configure the camera angle
Use **Camera Angle** to control the visual viewpoint.
The screenshot shows the default **Auto** setting.
Keep it on Auto when your creative direction already describes the desired scene and you want the system to choose an appropriate viewpoint.
### Step 6: Choose the aspect ratio
Select one of the available aspect ratios:
* **1:1**
* **4:5**
* **5:4**
* **4:3**
* **3:4**
* **16:9**
* **9:16**
In the example shown, **4:5** is selected for a portrait-oriented product campaign.
### Step 7: Choose the number of images
Select how many variations you want:
* **1**
* **2**
* **3**
* **4**
In the example screenshot, **4** images are selected, producing four variations in the generated results area.
### Step 8: Generate the photoshoot
When the setup is complete, select **Generate Photoshoot**.
The generated images appear under **Generated Results**.
Review the variations and choose the images that best match your intended campaign or content.
***
## How to write better creative directions
The quality of a custom photoshoot starts with the direction you provide.
A useful structure is:
```text theme={null}
Subject + action + environment + product focus + lighting + visual style
```
For example:
```text theme={null}
A stylish young adult man wearing the selected athletic sneaker,
walking naturally on a modern urban street. Keep the sneaker clearly
visible and in focus. Use soft natural daylight, realistic shadows,
and a premium commercial photography style.
```
### Be specific about the product
Instead of:
> Create a nice shoe photo.
Try:
> Create a premium lifestyle photo featuring the selected athletic sneaker. Keep the sneaker clearly visible and in sharp focus.
### Describe the environment
Instead of:
> Put the product outside.
Try:
> Place the subject on a modern urban street with contemporary buildings, natural pedestrian activity, and realistic daylight.
### Describe the intended visual outcome
Instead of:
> Make it look professional.
Try:
> Use a polished commercial photography aesthetic with realistic lighting, natural shadows, and a clean premium composition.
Avoid adding unnecessary instructions that do not contribute to the desired visual. Clear, focused directions are generally easier to translate into a consistent product image.
***
## Review generated results
After generation, the results appear in the **Generated Results** section.
For Custom Photoshoot, multiple variations can be displayed together so you can compare them quickly.
Look for:
* Accurate product appearance
* Clear product visibility
* Natural positioning
* Realistic lighting
* Appropriate composition
* Consistency with your creative direction
* Suitability for your intended marketing channel
If the result does not match your intent, adjust the creative direction or generation settings and create another photoshoot.
***
## Manage your photoshoots
The AI Photoshoot home page includes a **Manage Your Assets** section with shortcuts for:
* **My Products**
* **Edit Photos**
* **My Photoshoots**
Select **My Photoshoots** to browse previously generated photoshoots.
 ### Filter your photoshoots
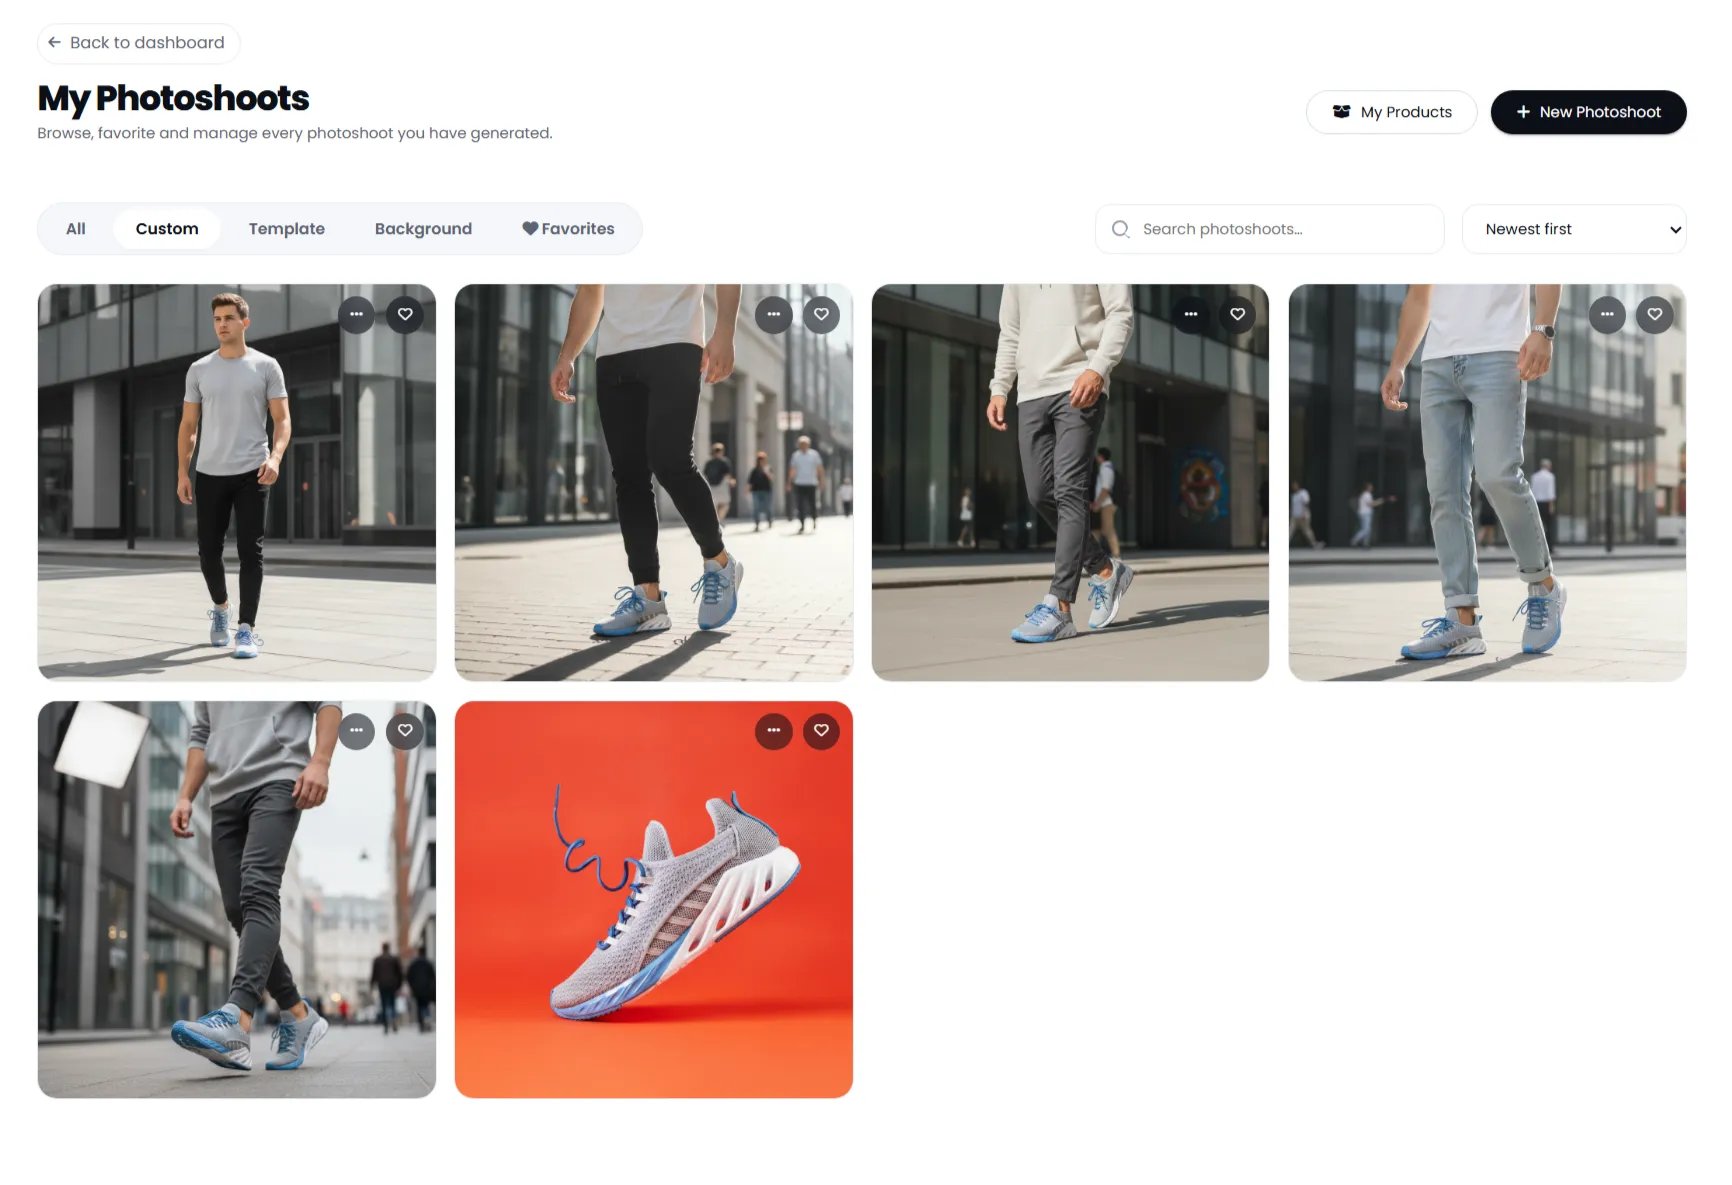
The My Photoshoots page provides filters for:
* **All**
* **Custom**
* **Template**
* **Background**
* **Favorites**
This makes it easier to find a specific type of generated visual.
### Search your photoshoots
Use the search field to find photoshoots quickly.
You can also change the sort order, with **Newest first** available in the current interface.
### Favorite important results
Photoshoots can be marked as favorites.
Use favorites to keep frequently used or campaign-ready visuals easy to find.
***
## Recommended workflow
For most product campaigns, this workflow is a good starting point:
Make sure the product image is available in your product library or upload the product you want to use.
Use Template-Based Generation for speed and consistency, or Custom Photoshoot when you need a specific scene.
Choose an aspect ratio that matches the channel where you plan to use the image.
Start with 2 to 4 images when you want options to compare.
Check product accuracy, composition, lighting, and overall marketing suitability.
Keep strong results in My Photoshoots and mark important assets as favorites.
## Template vs. Custom Photoshoot
| | Template-Based Generation | Custom Photoshoot |
| ------------------- | --------------------------------------- | ---------------------------------------- |
| Setup speed | Fast | More deliberate |
| Creative control | Guided | High |
| Best for | Repeatable visual concepts | Specific scenes and campaigns |
| Input | Product + template + settings | Creative direction + product + settings |
| Variations | Yes | Yes |
| Best starting point | When you want a proven visual structure | When you already know the scene you want |
## Tips for better product photos
If the product is important to the campaign, make its visibility a clear part of your creative direction.
Choose a portrait, square, or landscape ratio based on the placement where the final image will be used.
Multiple outputs give you more options and make it easier to select the strongest composition.
Templates are useful when you need a repeatable visual style across a product catalog or campaign.
When the exact environment, subject, action, or mood matters, use a detailed creative direction instead of relying only on a template.
## Common issues
### The generated image does not look like the selected product
Make the product reference clear and strengthen the product-specific instruction in your creative direction.
For example:
> Keep the selected sneaker's shape, colors, materials, and overall design consistent with the product reference.
### The product is difficult to see
Specify that the product should be clearly visible and in focus. You can also adjust the scene description so the product is not obscured by people, props, or the environment.
### The scene is not what you expected
Use Custom Photoshoot and describe the environment, subject, action, lighting, and composition more specifically.
### You need a different format
Create another photoshoot using the required aspect ratio. Choose the output format before generation whenever possible.
### You want more options
Increase the number of images from 1 to 2, 3, or 4 and compare the generated variations.
## AI Photoshoot at a glance
| Feature | Available |
| ------------------------------ | --------- |
| Custom creative direction | Yes |
| Template-based generation | Yes |
| Background replacement mode | Yes |
| Product selection | Yes |
| Product upload | Yes |
| Multiple images per generation | Yes |
| Aspect ratio selection | Yes |
| Lighting control | Yes |
| Camera angle control | Yes |
| Search photoshoots | Yes |
| Favorites | Yes |
| Photoshoot history | Yes |
## Summary
AI Photoshoot turns a product reference into a set of polished visual assets using either guided templates or your own creative direction.
Use **Template-Based Generation** when you want speed and a structured visual concept. Use **Custom Photoshoot** when you need more control over the scene and campaign direction.
Once your images are generated, use **My Photoshoots** to search, filter, favorite, and manage your visual assets.
### Filter your photoshoots
The My Photoshoots page provides filters for:
* **All**
* **Custom**
* **Template**
* **Background**
* **Favorites**
This makes it easier to find a specific type of generated visual.
### Search your photoshoots
Use the search field to find photoshoots quickly.
You can also change the sort order, with **Newest first** available in the current interface.
### Favorite important results
Photoshoots can be marked as favorites.
Use favorites to keep frequently used or campaign-ready visuals easy to find.
***
## Recommended workflow
For most product campaigns, this workflow is a good starting point:
Make sure the product image is available in your product library or upload the product you want to use.
Use Template-Based Generation for speed and consistency, or Custom Photoshoot when you need a specific scene.
Choose an aspect ratio that matches the channel where you plan to use the image.
Start with 2 to 4 images when you want options to compare.
Check product accuracy, composition, lighting, and overall marketing suitability.
Keep strong results in My Photoshoots and mark important assets as favorites.
## Template vs. Custom Photoshoot
| | Template-Based Generation | Custom Photoshoot |
| ------------------- | --------------------------------------- | ---------------------------------------- |
| Setup speed | Fast | More deliberate |
| Creative control | Guided | High |
| Best for | Repeatable visual concepts | Specific scenes and campaigns |
| Input | Product + template + settings | Creative direction + product + settings |
| Variations | Yes | Yes |
| Best starting point | When you want a proven visual structure | When you already know the scene you want |
## Tips for better product photos
If the product is important to the campaign, make its visibility a clear part of your creative direction.
Choose a portrait, square, or landscape ratio based on the placement where the final image will be used.
Multiple outputs give you more options and make it easier to select the strongest composition.
Templates are useful when you need a repeatable visual style across a product catalog or campaign.
When the exact environment, subject, action, or mood matters, use a detailed creative direction instead of relying only on a template.
## Common issues
### The generated image does not look like the selected product
Make the product reference clear and strengthen the product-specific instruction in your creative direction.
For example:
> Keep the selected sneaker's shape, colors, materials, and overall design consistent with the product reference.
### The product is difficult to see
Specify that the product should be clearly visible and in focus. You can also adjust the scene description so the product is not obscured by people, props, or the environment.
### The scene is not what you expected
Use Custom Photoshoot and describe the environment, subject, action, lighting, and composition more specifically.
### You need a different format
Create another photoshoot using the required aspect ratio. Choose the output format before generation whenever possible.
### You want more options
Increase the number of images from 1 to 2, 3, or 4 and compare the generated variations.
## AI Photoshoot at a glance
| Feature | Available |
| ------------------------------ | --------- |
| Custom creative direction | Yes |
| Template-based generation | Yes |
| Background replacement mode | Yes |
| Product selection | Yes |
| Product upload | Yes |
| Multiple images per generation | Yes |
| Aspect ratio selection | Yes |
| Lighting control | Yes |
| Camera angle control | Yes |
| Search photoshoots | Yes |
| Favorites | Yes |
| Photoshoot history | Yes |
## Summary
AI Photoshoot turns a product reference into a set of polished visual assets using either guided templates or your own creative direction.
Use **Template-Based Generation** when you want speed and a structured visual concept. Use **Custom Photoshoot** when you need more control over the scene and campaign direction.
Once your images are generated, use **My Photoshoots** to search, filter, favorite, and manage your visual assets.