> ## Documentation Index
> Fetch the complete documentation index at: https://docs.klyra.ai/llms.txt
> Use this file to discover all available pages before exploring further.
# Ai image generator
# AI Image Studio
AI Image Studio is Klyra AI's image workspace for creating new images and transforming existing ones. You can describe an image, choose an AI provider, generate a result, and continue working from the same workspace.
This tutorial covers the complete AI Image Studio editing toolkit, including 12 image-editing workflows, along with image generation and Gallery.
The screenshots in this guide reflect the current AI Image Studio interface and the workflows tested during product verification. Provider availability and output behavior may change as Klyra AI updates its integrations.
## 1. Start with AI Image Studio
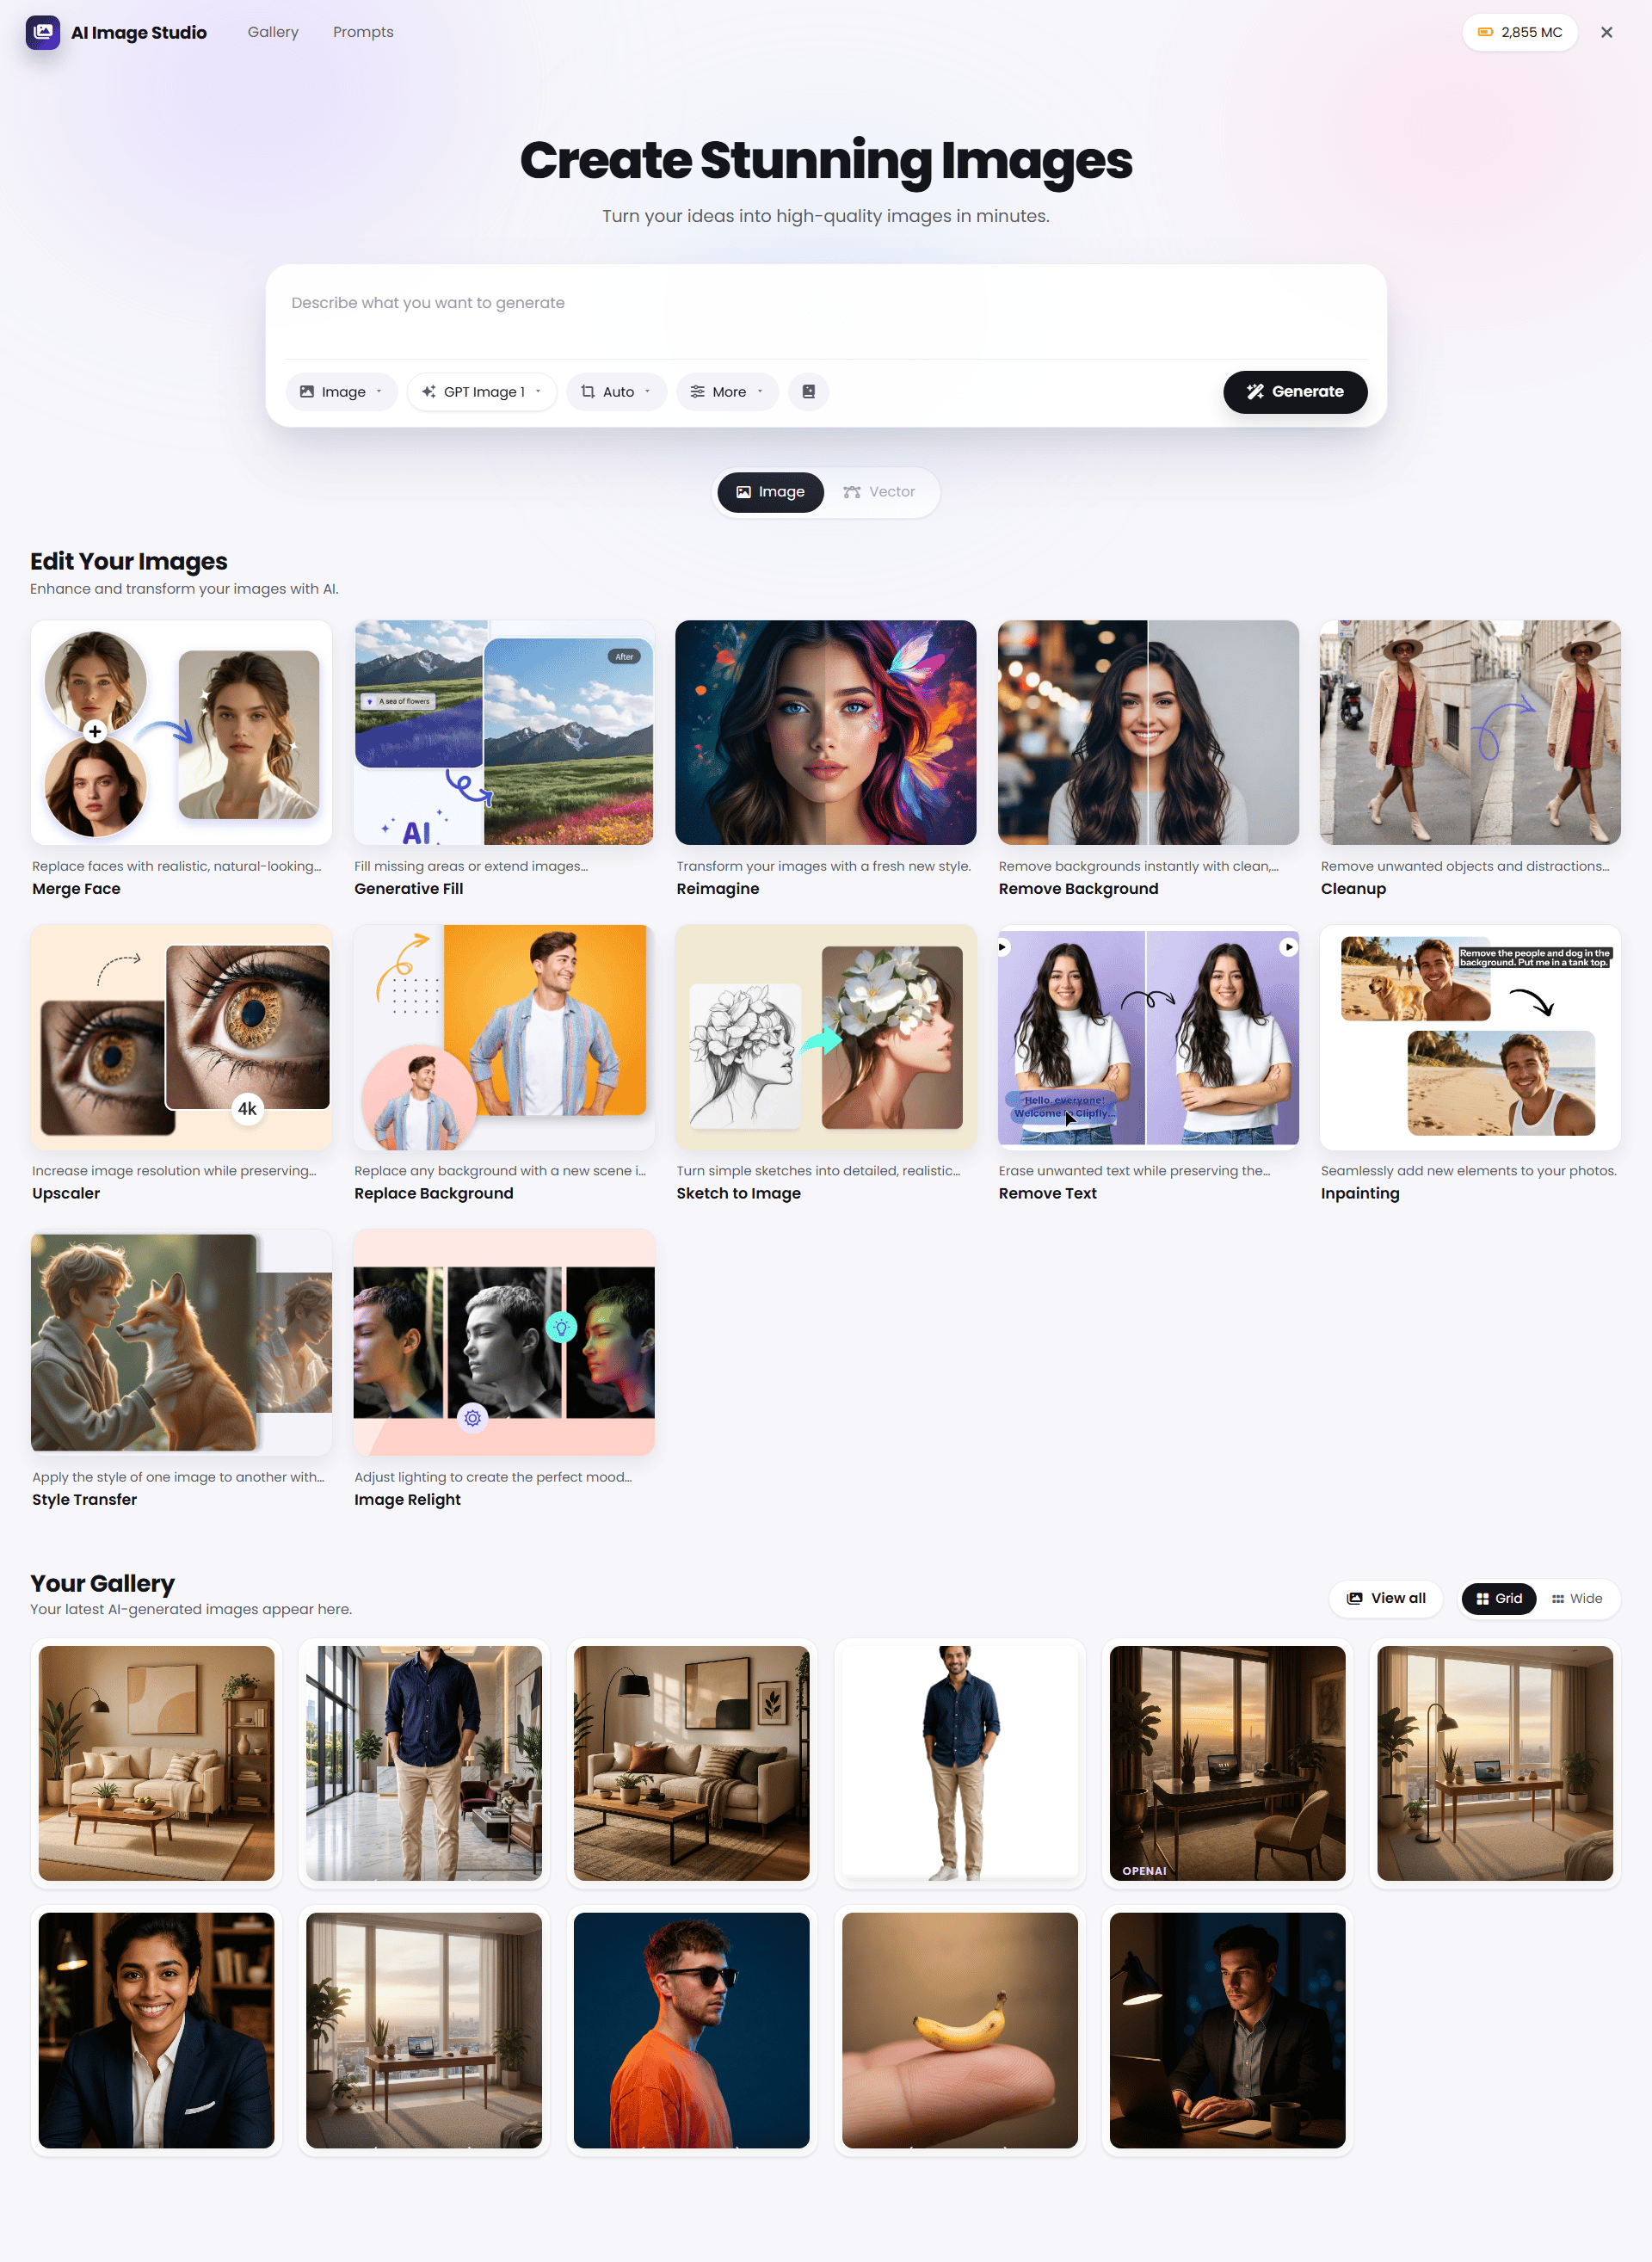
Open **AI Image Studio** from Klyra AI. The main workspace combines image creation, editing shortcuts, and your recent Gallery in one place.
 ### What you can do from the workspace
The workspace gives you access to:
* A prompt composer for describing the image you want to create.
* Image generation controls such as the generation mode, model, aspect ratio, and additional options.
* A set of image editing workflows.
* A Gallery area for recently generated images.
* A dedicated Gallery view for browsing and managing generated images.
The editing area currently includes workflows such as Merge Face, Generative Fill, Reimagine, Remove Background, Cleanup, Upscaler, Replace Background, Sketch to Image, Remove Text, Inpainting, Style Transfer, and Image Relight.
## 2. Generate an image
Image generation is the starting point when you want to create a new visual from a description.
### What you can do from the workspace
The workspace gives you access to:
* A prompt composer for describing the image you want to create.
* Image generation controls such as the generation mode, model, aspect ratio, and additional options.
* A set of image editing workflows.
* A Gallery area for recently generated images.
* A dedicated Gallery view for browsing and managing generated images.
The editing area currently includes workflows such as Merge Face, Generative Fill, Reimagine, Remove Background, Cleanup, Upscaler, Replace Background, Sketch to Image, Remove Text, Inpainting, Style Transfer, and Image Relight.
## 2. Generate an image
Image generation is the starting point when you want to create a new visual from a description.
 ### Step 1: Describe what you want
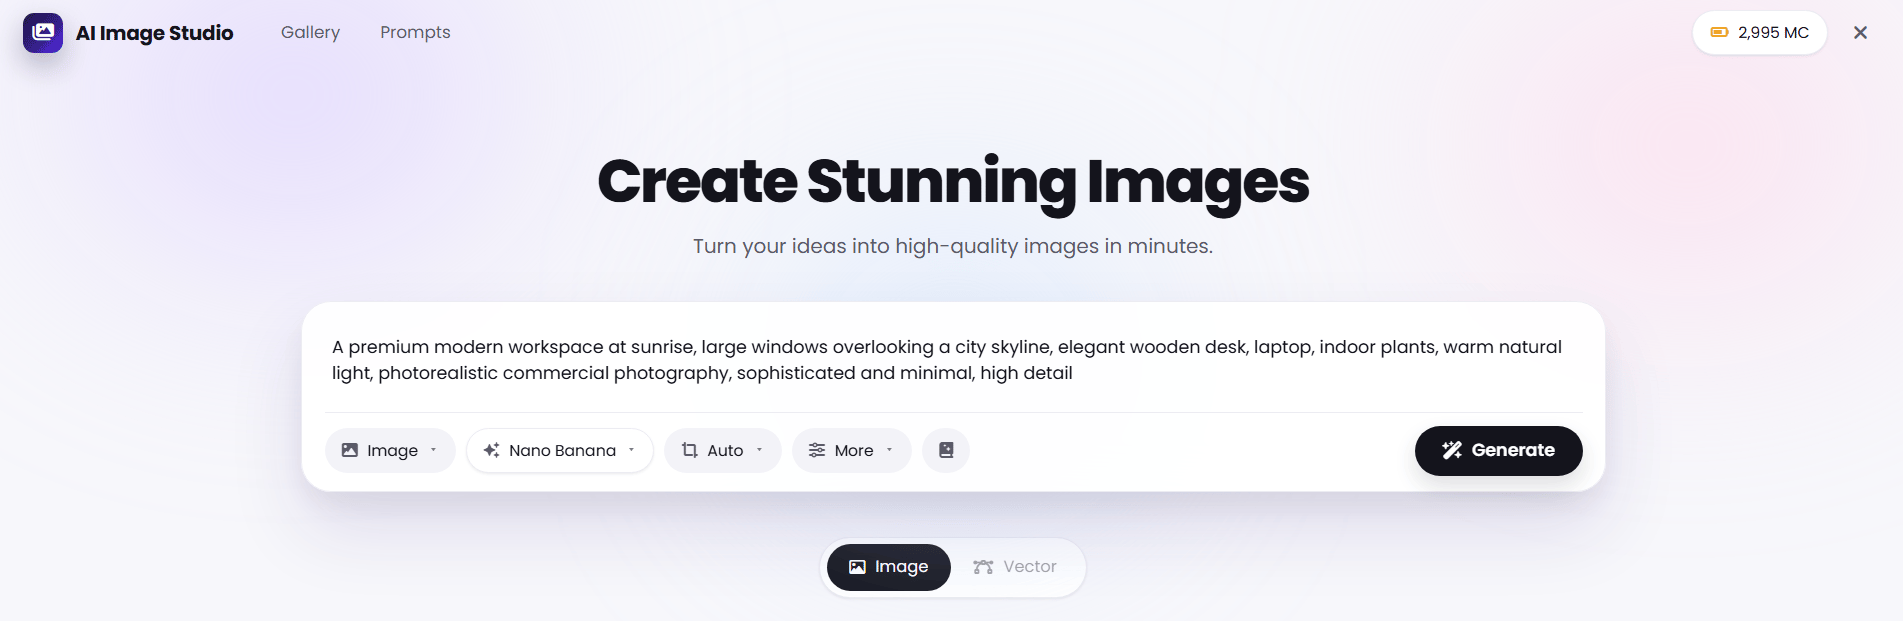
Enter a clear description in the prompt field.
A useful prompt normally describes:
* The subject
* The environment
* The visual style
* Lighting
* Composition
* Important details that should remain visible
For example:
> A premium modern workspace at sunrise, large windows overlooking a city skyline, elegant wooden desk, laptop, indoor plants, warm natural light, photorealistic commercial photography, sophisticated and minimal, high detail.
### Step 2: Choose the image mode
The composer includes an **Image** mode for image generation.
### Step 3: Choose a model
Select the model you want to use from the model selector. The workspace includes models from providers such as Google and OpenAI.
Model availability and the exact model list can change as Klyra AI adds or updates provider integrations.
### Step 4: Choose the aspect ratio
The composer provides an aspect-ratio control. **Auto** can be used when you want the system to determine an appropriate output format.
### Step 5: Use additional controls when needed
Use **More** when you need additional generation controls. Keep the prompt focused first, then add extra controls when they provide a clear benefit.
### Step 6: Generate
Click **Generate** to create the image.
The amount displayed by the interface is the media capacity cost for that generation. Actual cost can depend on the selected model and configuration.
## 3. Review and reuse generated images
After generation, your results can be accessed from the Gallery.
The workspace also shows recent images directly on the AI Image Studio home screen, making it easy to revisit your latest work without leaving the creation experience.
## 4. Use the Gallery
The Gallery is the central place to browse and revisit generated images.
### Step 1: Describe what you want
Enter a clear description in the prompt field.
A useful prompt normally describes:
* The subject
* The environment
* The visual style
* Lighting
* Composition
* Important details that should remain visible
For example:
> A premium modern workspace at sunrise, large windows overlooking a city skyline, elegant wooden desk, laptop, indoor plants, warm natural light, photorealistic commercial photography, sophisticated and minimal, high detail.
### Step 2: Choose the image mode
The composer includes an **Image** mode for image generation.
### Step 3: Choose a model
Select the model you want to use from the model selector. The workspace includes models from providers such as Google and OpenAI.
Model availability and the exact model list can change as Klyra AI adds or updates provider integrations.
### Step 4: Choose the aspect ratio
The composer provides an aspect-ratio control. **Auto** can be used when you want the system to determine an appropriate output format.
### Step 5: Use additional controls when needed
Use **More** when you need additional generation controls. Keep the prompt focused first, then add extra controls when they provide a clear benefit.
### Step 6: Generate
Click **Generate** to create the image.
The amount displayed by the interface is the media capacity cost for that generation. Actual cost can depend on the selected model and configuration.
## 3. Review and reuse generated images
After generation, your results can be accessed from the Gallery.
The workspace also shows recent images directly on the AI Image Studio home screen, making it easy to revisit your latest work without leaving the creation experience.
## 4. Use the Gallery
The Gallery is the central place to browse and revisit generated images.
 ### Search your images
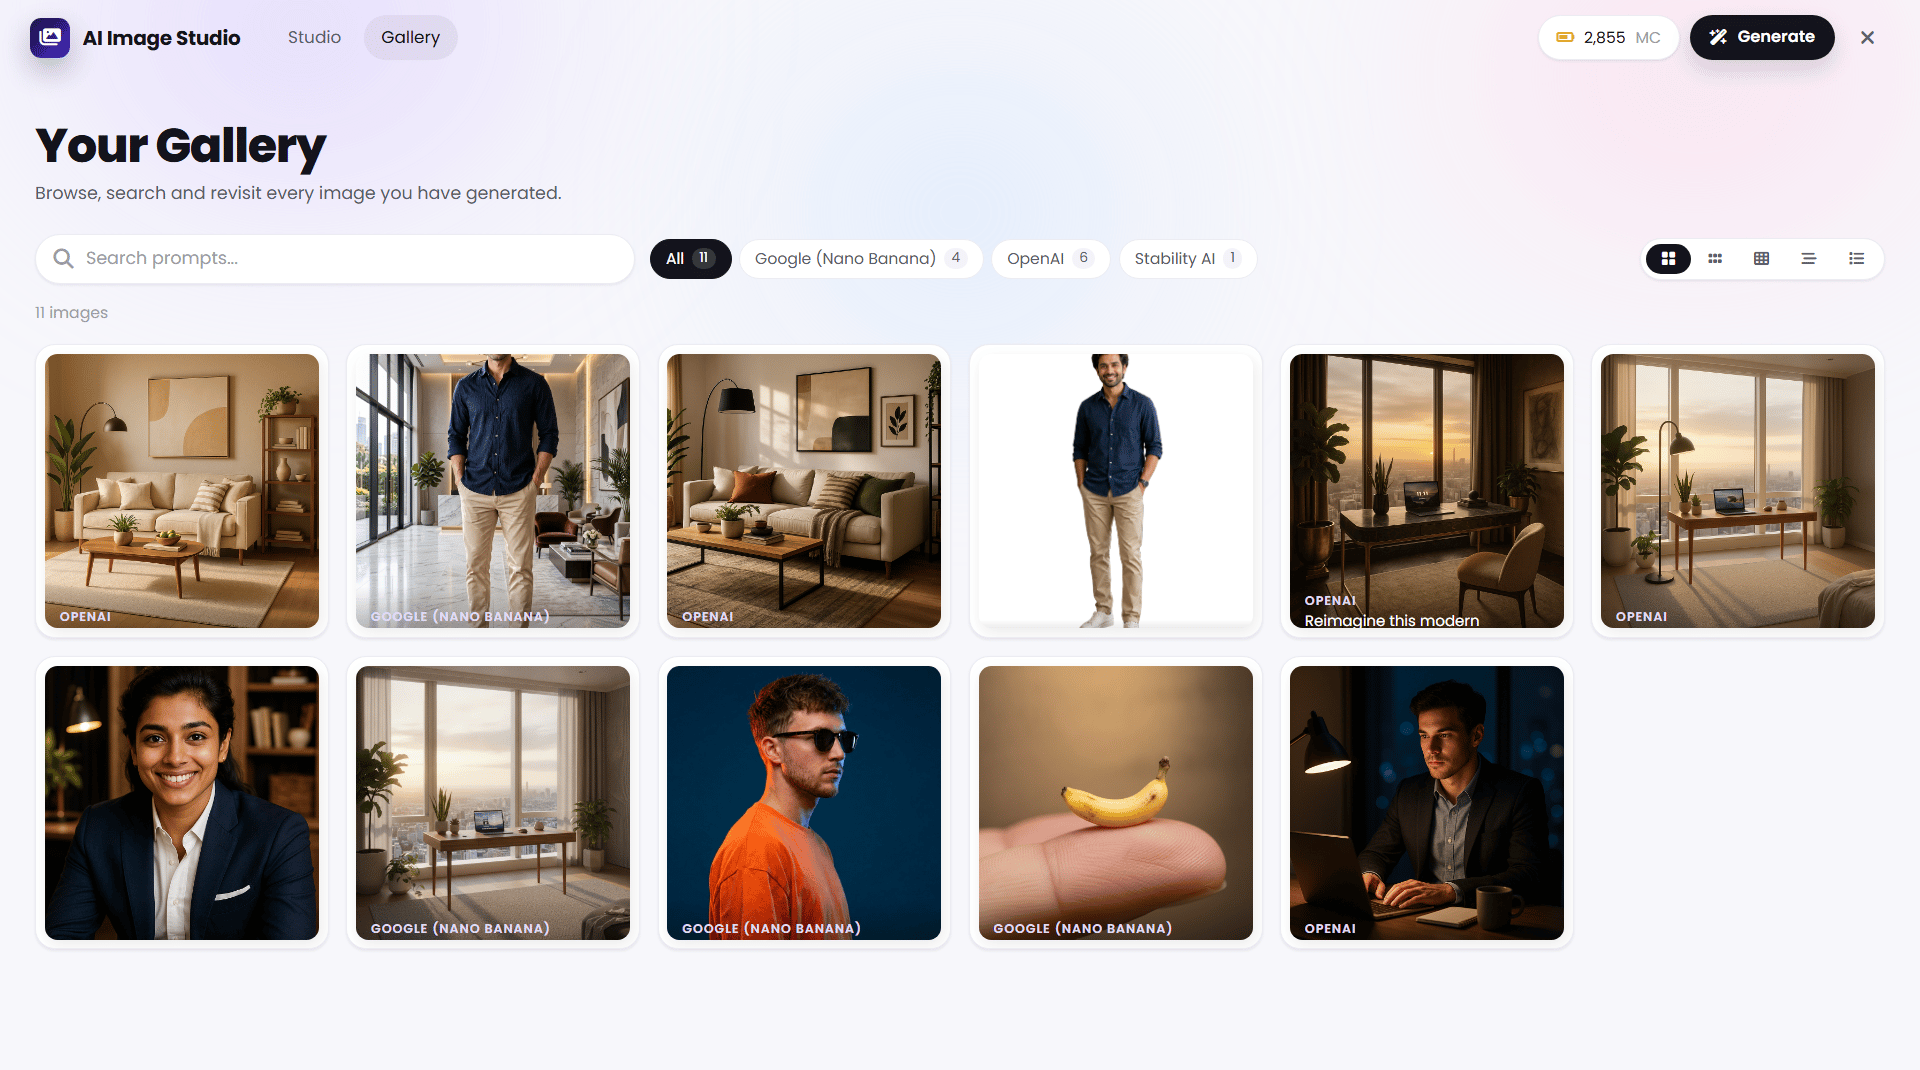
Use the search field to find images by their associated prompt information.
### Filter by provider
The Gallery includes provider filters such as:
* All
* OpenAI
* Google (Nano Banana)
* Stability AI
The counts next to the filters indicate how many images are available for each provider.
### Change the Gallery layout
The Gallery provides multiple layout controls so you can choose how your images are displayed. The interface exposes five view options through the view control.
### Open an image
Hover over an image and use the available actions to:
* Download the image
* View the image
* Delete the image
Use **View** when you want to inspect an individual result before deciding what to do with it.
## 5. The 12 AI Image Studio editing features
AI Image Studio includes 12 dedicated image-editing workflows. Each workflow follows the same core pattern: upload an image, choose a provider, add instructions when available, generate, review, and download the result.
The 12 editing features covered in this guide are:
1. Merge Face
2. Generative Fill
3. Reimagine
4. Remove Background
5. Cleanup
6. Upscaler
7. Replace Background
8. Sketch to Image
9. Remove Text
10. Inpainting
11. Style Transfer
12. Image Relight
Provider availability and output behavior can change as Klyra AI updates its model integrations. The instructions below use the current AI Image Studio interface and the workflows tested for this tutorial.
## 6. Merge Face
Merge Face lets you swap or blend a face between two images.
### Search your images
Use the search field to find images by their associated prompt information.
### Filter by provider
The Gallery includes provider filters such as:
* All
* OpenAI
* Google (Nano Banana)
* Stability AI
The counts next to the filters indicate how many images are available for each provider.
### Change the Gallery layout
The Gallery provides multiple layout controls so you can choose how your images are displayed. The interface exposes five view options through the view control.
### Open an image
Hover over an image and use the available actions to:
* Download the image
* View the image
* Delete the image
Use **View** when you want to inspect an individual result before deciding what to do with it.
## 5. The 12 AI Image Studio editing features
AI Image Studio includes 12 dedicated image-editing workflows. Each workflow follows the same core pattern: upload an image, choose a provider, add instructions when available, generate, review, and download the result.
The 12 editing features covered in this guide are:
1. Merge Face
2. Generative Fill
3. Reimagine
4. Remove Background
5. Cleanup
6. Upscaler
7. Replace Background
8. Sketch to Image
9. Remove Text
10. Inpainting
11. Style Transfer
12. Image Relight
Provider availability and output behavior can change as Klyra AI updates its model integrations. The instructions below use the current AI Image Studio interface and the workflows tested for this tutorial.
## 6. Merge Face
Merge Face lets you swap or blend a face between two images.
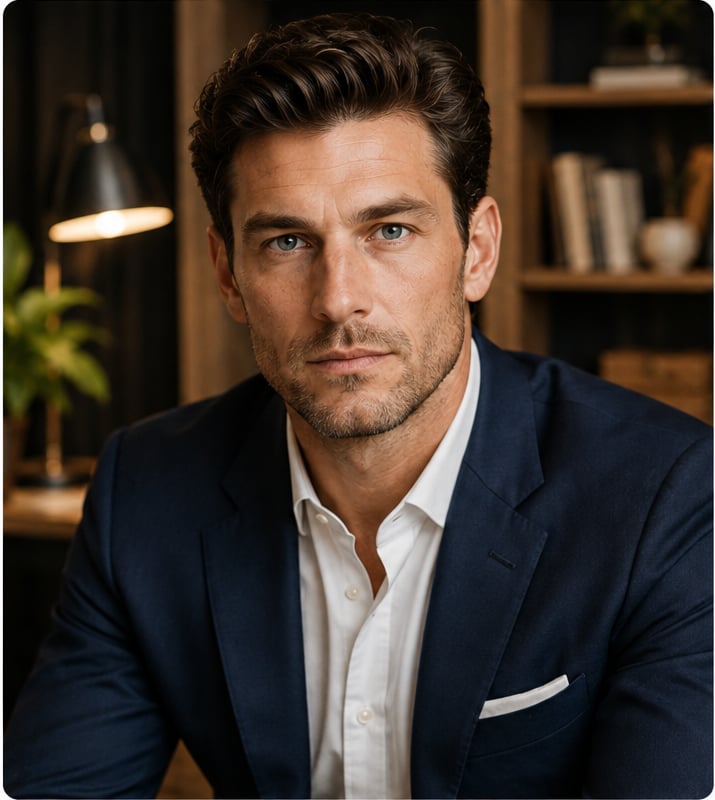
 ### Step 1: Upload the main image
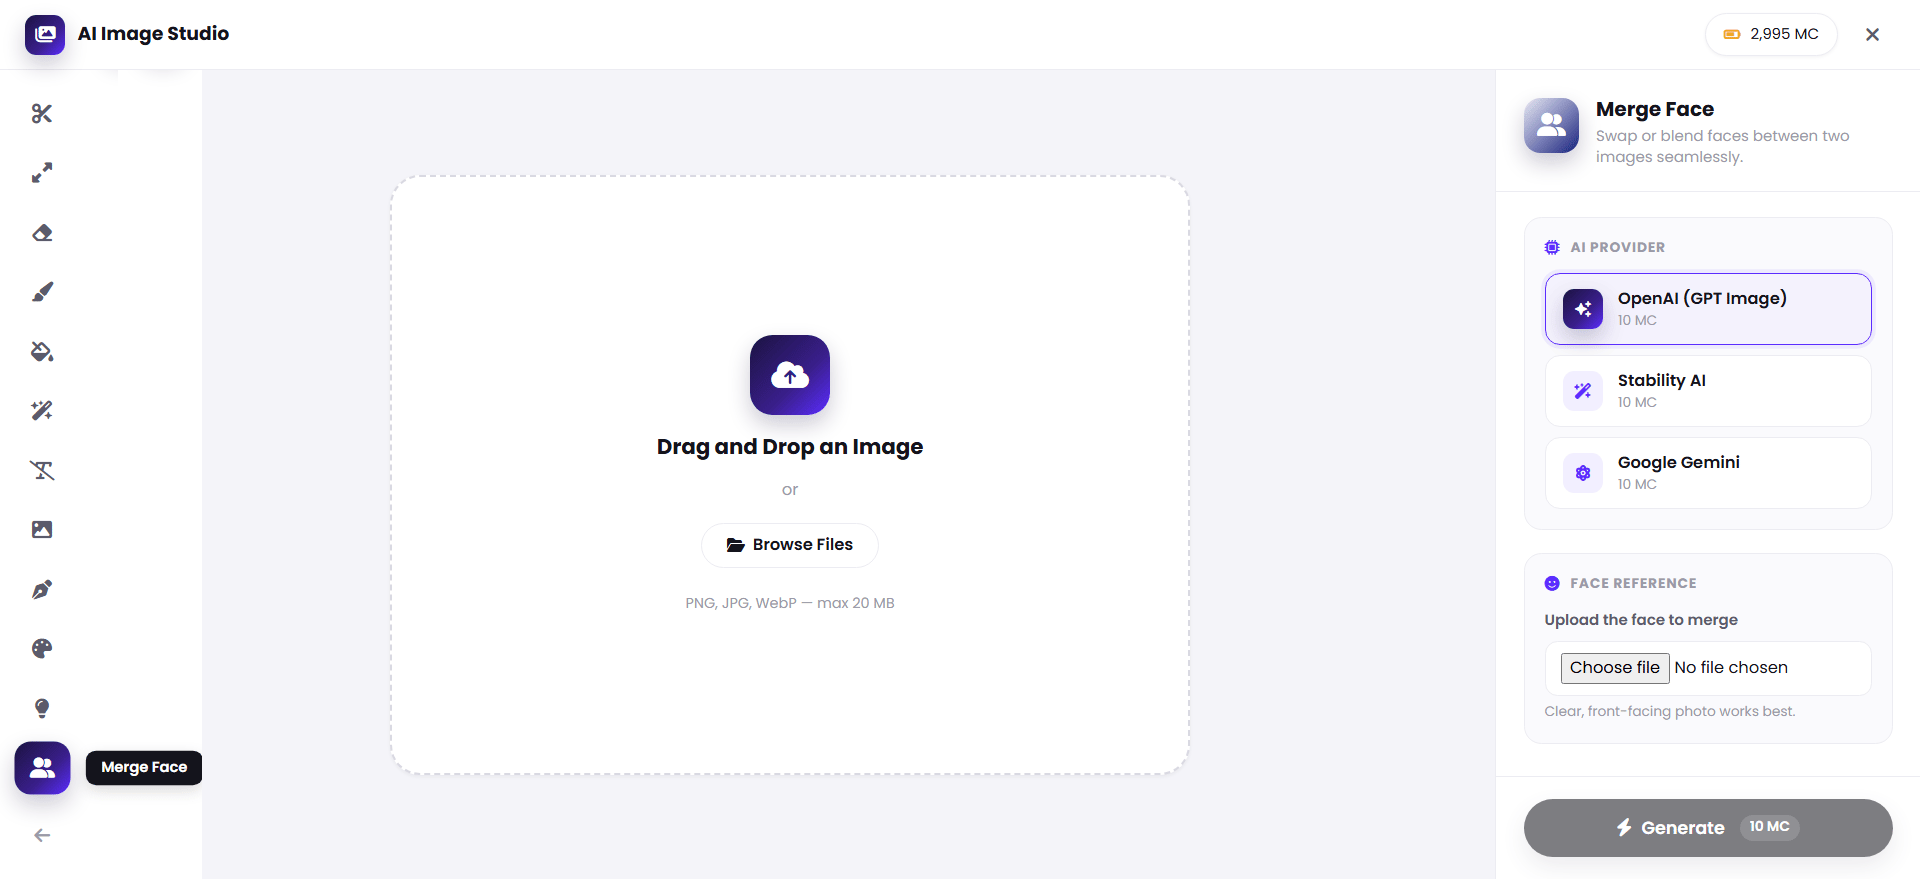
Use the main upload area to add the image you want to edit. You can drag and drop an image or select **Browse Files**.
The upload interface accepts:
* PNG
* JPG
* WebP
* Maximum file size: **20 MB**
### Step 1: Upload the main image
Use the main upload area to add the image you want to edit. You can drag and drop an image or select **Browse Files**.
The upload interface accepts:
* PNG
* JPG
* WebP
* Maximum file size: **20 MB**
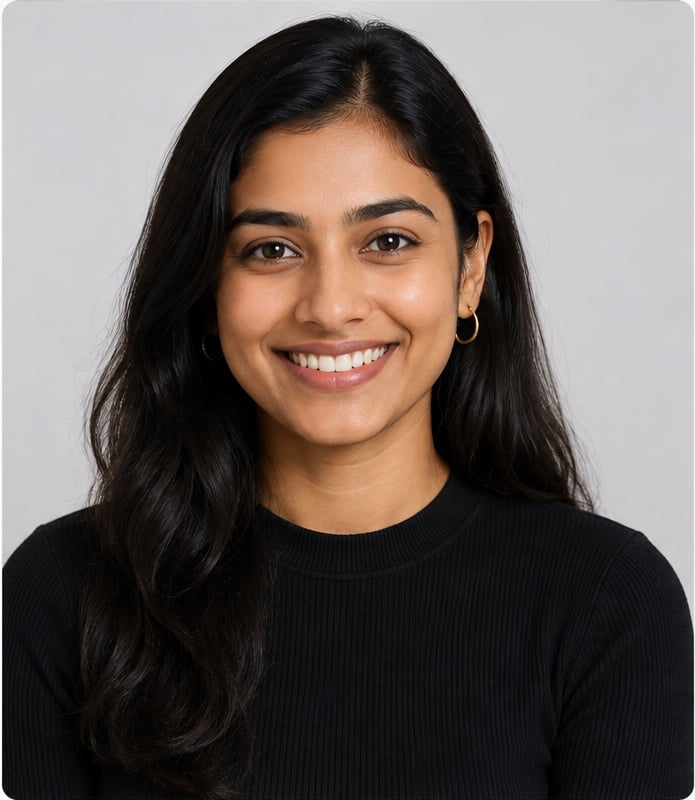
 ### Step 2: Add the face reference
In **Face Reference**, select **Choose file** and upload the face you want to merge. A clear, front-facing reference works best.
### Step 2: Add the face reference
In **Face Reference**, select **Choose file** and upload the face you want to merge. A clear, front-facing reference works best.
 ### Step 3: Choose an AI provider
The interface provides:
* OpenAI (GPT Image)
* Stability AI
* Google Gemini
### Step 4: Generate
Click **Generate** to swap or blend a face between two given images. This request consumes **10 MC** (AI Media Capacity).
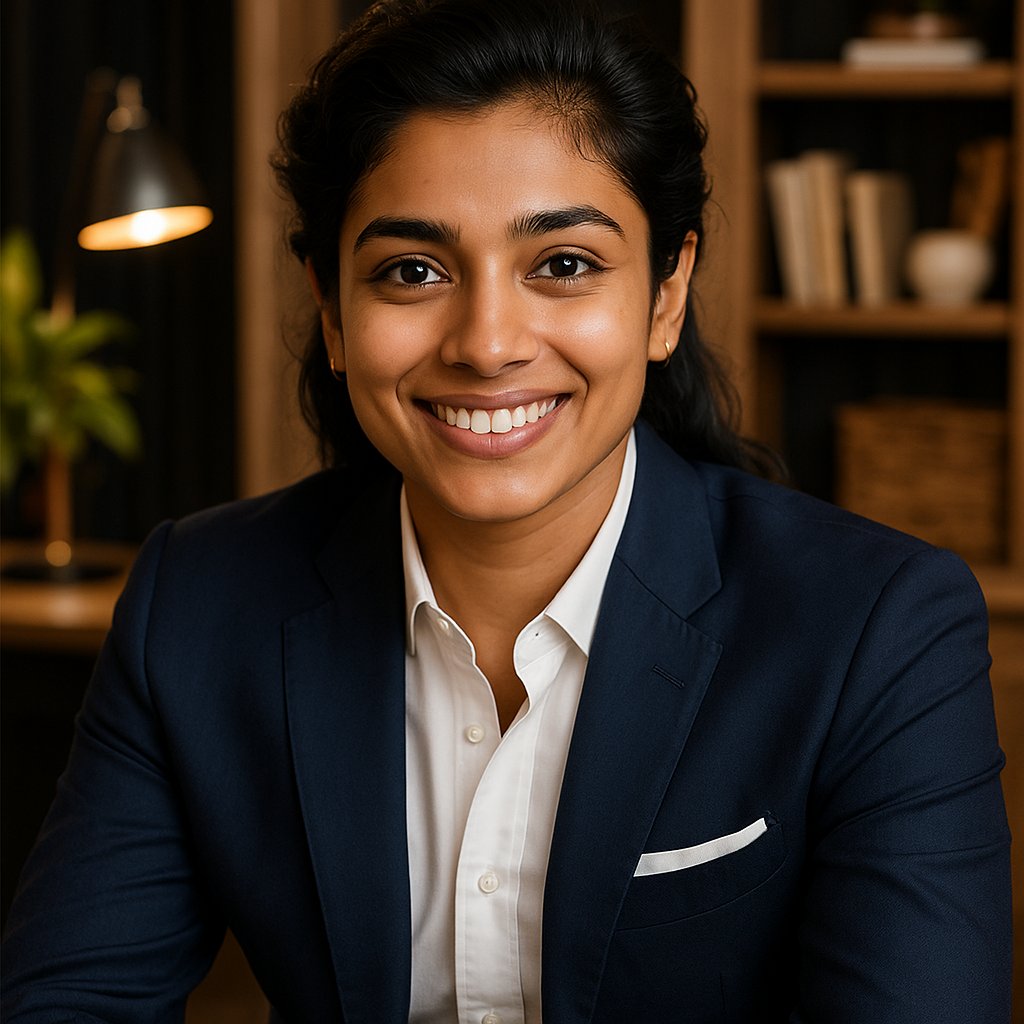
### Result
The generated image appears in the workspace with **Change** and **Download** actions.
### Step 3: Choose an AI provider
The interface provides:
* OpenAI (GPT Image)
* Stability AI
* Google Gemini
### Step 4: Generate
Click **Generate** to swap or blend a face between two given images. This request consumes **10 MC** (AI Media Capacity).
### Result
The generated image appears in the workspace with **Change** and **Download** actions.
 ## 7. Generative Fill
Generative Fill lets you add or extend content within an image.
## 7. Generative Fill
Generative Fill lets you add or extend content within an image.
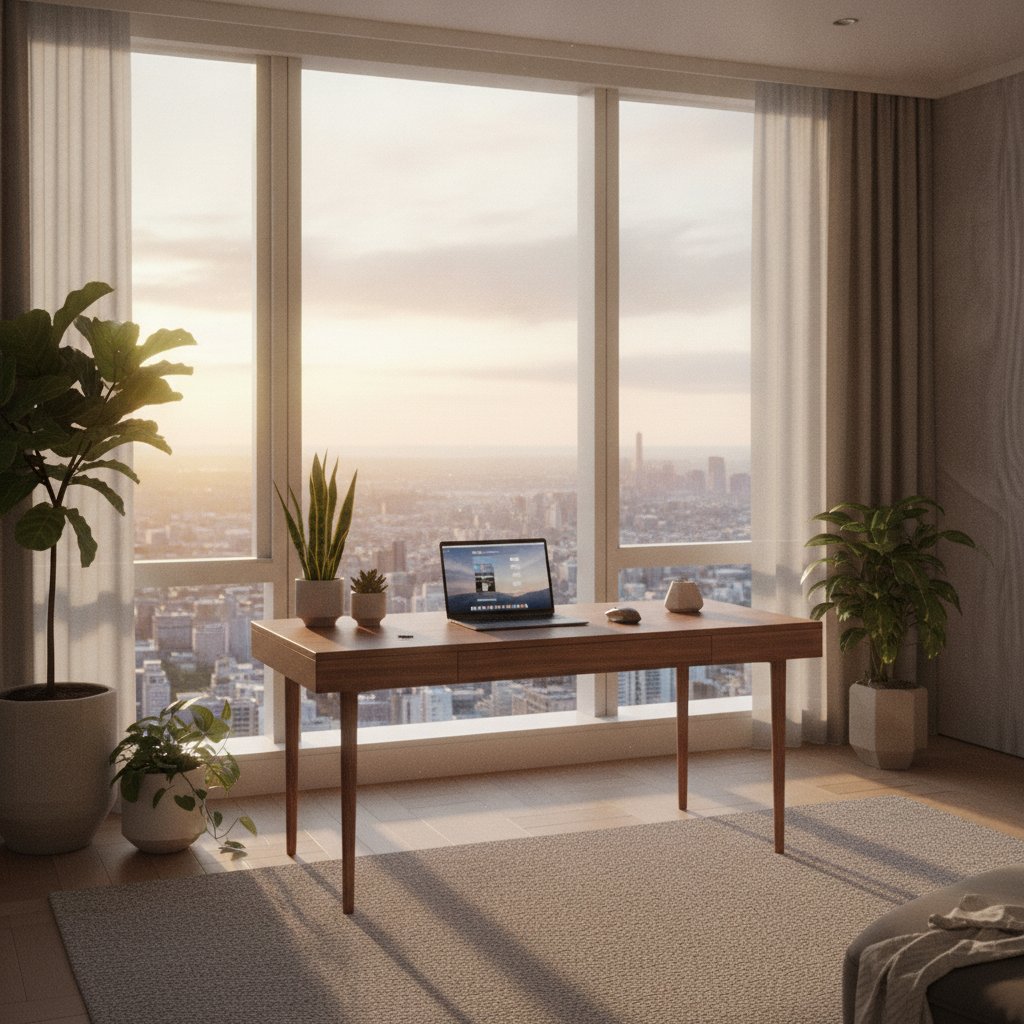
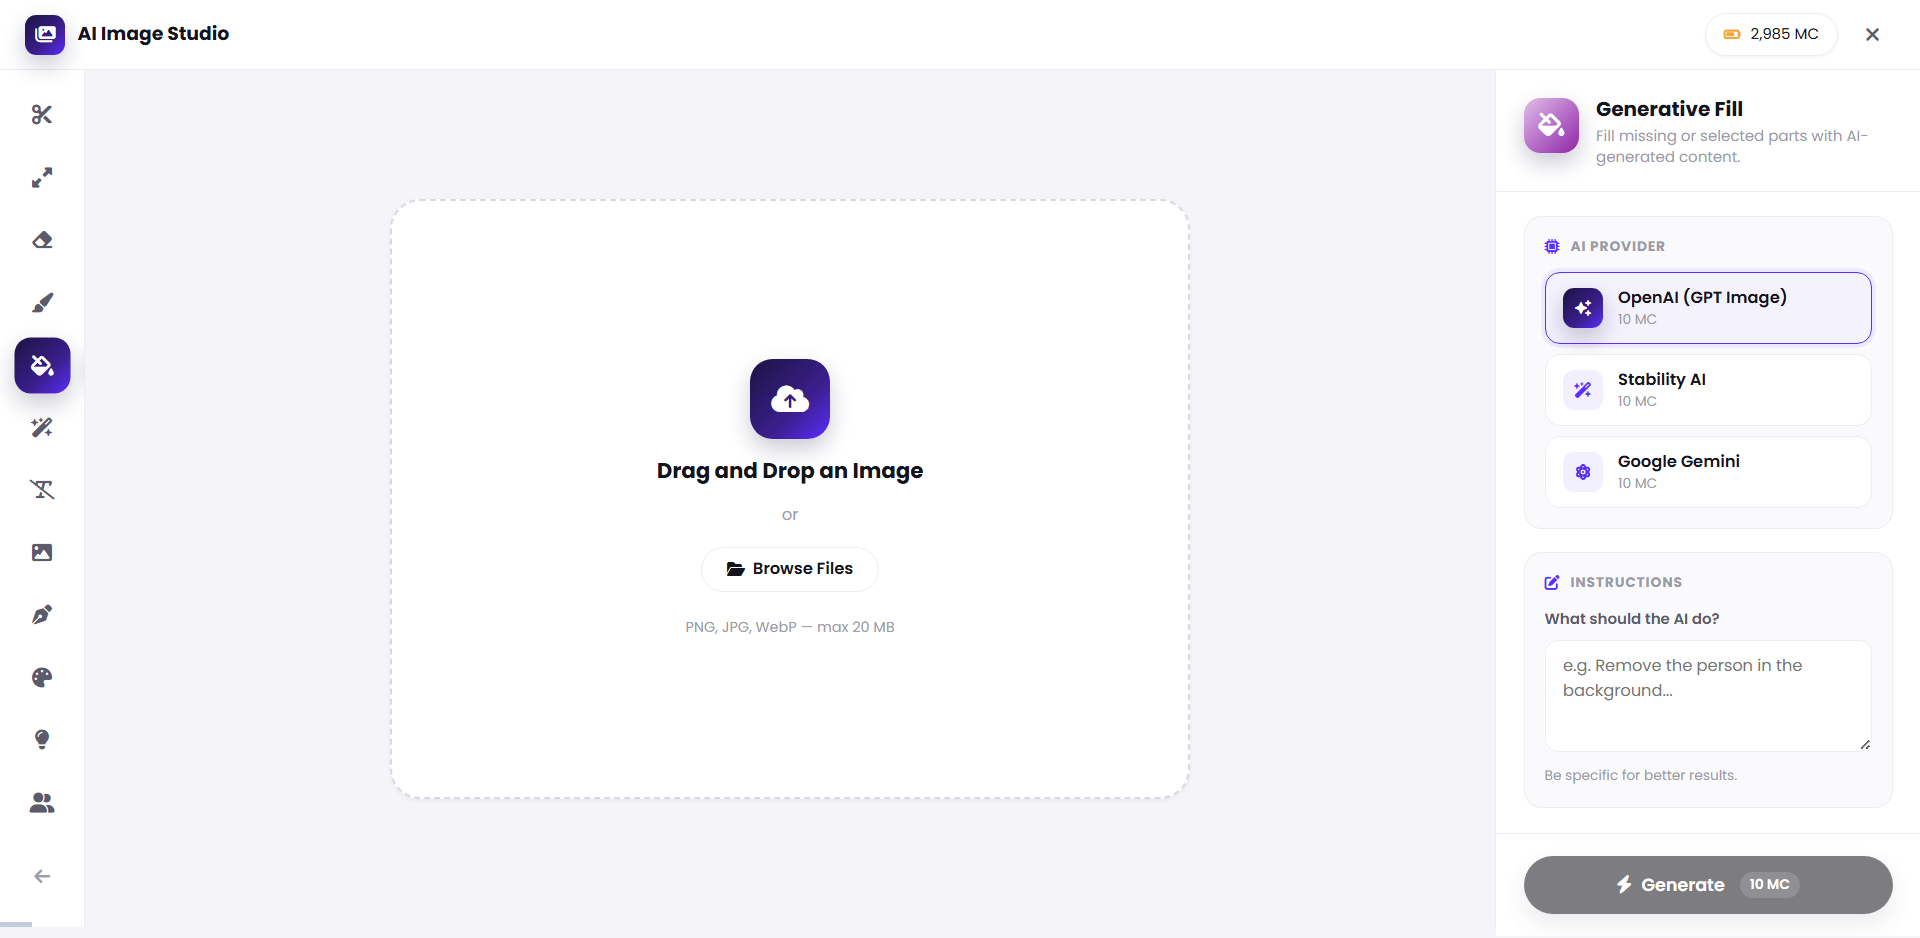 ### Step 1: Upload an image
Drag and drop an image into the workspace or select **Browse Files**.
### Step 1: Upload an image
Drag and drop an image into the workspace or select **Browse Files**.
 ### Step 2: Choose a provider
The interface provides:
* OpenAI (GPT Image)
* Stability AI
* Google Gemini
### Step 3: Describe the change
Use **Instructions** to tell the AI what should be added or changed.
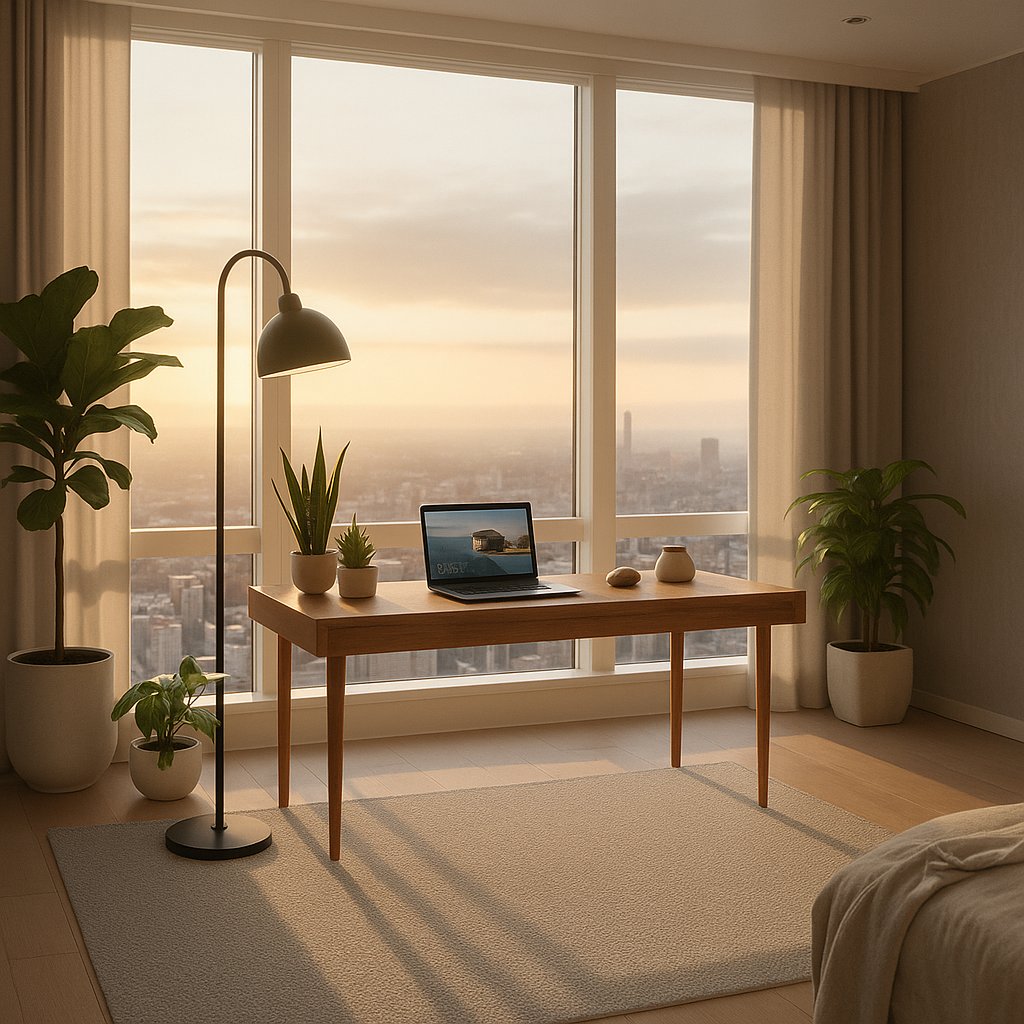
Example:
> Add a modern black floor lamp on the left side of the room, positioned beside the desk. Match the existing perspective, warm lighting, materials, and shadows.
### Step 4: Generate
Click **Generate to** add or extend content within an image. This request consumes **10 MC** (AI Media Capacity).
### Tips
Be specific about the object, placement, size, perspective, lighting, materials, and shadows.
### Step 2: Choose a provider
The interface provides:
* OpenAI (GPT Image)
* Stability AI
* Google Gemini
### Step 3: Describe the change
Use **Instructions** to tell the AI what should be added or changed.
Example:
> Add a modern black floor lamp on the left side of the room, positioned beside the desk. Match the existing perspective, warm lighting, materials, and shadows.
### Step 4: Generate
Click **Generate to** add or extend content within an image. This request consumes **10 MC** (AI Media Capacity).
### Tips
Be specific about the object, placement, size, perspective, lighting, materials, and shadows.
 ## 8. Reimagine
Reimagine restyles an existing image according to a new visual direction.
## 8. Reimagine
Reimagine restyles an existing image according to a new visual direction.
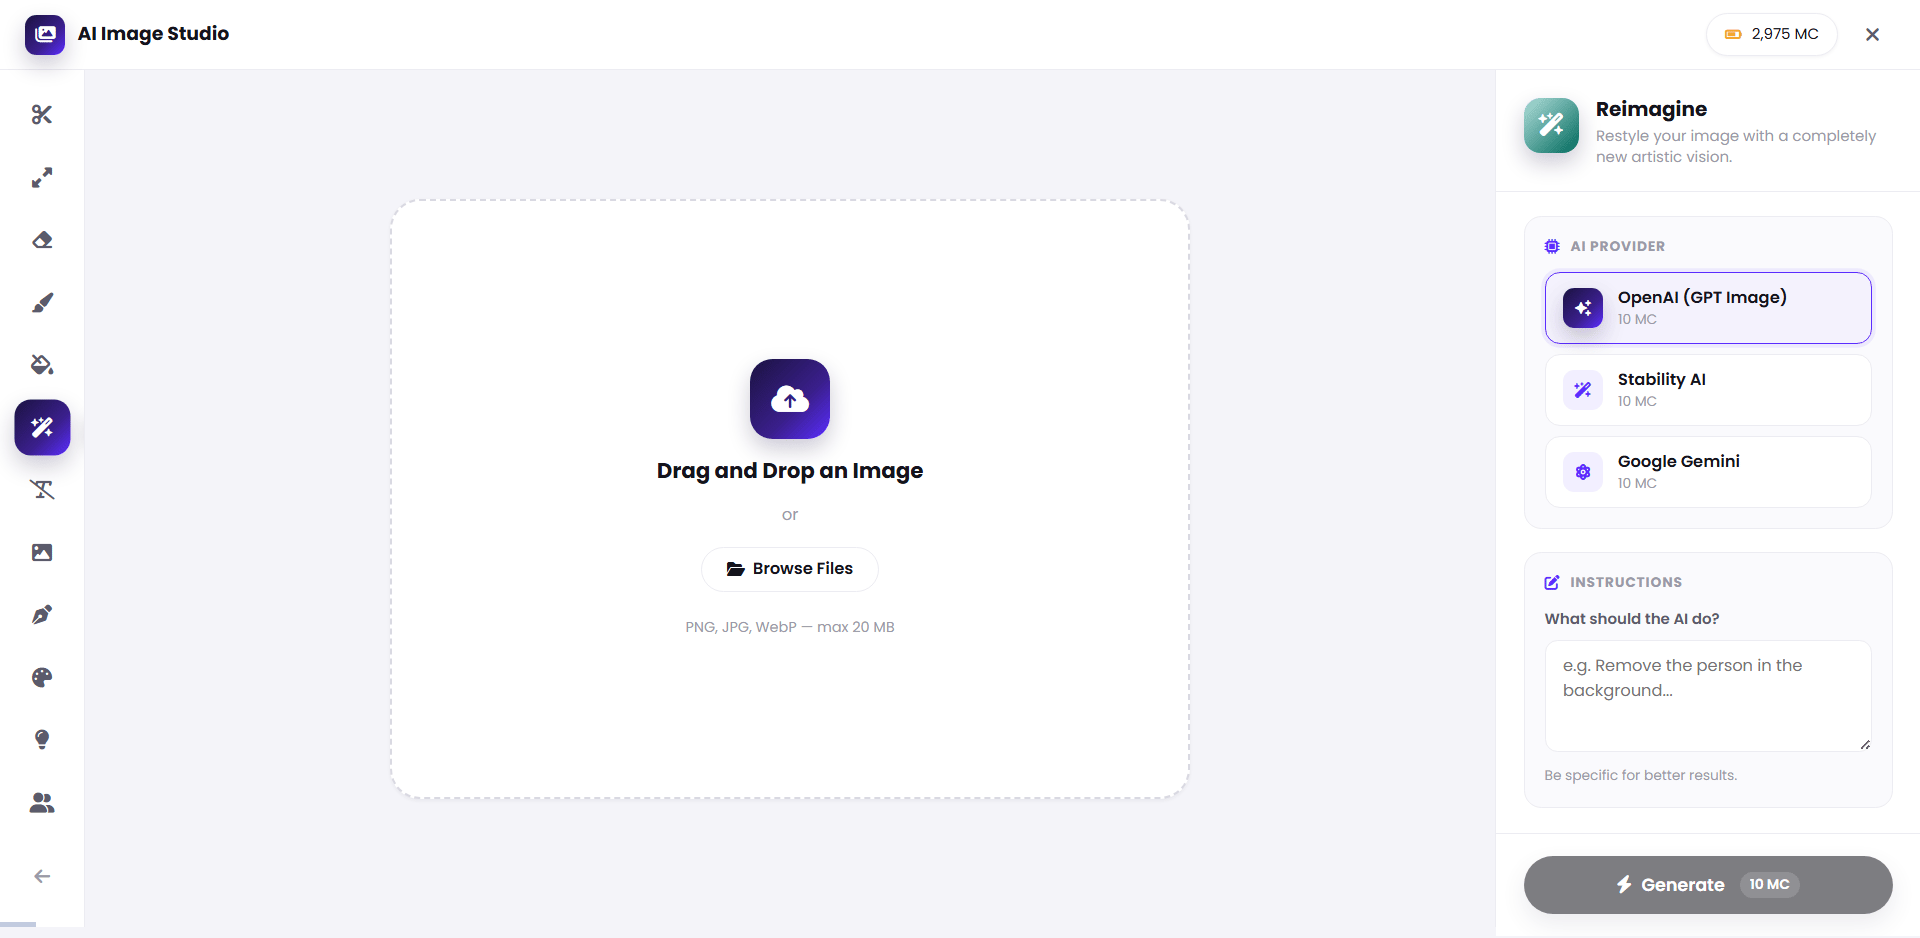 ### Step 1: Upload the source image
Add the image using drag and drop or **Browse Files**.
### Step 1: Upload the source image
Add the image using drag and drop or **Browse Files**.
 ### Step 2: Select a provider
The interface provides:
* OpenAI (GPT Image)
* Stability AI
* Google Gemini
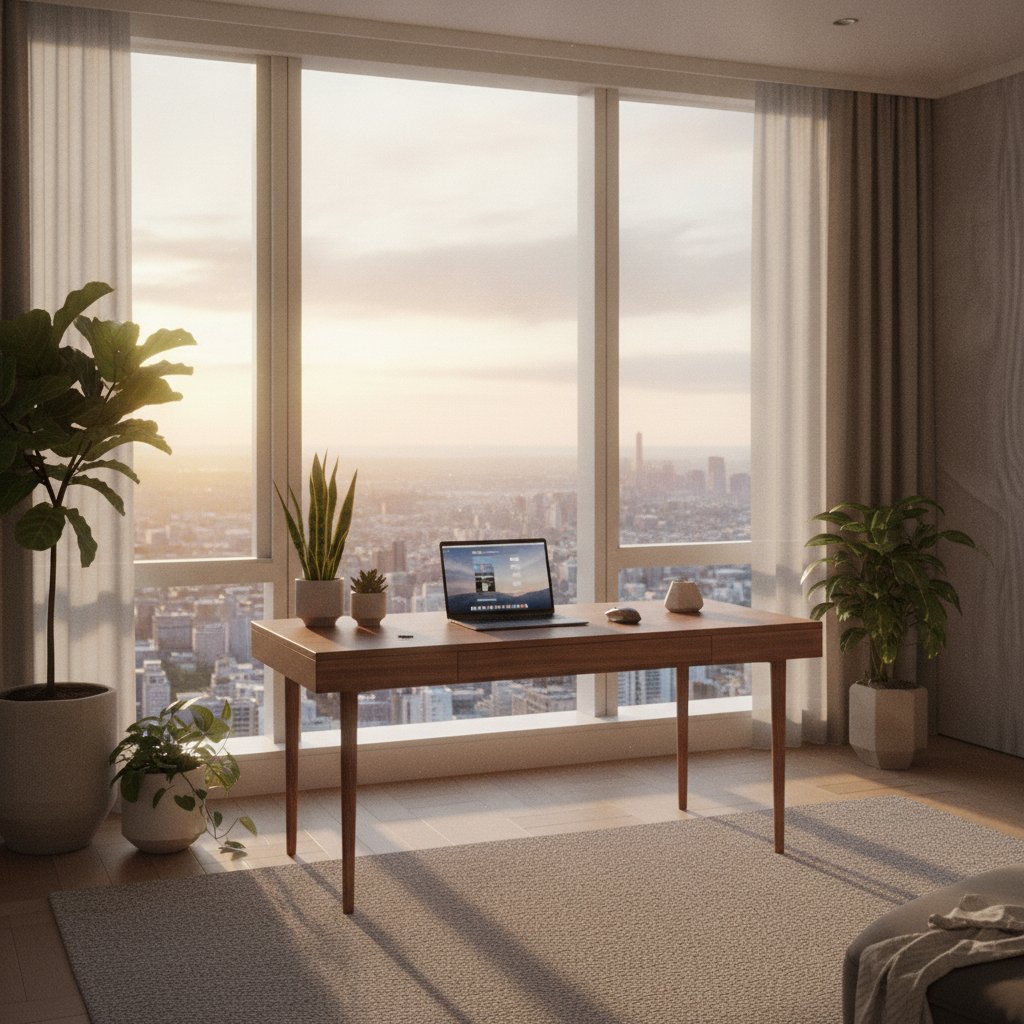
### Step 3: Describe the new direction
Use **Instructions** to separate what should stay unchanged from what should change.
Example:
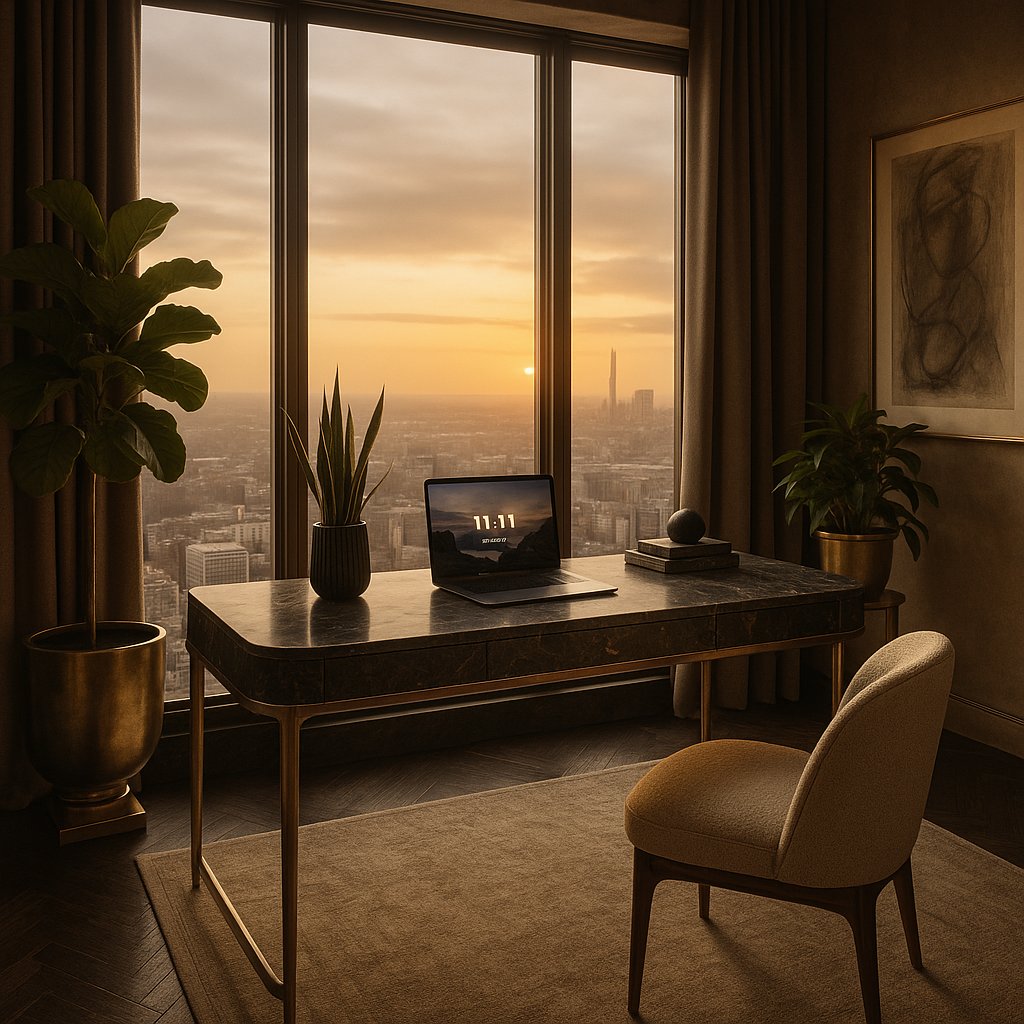
> Transform this modern workspace into a premium contemporary creative studio. Keep the same room layout, desk position, laptop, plants, windows, and city view. Change the furniture materials, decor, color palette, and lighting while keeping the composition realistic.
### Step 4: Generate
Click **Generate**. This request consumes **10 MC** (AI Media Capacity).
### Step 2: Select a provider
The interface provides:
* OpenAI (GPT Image)
* Stability AI
* Google Gemini
### Step 3: Describe the new direction
Use **Instructions** to separate what should stay unchanged from what should change.
Example:
> Transform this modern workspace into a premium contemporary creative studio. Keep the same room layout, desk position, laptop, plants, windows, and city view. Change the furniture materials, decor, color palette, and lighting while keeping the composition realistic.
### Step 4: Generate
Click **Generate**. This request consumes **10 MC** (AI Media Capacity).
 ## 9. Remove Background
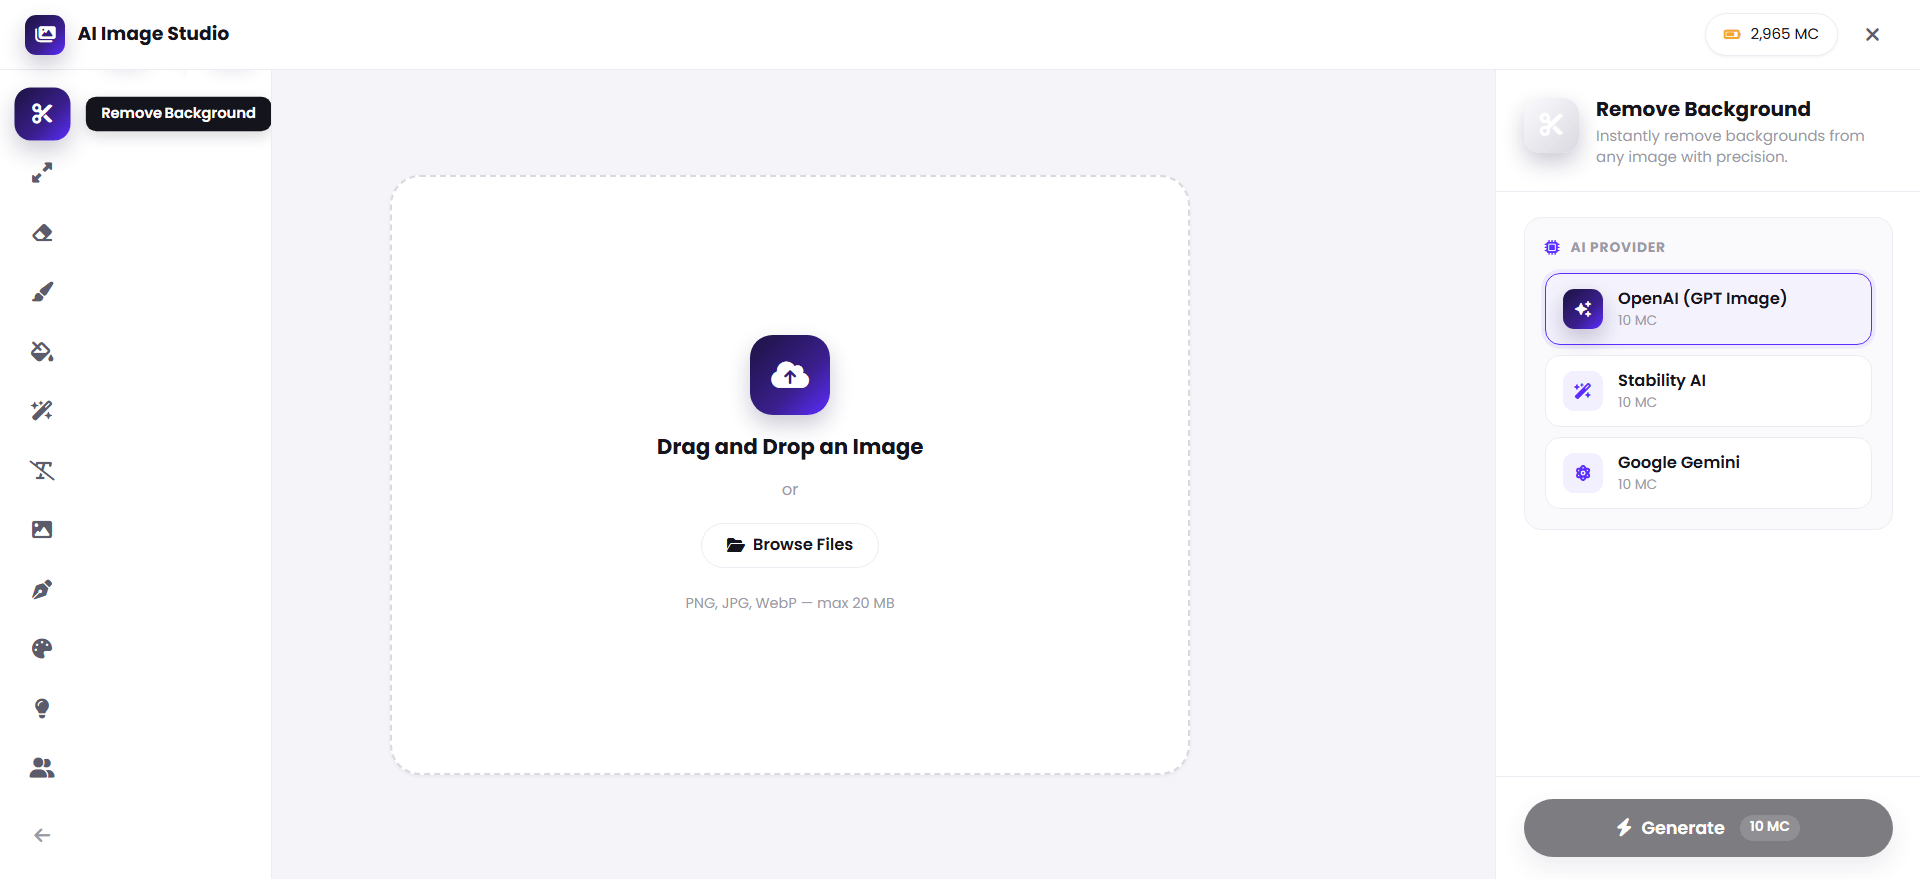
Remove Background separates the main subject from its original background.
## 9. Remove Background
Remove Background separates the main subject from its original background.
 ### Step 1: Upload an image
Add an image using drag and drop or **Browse Files**.
### Step 1: Upload an image
Add an image using drag and drop or **Browse Files**.
 The interface accepts PNG, JPG, and WebP, with a maximum file size of **20 MB**.
### Step 2: Choose a provider
The workflow supports:
* OpenAI (GPT Image)
* Stability AI (**Recommended**)
* Google Gemini
### Step 3: Generate
Click **Generate**. This request consumes **10 MC** (AI Media Capacity).
The interface accepts PNG, JPG, and WebP, with a maximum file size of **20 MB**.
### Step 2: Choose a provider
The workflow supports:
* OpenAI (GPT Image)
* Stability AI (**Recommended**)
* Google Gemini
### Step 3: Generate
Click **Generate**. This request consumes **10 MC** (AI Media Capacity).
 ### Recommended provider
For users whose primary requirement is a **true transparent background**, **Stability AI is the recommended provider based on the current testing results**.
Provider output can vary by image and model behavior. OpenAI and Google Gemini remain available as alternatives.
## 10. Cleanup
Cleanup is designed to remove unwanted elements from an image while reconstructing the surrounding area.
### Recommended provider
For users whose primary requirement is a **true transparent background**, **Stability AI is the recommended provider based on the current testing results**.
Provider output can vary by image and model behavior. OpenAI and Google Gemini remain available as alternatives.
## 10. Cleanup
Cleanup is designed to remove unwanted elements from an image while reconstructing the surrounding area.
 ### Step 1: Upload the image
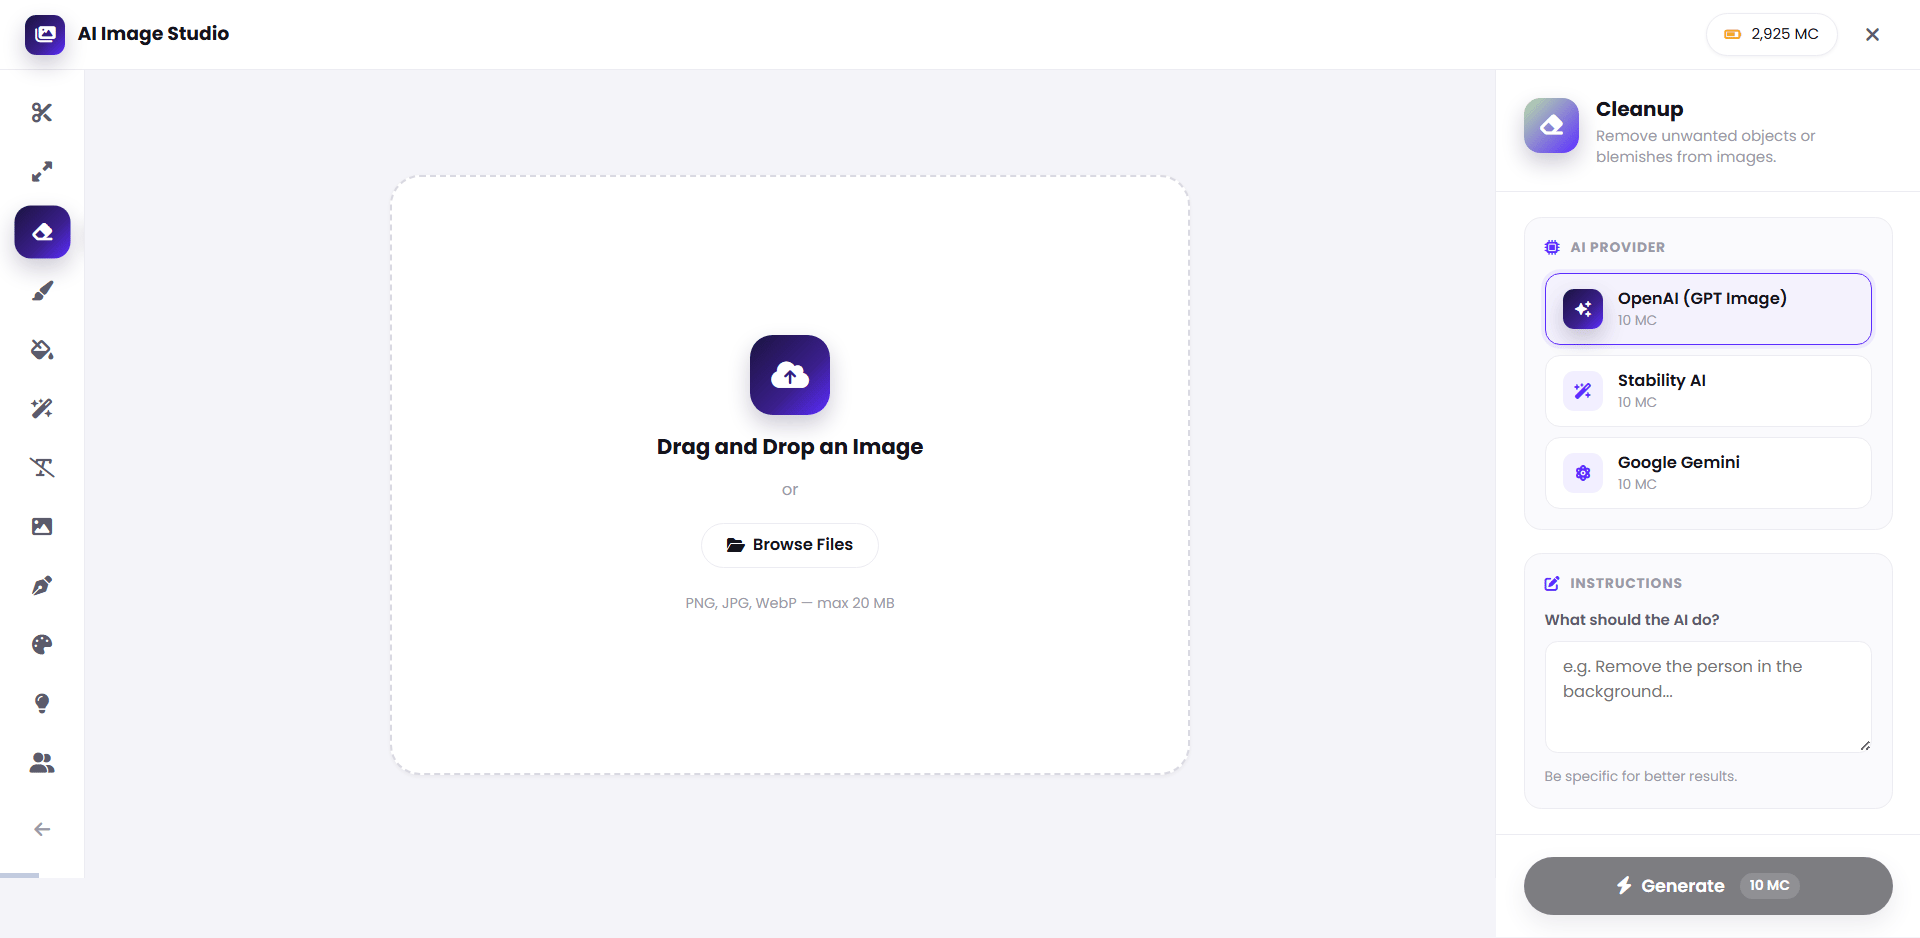
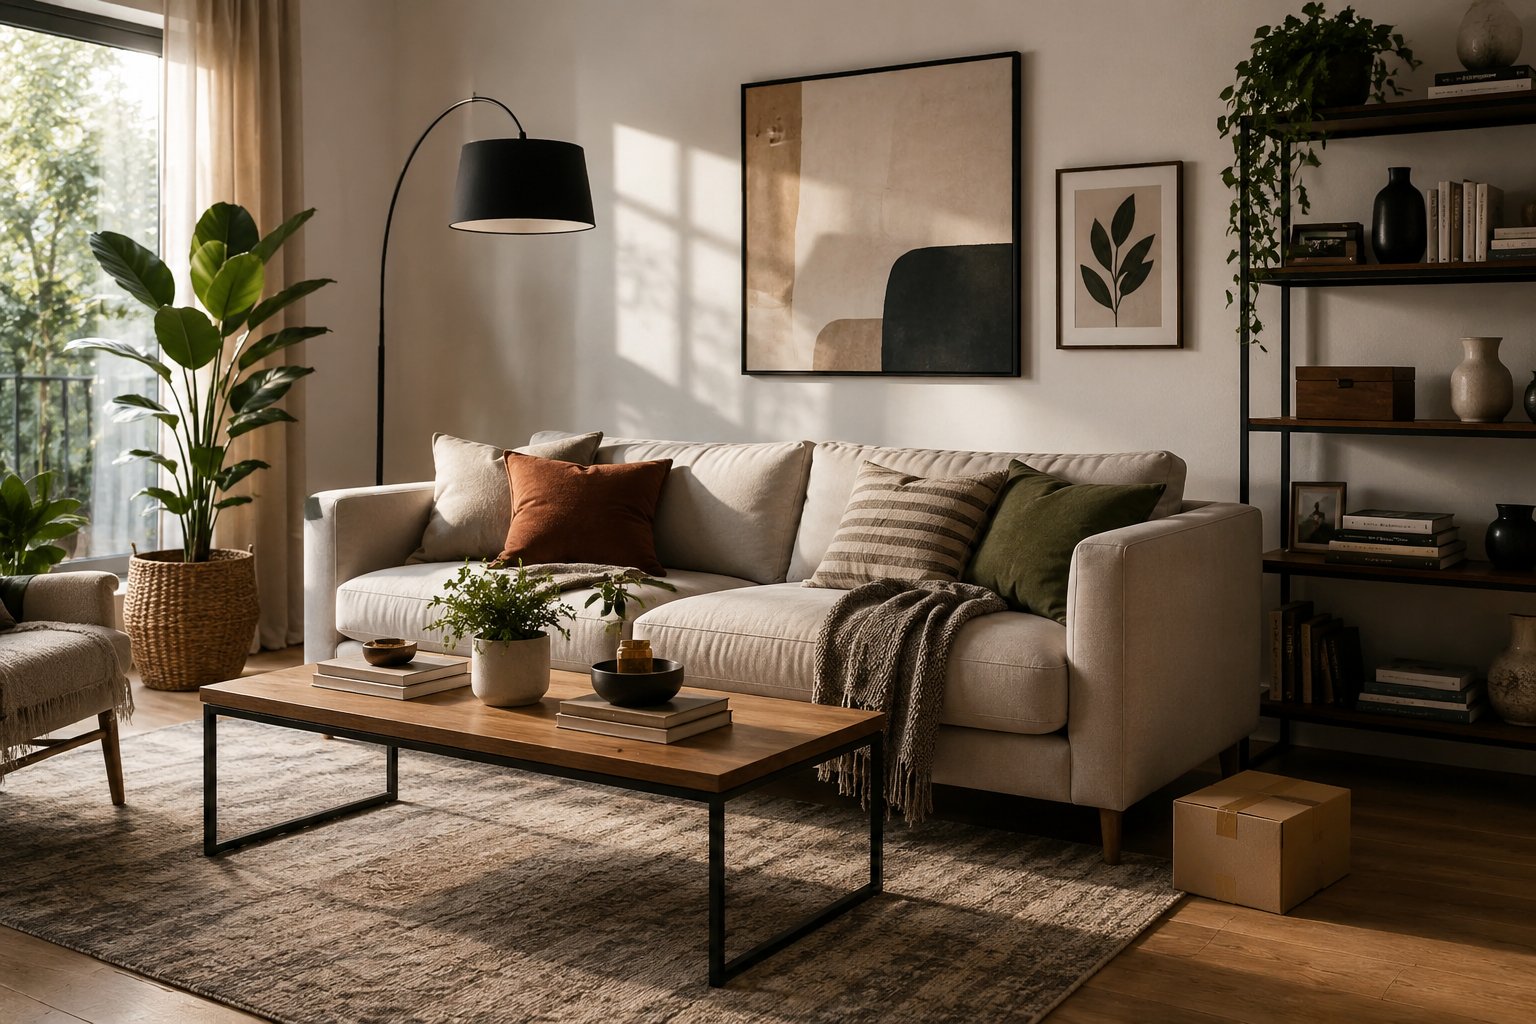
Open **Cleanup**, then drag and drop the image you want to clean up or select **Browse Files**.
### Step 1: Upload the image
Open **Cleanup**, then drag and drop the image you want to clean up or select **Browse Files**.
 ### Step 2: Select a provider
The AI Image Studio editing workflows use provider selection to let you choose the model you want to process the image with. Select the provider available in your current interface.
### Step 3: Describe what should be removed
Use the workflow instructions to identify the unwanted object or visual element.
Example:
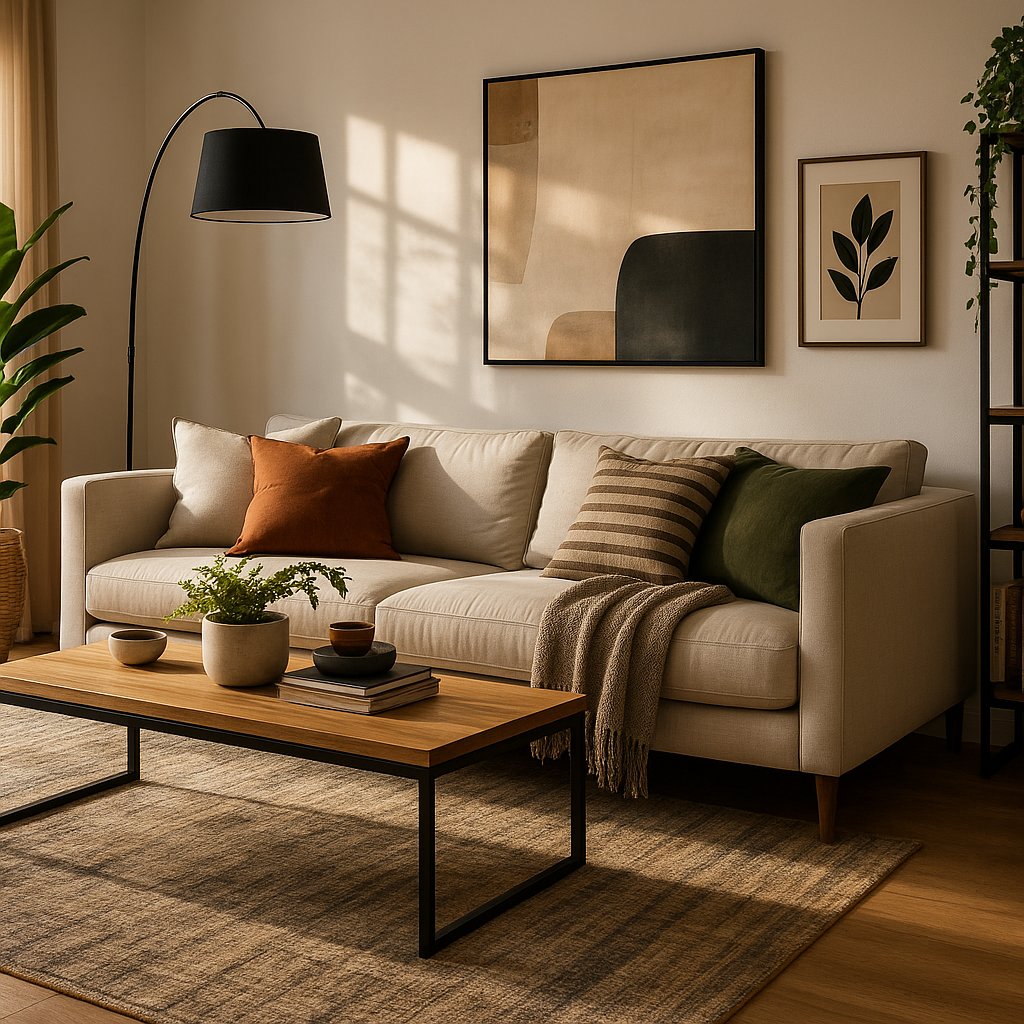
> Remove the small cardboard box on the floor near the sofa. Reconstruct the floor and surrounding shadows naturally so the area looks untouched.
### Step 4: Generate
Click **Generate**. This request consumes **10 MC** (AI Media Capacity).
### Step 2: Select a provider
The AI Image Studio editing workflows use provider selection to let you choose the model you want to process the image with. Select the provider available in your current interface.
### Step 3: Describe what should be removed
Use the workflow instructions to identify the unwanted object or visual element.
Example:
> Remove the small cardboard box on the floor near the sofa. Reconstruct the floor and surrounding shadows naturally so the area looks untouched.
### Step 4: Generate
Click **Generate**. This request consumes **10 MC** (AI Media Capacity).
 ### Tips
* Identify one unwanted element at a time when possible.
* Mention its exact location.
* Ask the AI to preserve the surrounding objects, perspective, lighting, and shadows.
* Use **Change** if you want another variation.
## 11. Upscaler
Upscaler enhances image resolution and sharpens details.
### Tips
* Identify one unwanted element at a time when possible.
* Mention its exact location.
* Ask the AI to preserve the surrounding objects, perspective, lighting, and shadows.
* Use **Change** if you want another variation.
## 11. Upscaler
Upscaler enhances image resolution and sharpens details.
 ### Step 1: Upload the source image
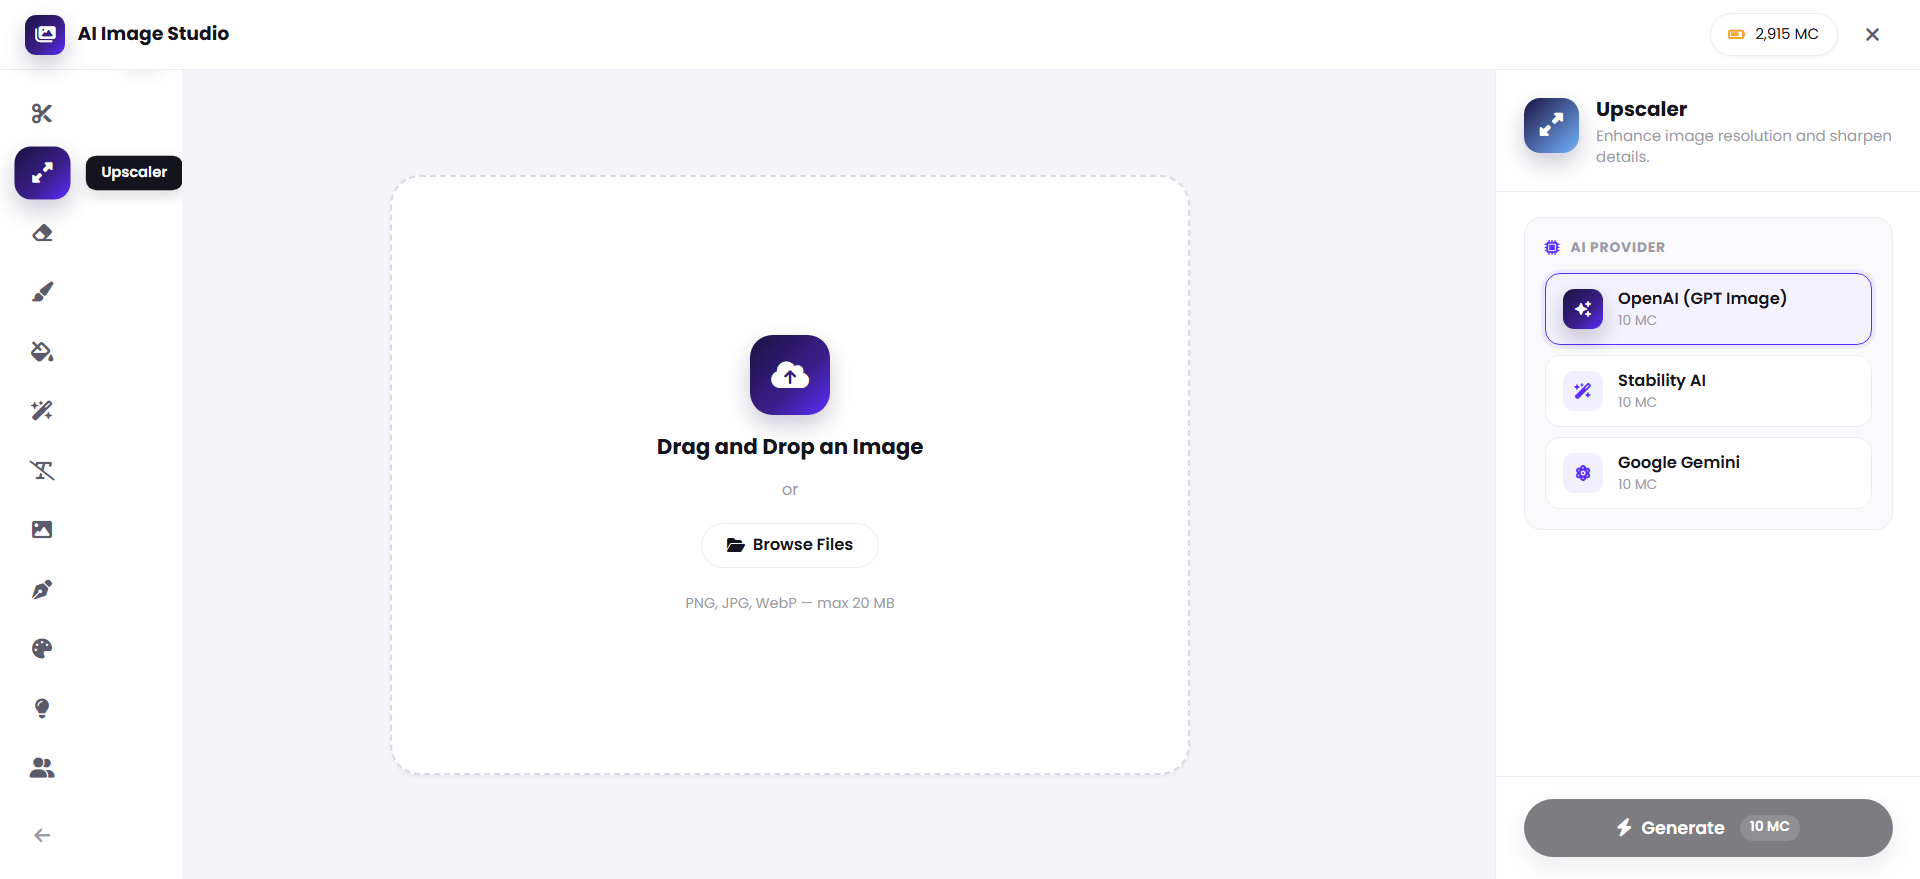
Open **Upscaler**, then drag and drop your image or select **Browse Files**.
### Step 1: Upload the source image
Open **Upscaler**, then drag and drop your image or select **Browse Files**.
 The upload interface accepts PNG, JPG, and WebP, with a maximum file size of **20 MB**.
### Step 2: Choose a provider
The Upscaler interface provides:
* OpenAI (GPT Image)
* Stability AI
* Google Gemini
### Step 3: Generate
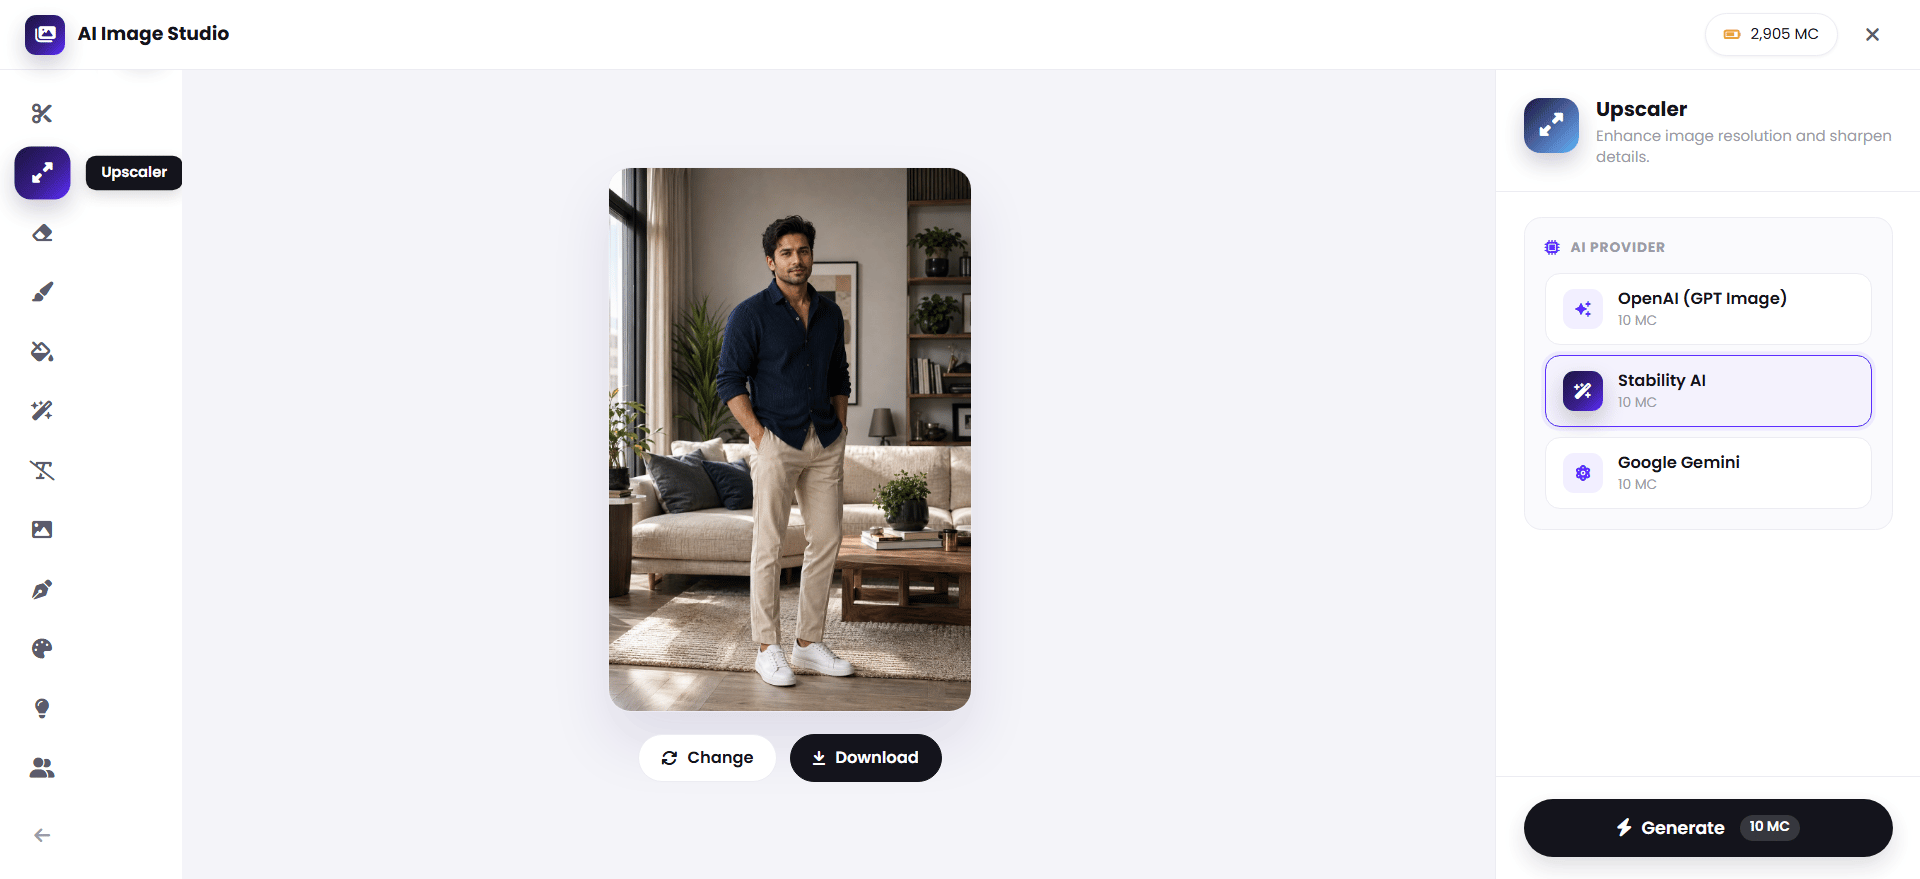
Click **Generate** to process the image. This request consumes **10 MC** (AI Media Capacity).
### Result
Review the enhanced image and use **Change** for another result or **Download** when ready.
Upscaling can produce a substantially larger output file or image resolution. Check the resulting dimensions and file size before using the image in production.
### Recommended use
Upscaler is useful when you need a cleaner, sharper version of an existing image, especially when the source image is too small for its intended use.
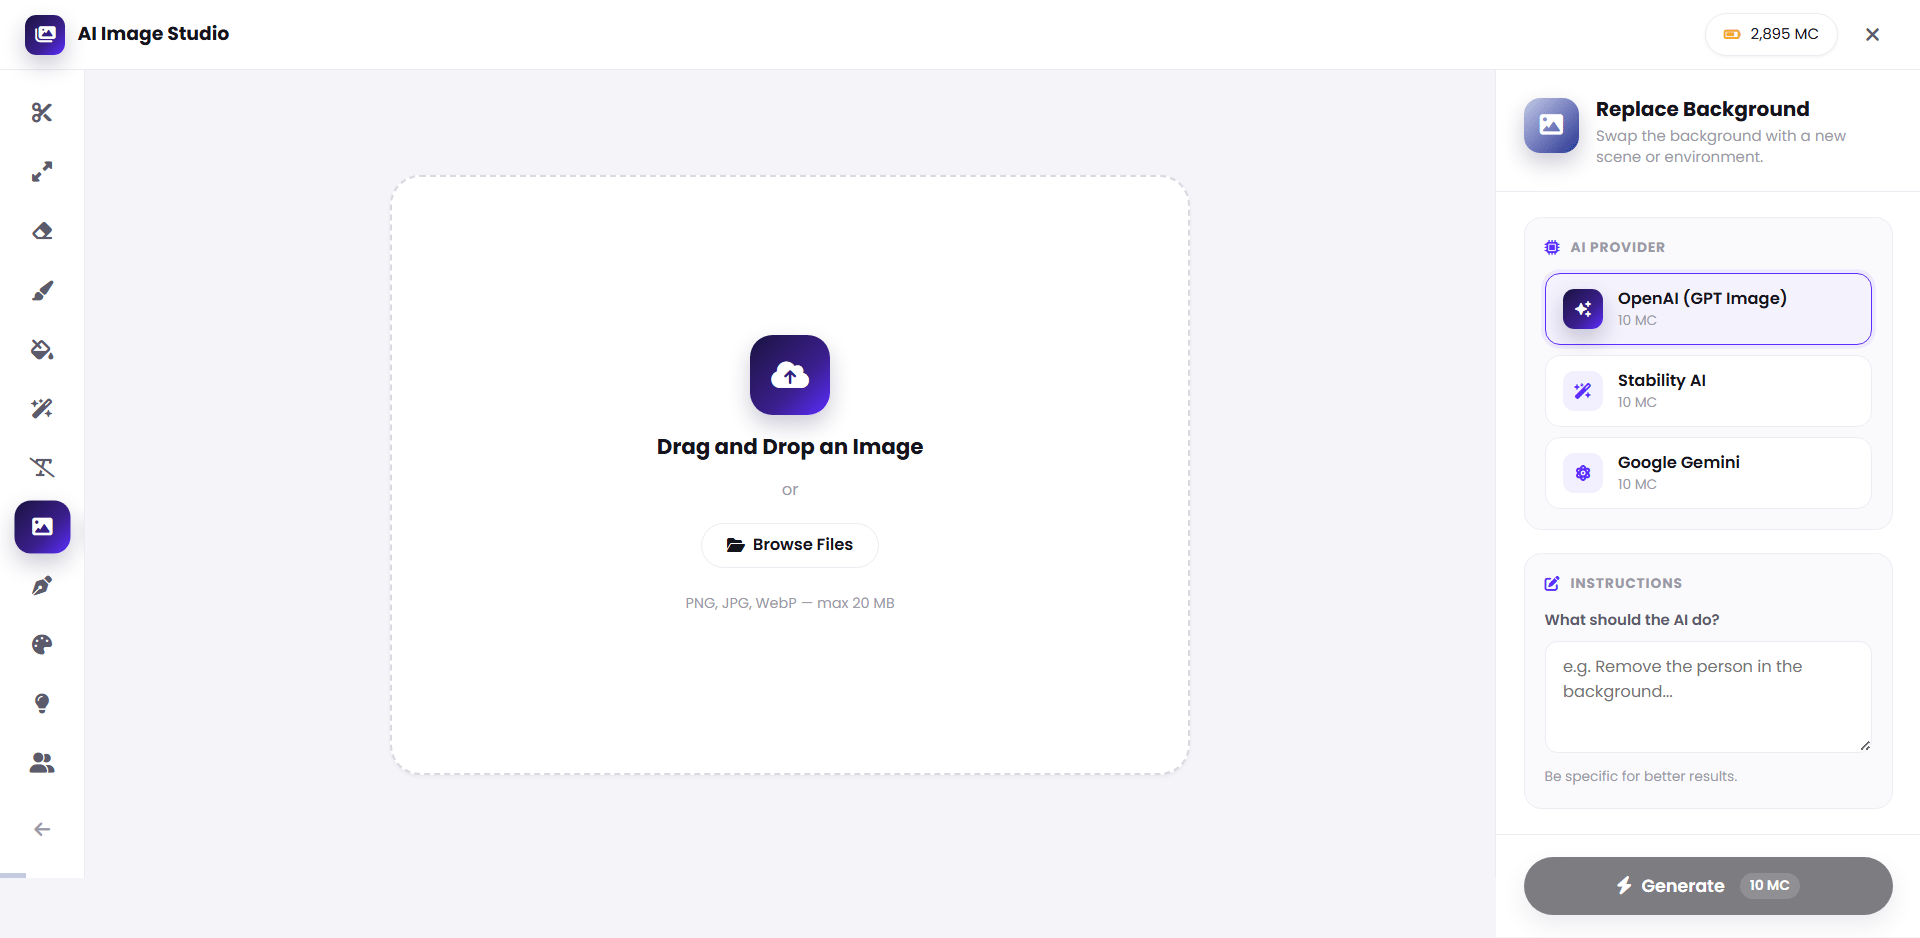
## 12. Replace Background
Replace Background swaps the original background for a new scene or environment while keeping the main subject consistent.
The upload interface accepts PNG, JPG, and WebP, with a maximum file size of **20 MB**.
### Step 2: Choose a provider
The Upscaler interface provides:
* OpenAI (GPT Image)
* Stability AI
* Google Gemini
### Step 3: Generate
Click **Generate** to process the image. This request consumes **10 MC** (AI Media Capacity).
### Result
Review the enhanced image and use **Change** for another result or **Download** when ready.
Upscaling can produce a substantially larger output file or image resolution. Check the resulting dimensions and file size before using the image in production.
### Recommended use
Upscaler is useful when you need a cleaner, sharper version of an existing image, especially when the source image is too small for its intended use.
## 12. Replace Background
Replace Background swaps the original background for a new scene or environment while keeping the main subject consistent.
 ### Step 1: Upload the source image
Open **Replace Background**, then upload the image using drag and drop or **Browse Files**.
### Step 1: Upload the source image
Open **Replace Background**, then upload the image using drag and drop or **Browse Files**.
 ### Step 2: Choose a provider
Select the provider you want to use from the available AI providers.
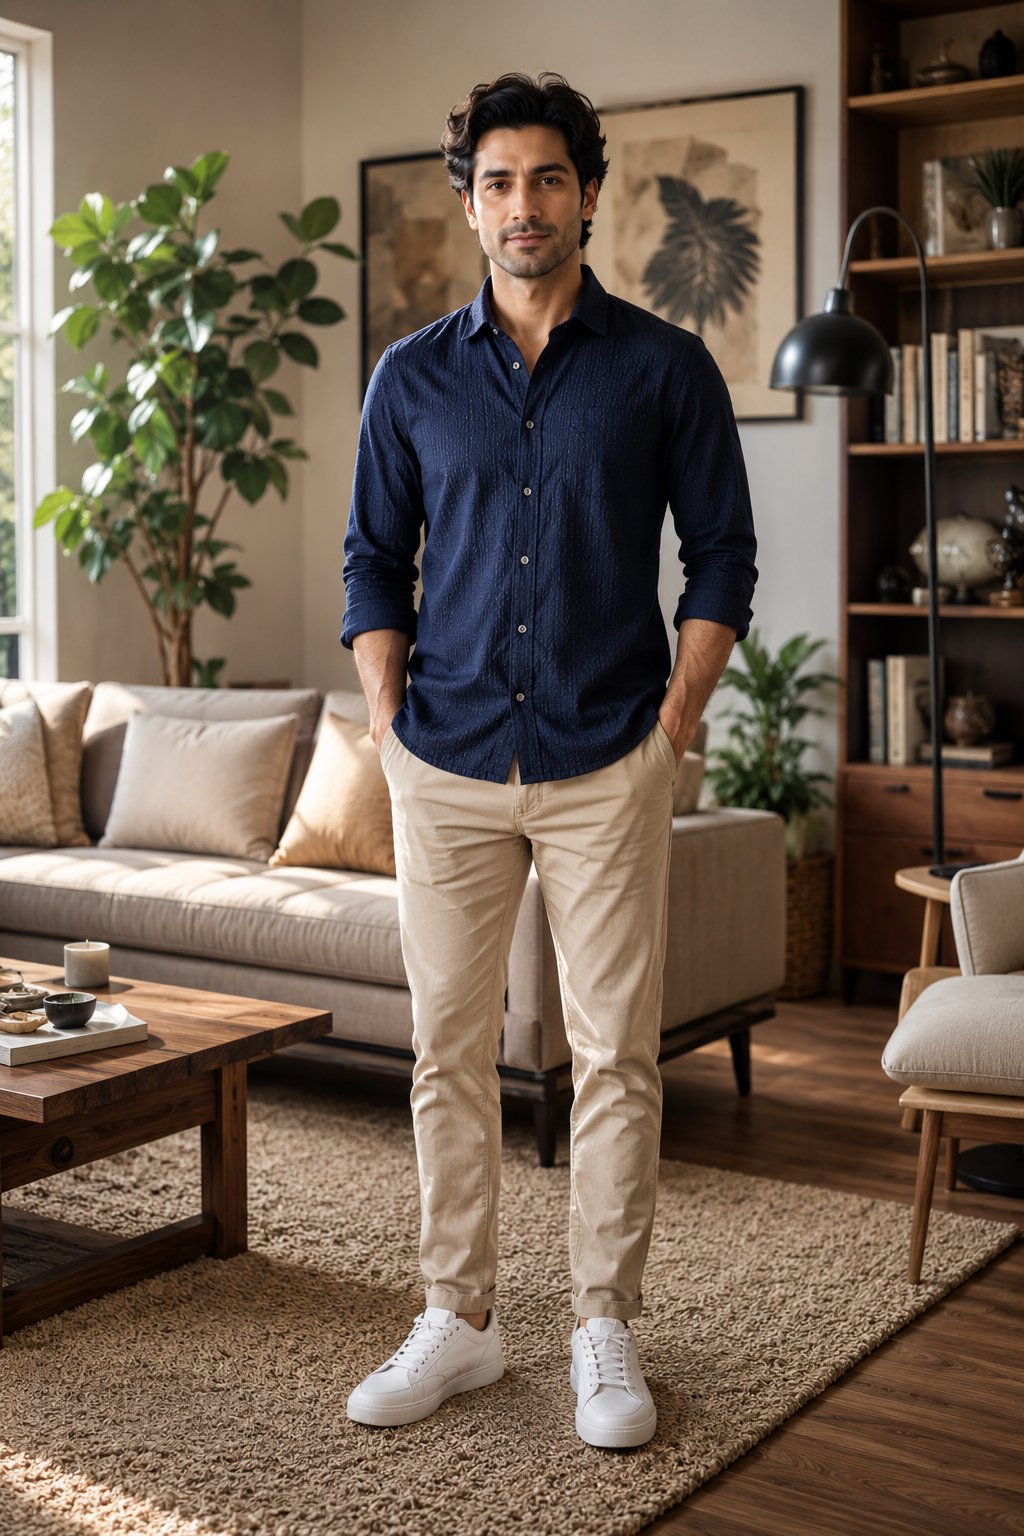
### Step 3: Describe the new background
Use **Instructions** to describe the replacement environment and explicitly state what should remain unchanged.
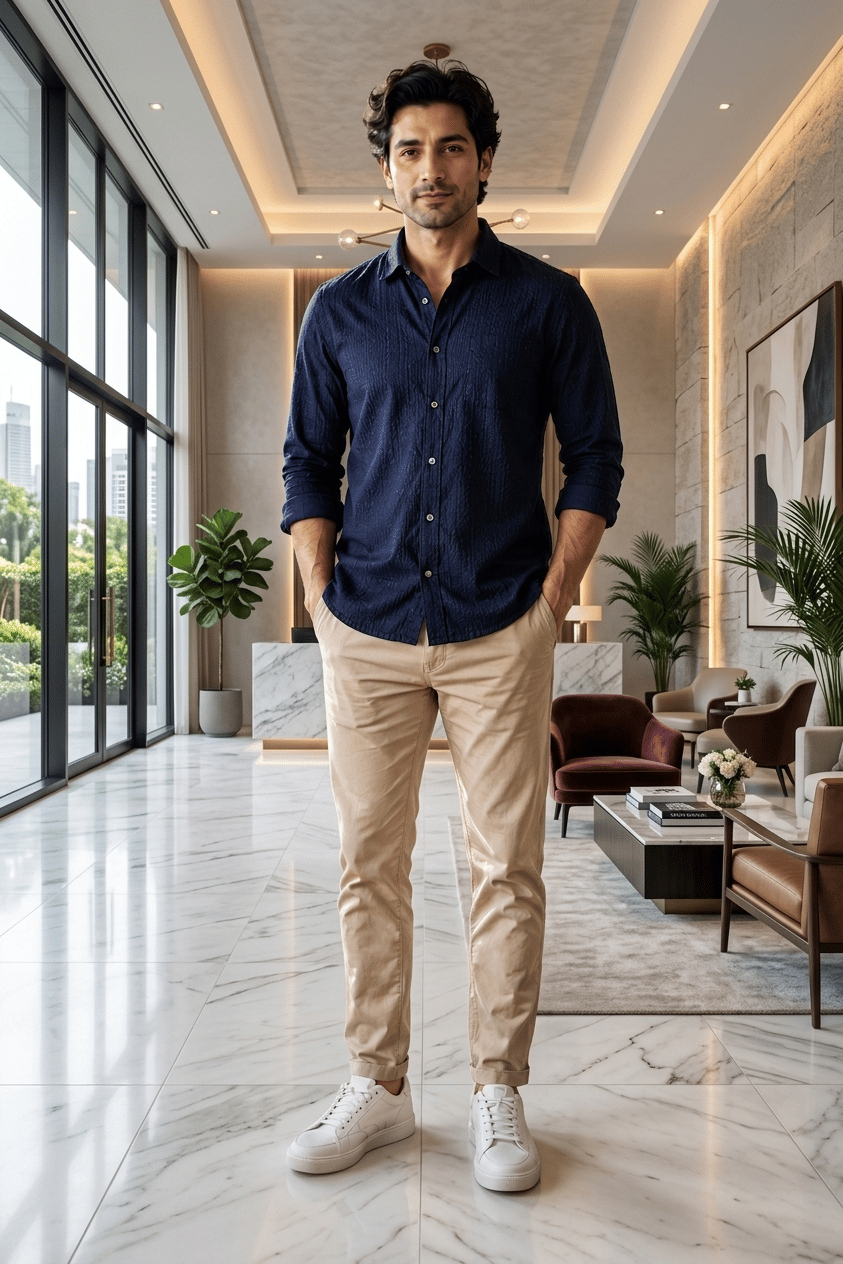
Example:
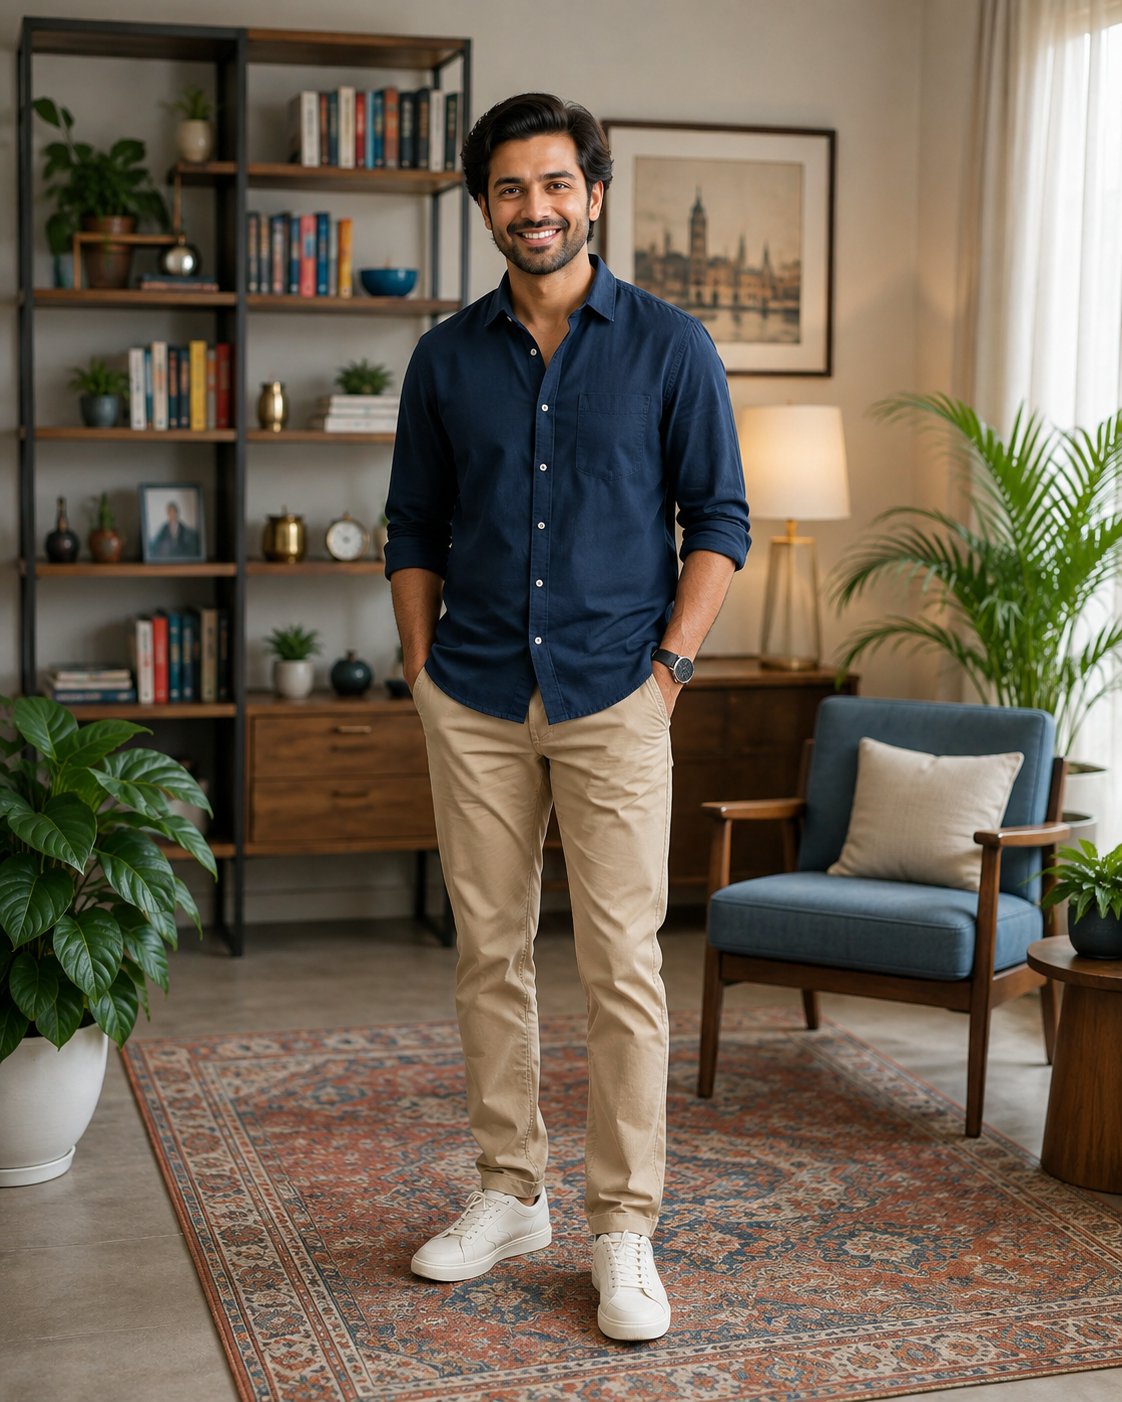
> Replace the entire living room background with a bright, modern luxury hotel lobby. Keep the person completely unchanged, including facial features, hair, clothing, body position, proportions, and pose. Match the subject's lighting and perspective naturally to the new environment.
### Step 4: Generate
Select **Generate** and review the result. This request consumes **10 MC** (AI Media Capacity).
### Step 2: Choose a provider
Select the provider you want to use from the available AI providers.
### Step 3: Describe the new background
Use **Instructions** to describe the replacement environment and explicitly state what should remain unchanged.
Example:
> Replace the entire living room background with a bright, modern luxury hotel lobby. Keep the person completely unchanged, including facial features, hair, clothing, body position, proportions, and pose. Match the subject's lighting and perspective naturally to the new environment.
### Step 4: Generate
Select **Generate** and review the result. This request consumes **10 MC** (AI Media Capacity).
 ### Tips
For reliable background replacement, specify:
* The new environment
* Lighting direction and color temperature
* Perspective
* Depth of field
* What must remain unchanged
* How the subject should blend into the new scene
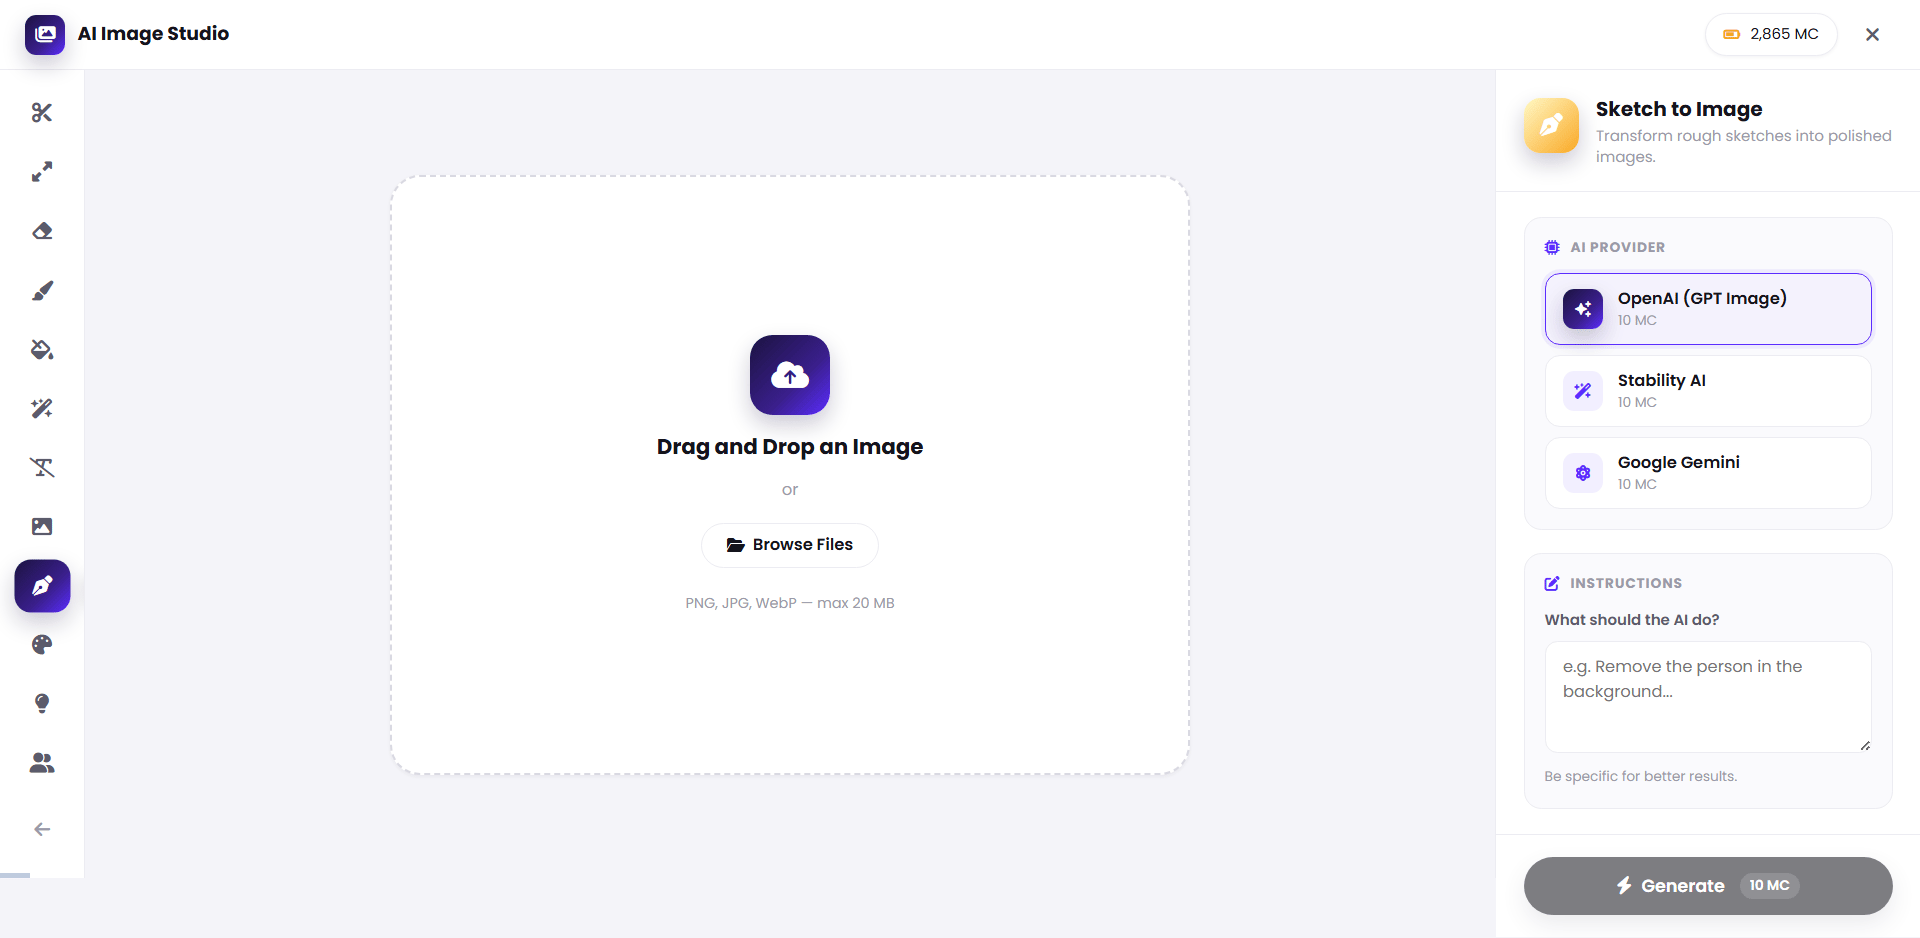
## 13. Sketch to Image
Sketch to Image transforms a rough sketch into a polished image while using the sketch as the composition reference.
### Tips
For reliable background replacement, specify:
* The new environment
* Lighting direction and color temperature
* Perspective
* Depth of field
* What must remain unchanged
* How the subject should blend into the new scene
## 13. Sketch to Image
Sketch to Image transforms a rough sketch into a polished image while using the sketch as the composition reference.
 ### Step 1: Prepare the sketch
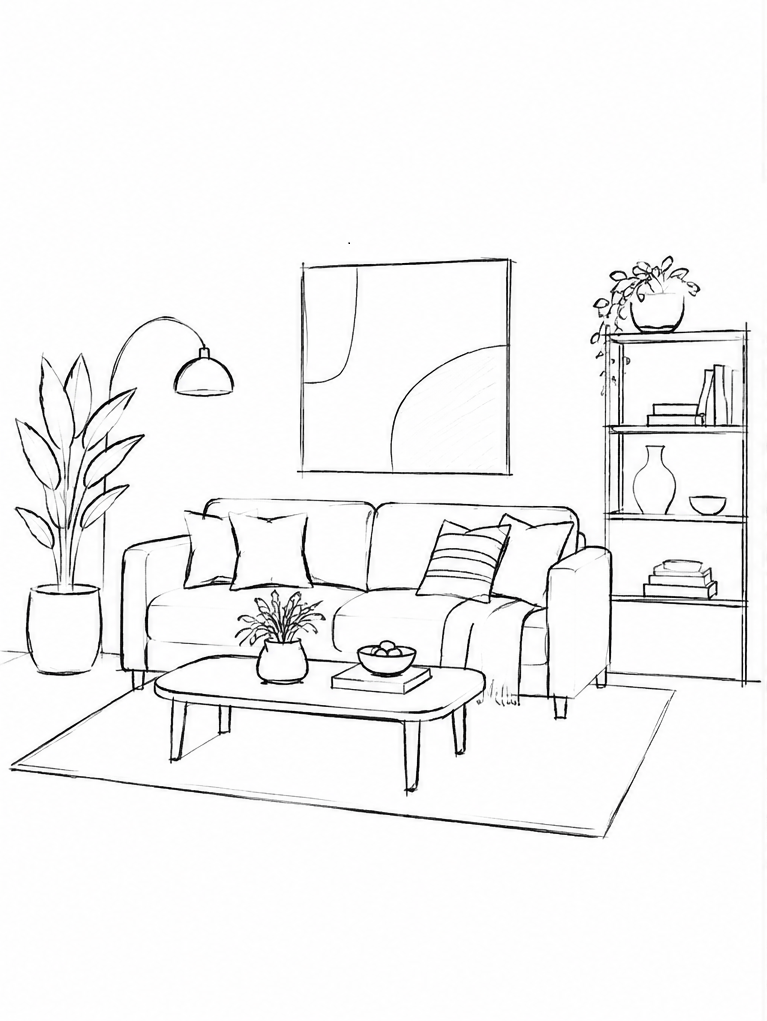
Create or upload a sketch that clearly shows the main objects, layout, and approximate proportions you want in the final image.
### Step 2: Upload the sketch
Open **Sketch to Image**, then drag and drop the sketch or select **Browse Files**.
### Step 1: Prepare the sketch
Create or upload a sketch that clearly shows the main objects, layout, and approximate proportions you want in the final image.
### Step 2: Upload the sketch
Open **Sketch to Image**, then drag and drop the sketch or select **Browse Files**.
 The interface accepts PNG, JPG, and WebP, with a maximum file size of **20 MB**.
### Step 3: Choose a provider
Select the provider available in the workflow.
### Step 4: Describe the desired result
Use **Instructions** to explain how the rough sketch should be rendered.
Example:
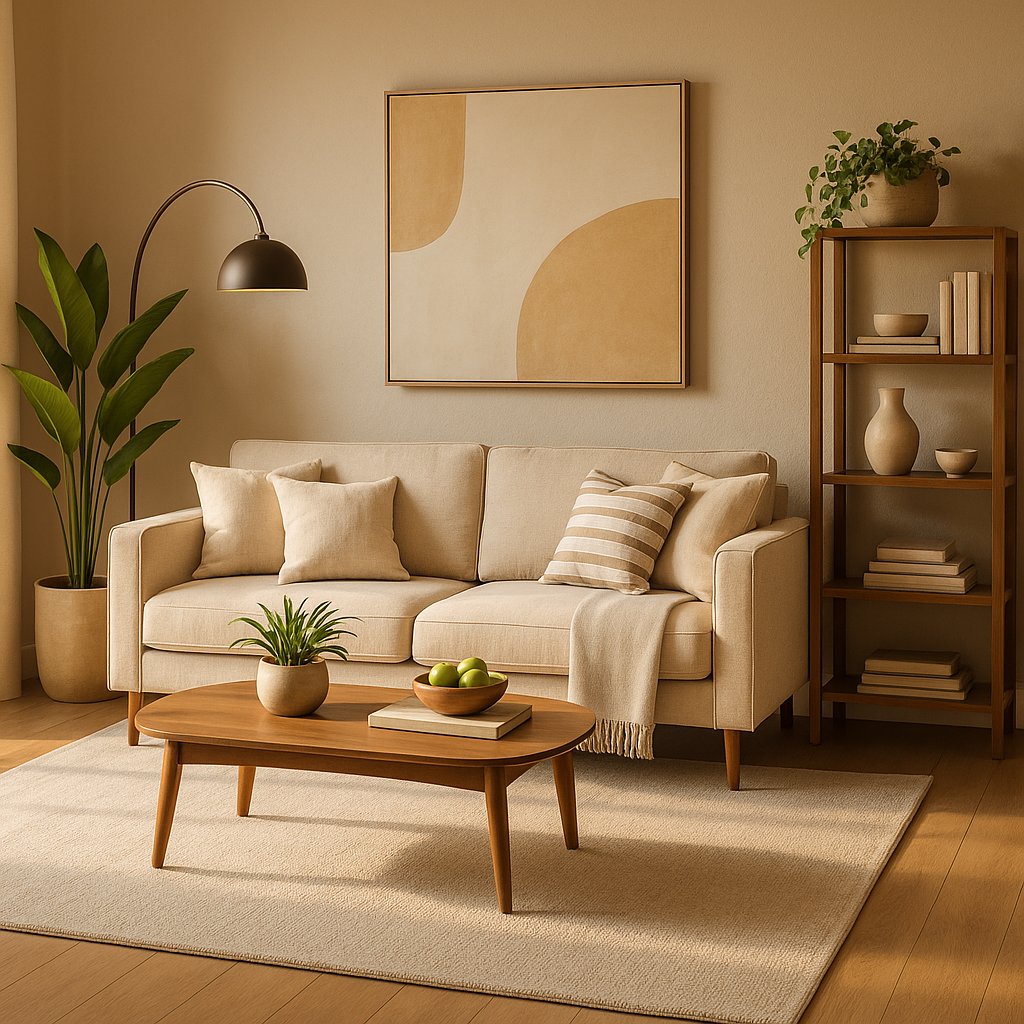
> Transform this rough sketch into a photorealistic modern living room. Preserve the composition, layout, proportions, and placement of the sofa, coffee table, floor lamp, plant, shelving, rug, and wall artwork. Use warm natural lighting, realistic materials, detailed textures, and premium interior photography.
### Step 5: Generate
Select **Generate**, then review the polished result. This request consumes **10 MC** (AI Media Capacity).
The interface accepts PNG, JPG, and WebP, with a maximum file size of **20 MB**.
### Step 3: Choose a provider
Select the provider available in the workflow.
### Step 4: Describe the desired result
Use **Instructions** to explain how the rough sketch should be rendered.
Example:
> Transform this rough sketch into a photorealistic modern living room. Preserve the composition, layout, proportions, and placement of the sofa, coffee table, floor lamp, plant, shelving, rug, and wall artwork. Use warm natural lighting, realistic materials, detailed textures, and premium interior photography.
### Step 5: Generate
Select **Generate**, then review the polished result. This request consumes **10 MC** (AI Media Capacity).
 ### Tips
The strongest Sketch to Image prompts distinguish between:
1. **Structure to preserve:** layout, proportions, placement, and perspective.
2. **Visual treatment to add:** materials, colors, lighting, textures, and photographic realism.
## 14. Remove Text
Remove Text is designed to erase text and watermarks from images while reconstructing the surrounding visual area.
### Tips
The strongest Sketch to Image prompts distinguish between:
1. **Structure to preserve:** layout, proportions, placement, and perspective.
2. **Visual treatment to add:** materials, colors, lighting, textures, and photographic realism.
## 14. Remove Text
Remove Text is designed to erase text and watermarks from images while reconstructing the surrounding visual area.
 ### Step 1: Upload the image
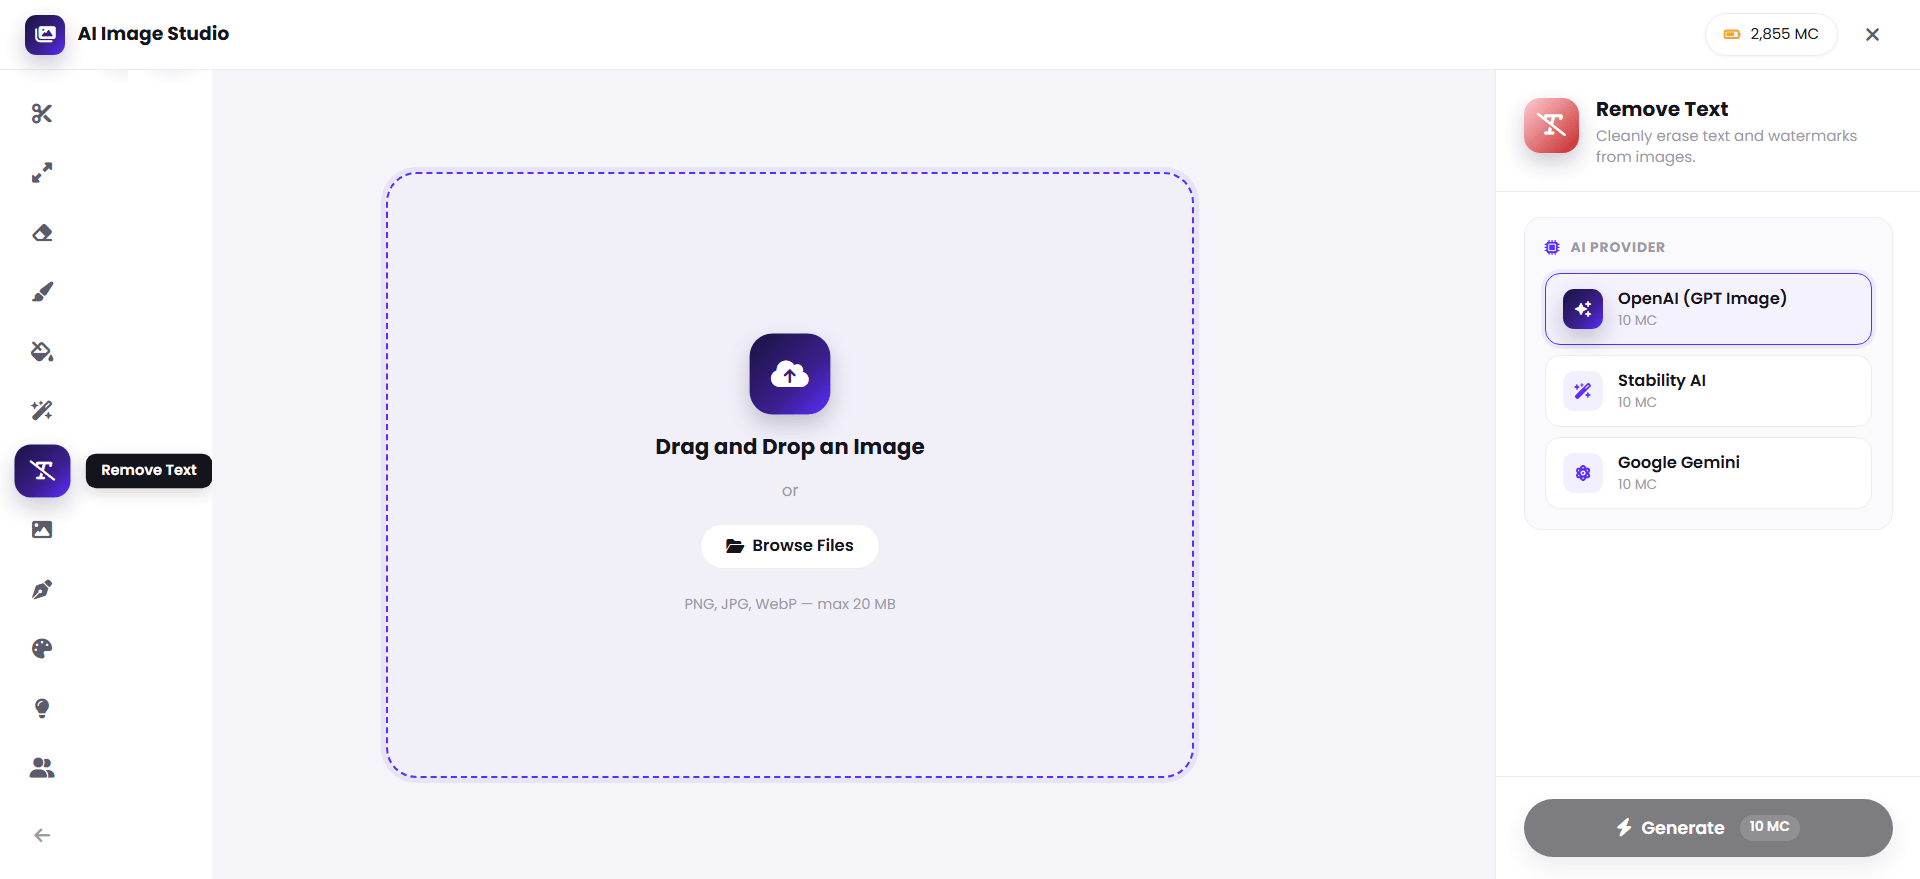
Open **Remove Text**, then drag and drop the image or select **Browse Files**.
The interface accepts PNG, JPG, and WebP, with a maximum file size of **20 MB**.
### Step 2: Choose a provider
The current interface provides:
* OpenAI (GPT Image)
* Stability AI
* Google Gemini
### Step 3: Generate
Upload the image and click **Generate**. This request consumes **10 MC** (AI Media Capacity).
### Tips
For the cleanest result, use an image where the text is clearly visible and the surrounding background contains enough visual information for reconstruction.
Only remove text or watermarks when you have the rights or permission to modify the image.
## 15. Inpainting
Inpainting lets you add or modify elements within a specific area of an image.
### Step 1: Upload the image
Open **Remove Text**, then drag and drop the image or select **Browse Files**.
The interface accepts PNG, JPG, and WebP, with a maximum file size of **20 MB**.
### Step 2: Choose a provider
The current interface provides:
* OpenAI (GPT Image)
* Stability AI
* Google Gemini
### Step 3: Generate
Upload the image and click **Generate**. This request consumes **10 MC** (AI Media Capacity).
### Tips
For the cleanest result, use an image where the text is clearly visible and the surrounding background contains enough visual information for reconstruction.
Only remove text or watermarks when you have the rights or permission to modify the image.
## 15. Inpainting
Inpainting lets you add or modify elements within a specific area of an image.
 ### Step 1: Upload the source image
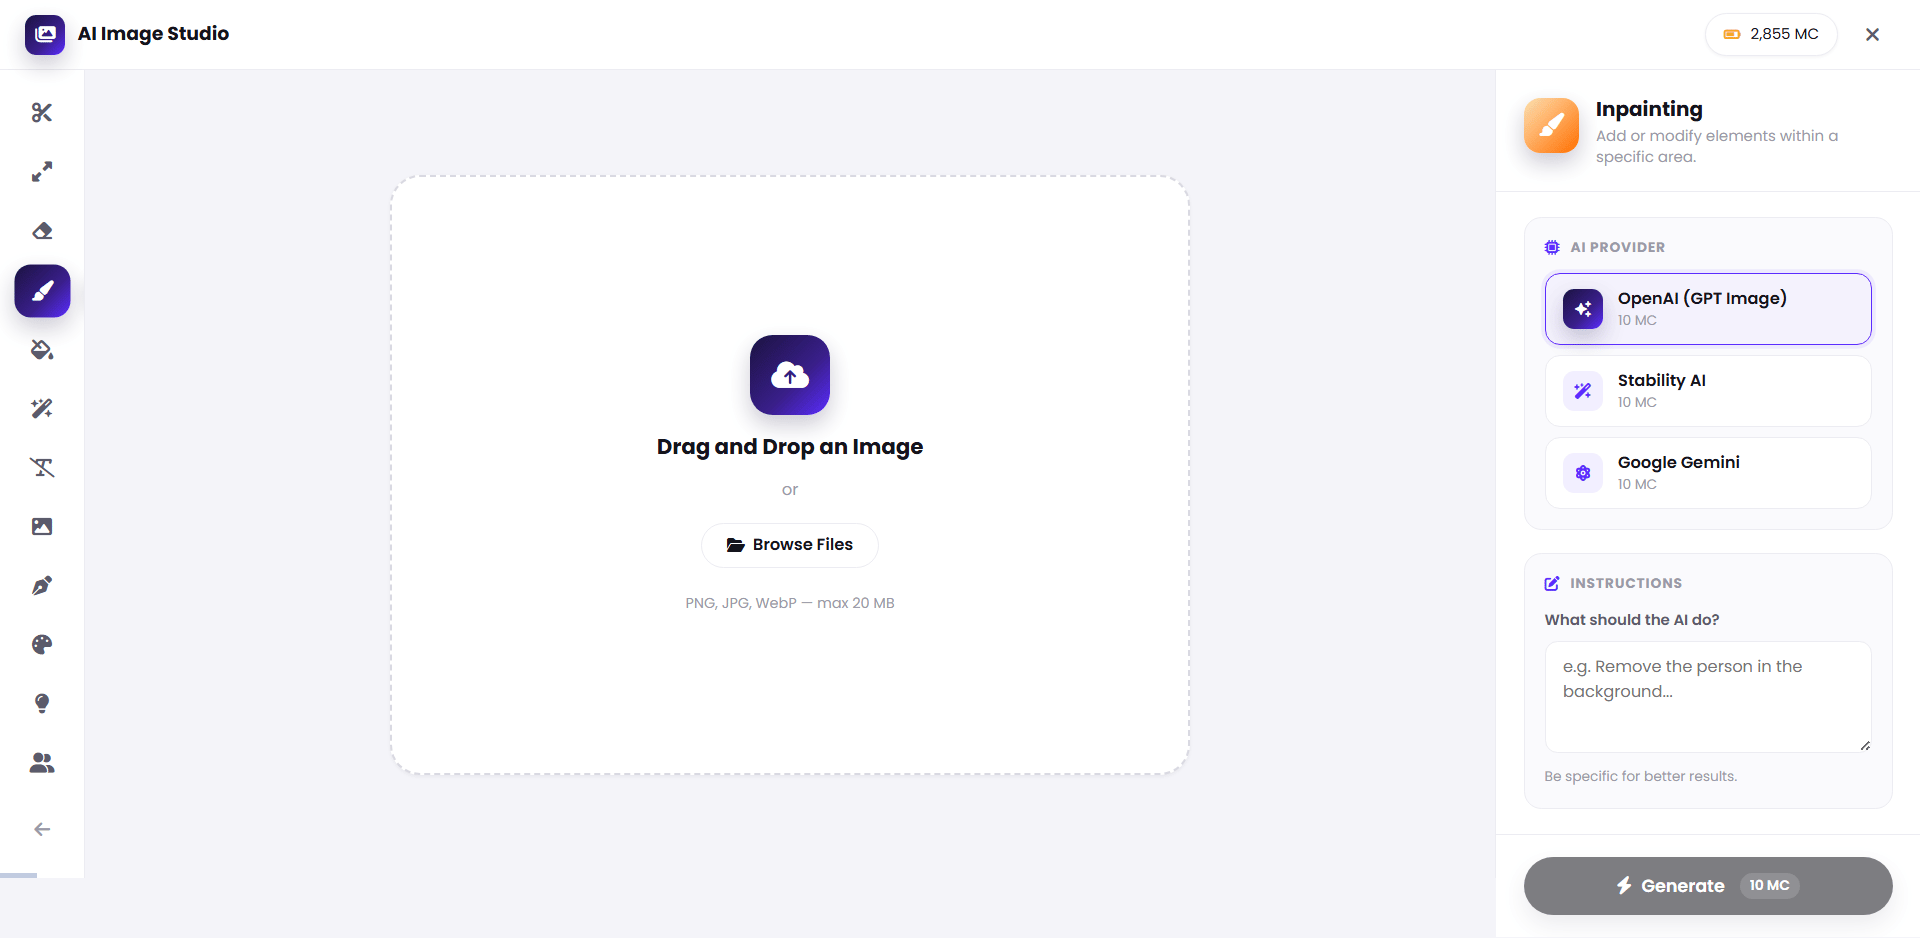
Open **Inpainting**, then upload the image using drag and drop or **Browse Files**.
### Step 2: Choose a provider
The current interface provides:
* OpenAI (GPT Image)
* Stability AI
* Google Gemini
### Step 3: Describe the desired change
Use **Instructions** to describe the element you want to add or modify.
Example:
> Add a small modern ceramic vase with green foliage on the coffee table. Match the existing perspective, scale, warm indoor lighting, materials, and natural shadow.
### Step 4: Generate
Clck **Generate** and review the result. This request consumes **10 MC** (AI Media Capacity).
### Tips
Describe the target area and the relationship between the new element and the existing scene. Mention scale, orientation, perspective, lighting, material, and shadows when relevant.
## 16. Style Transfer
Style Transfer applies an artistic style from a reference to your image.
### Step 1: Upload the source image
Open **Inpainting**, then upload the image using drag and drop or **Browse Files**.
### Step 2: Choose a provider
The current interface provides:
* OpenAI (GPT Image)
* Stability AI
* Google Gemini
### Step 3: Describe the desired change
Use **Instructions** to describe the element you want to add or modify.
Example:
> Add a small modern ceramic vase with green foliage on the coffee table. Match the existing perspective, scale, warm indoor lighting, materials, and natural shadow.
### Step 4: Generate
Clck **Generate** and review the result. This request consumes **10 MC** (AI Media Capacity).
### Tips
Describe the target area and the relationship between the new element and the existing scene. Mention scale, orientation, perspective, lighting, material, and shadows when relevant.
## 16. Style Transfer
Style Transfer applies an artistic style from a reference to your image.
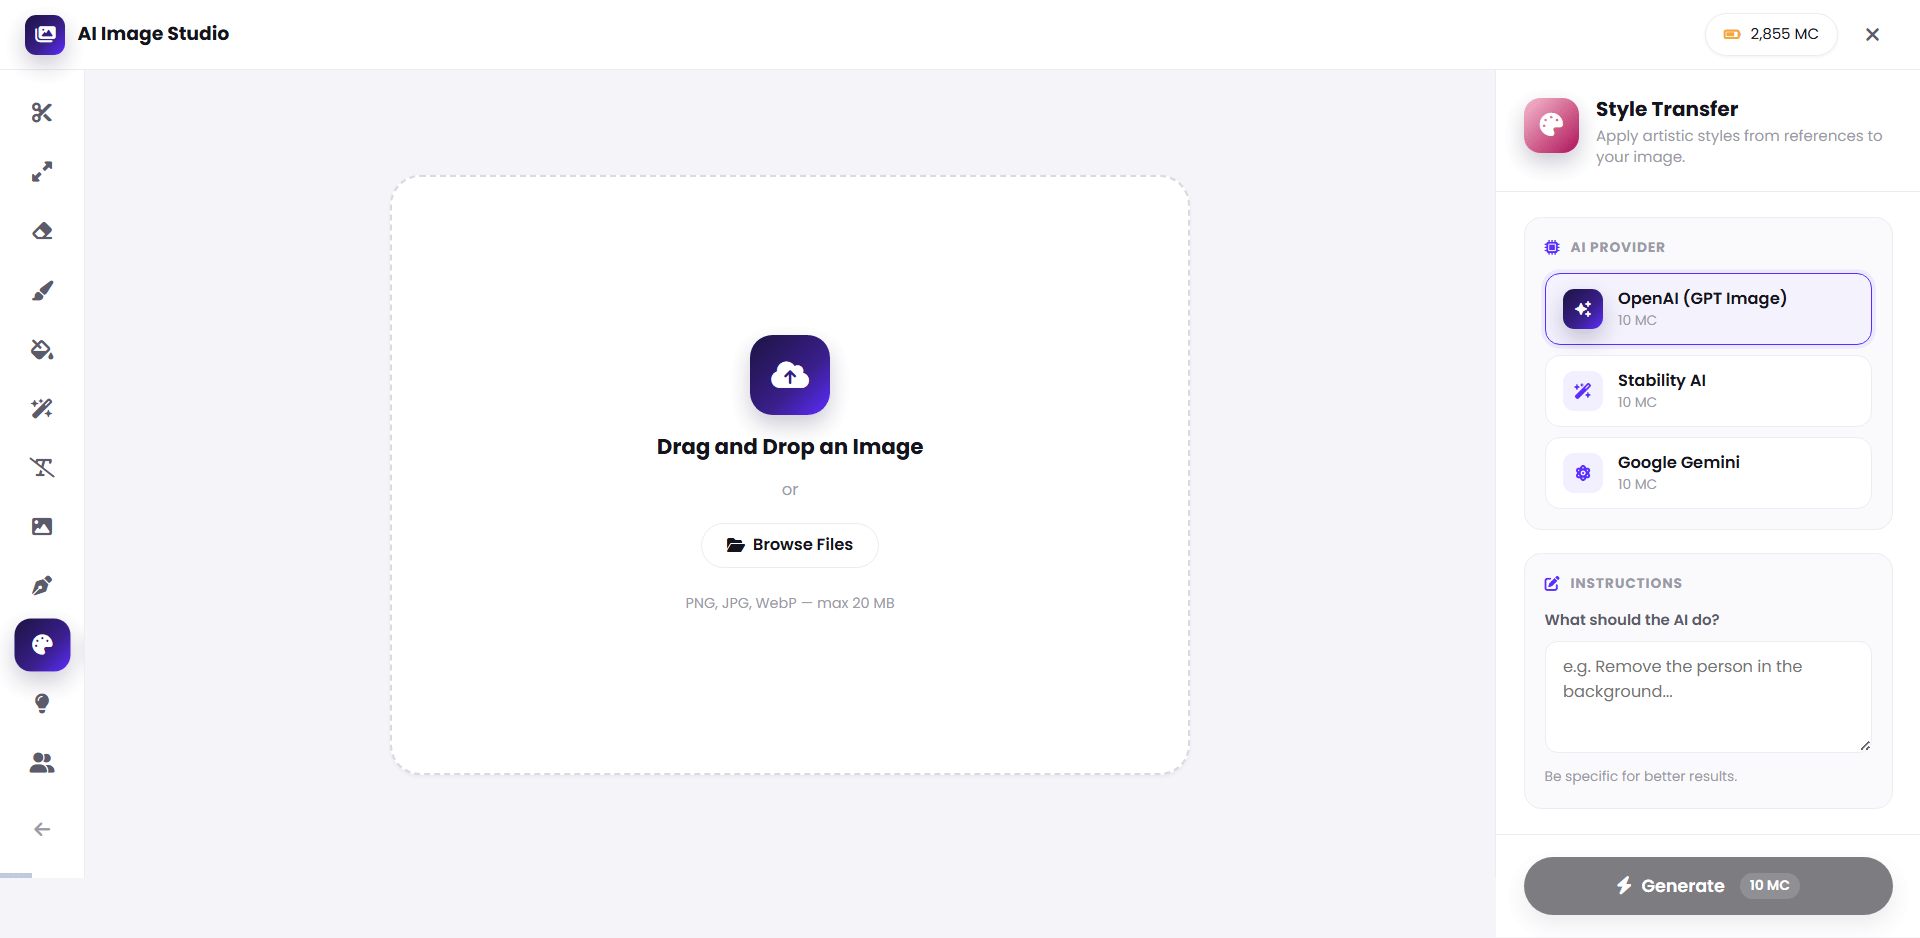 ### Step 1: Upload the image
Open **Style Transfer**, then upload the image you want to transform.
### Step 2: Choose a provider
The current interface provides:
* OpenAI (GPT Image)
* Stability AI
* Google Gemini
### Step 3: Describe the style
Use **Instructions** to describe the desired artistic direction and what should remain recognizable.
Example:
> Transform the image into a refined editorial watercolor illustration. Preserve the main subject, composition, pose, and important objects. Use soft watercolor washes, subtle paper texture, elegant brushwork, and a sophisticated muted palette.
### Step 4: Generate
Click **Generate**, then review the result. This request consumes **10 MC** (AI Media Capacity).
### Tips
Be specific about the style, medium, texture, color treatment, and mood. If preserving the original composition matters, state that explicitly.
## 17. Image Relight
Image Relight changes the lighting conditions and atmosphere of an existing image.
### Step 1: Upload the image
Open **Style Transfer**, then upload the image you want to transform.
### Step 2: Choose a provider
The current interface provides:
* OpenAI (GPT Image)
* Stability AI
* Google Gemini
### Step 3: Describe the style
Use **Instructions** to describe the desired artistic direction and what should remain recognizable.
Example:
> Transform the image into a refined editorial watercolor illustration. Preserve the main subject, composition, pose, and important objects. Use soft watercolor washes, subtle paper texture, elegant brushwork, and a sophisticated muted palette.
### Step 4: Generate
Click **Generate**, then review the result. This request consumes **10 MC** (AI Media Capacity).
### Tips
Be specific about the style, medium, texture, color treatment, and mood. If preserving the original composition matters, state that explicitly.
## 17. Image Relight
Image Relight changes the lighting conditions and atmosphere of an existing image.
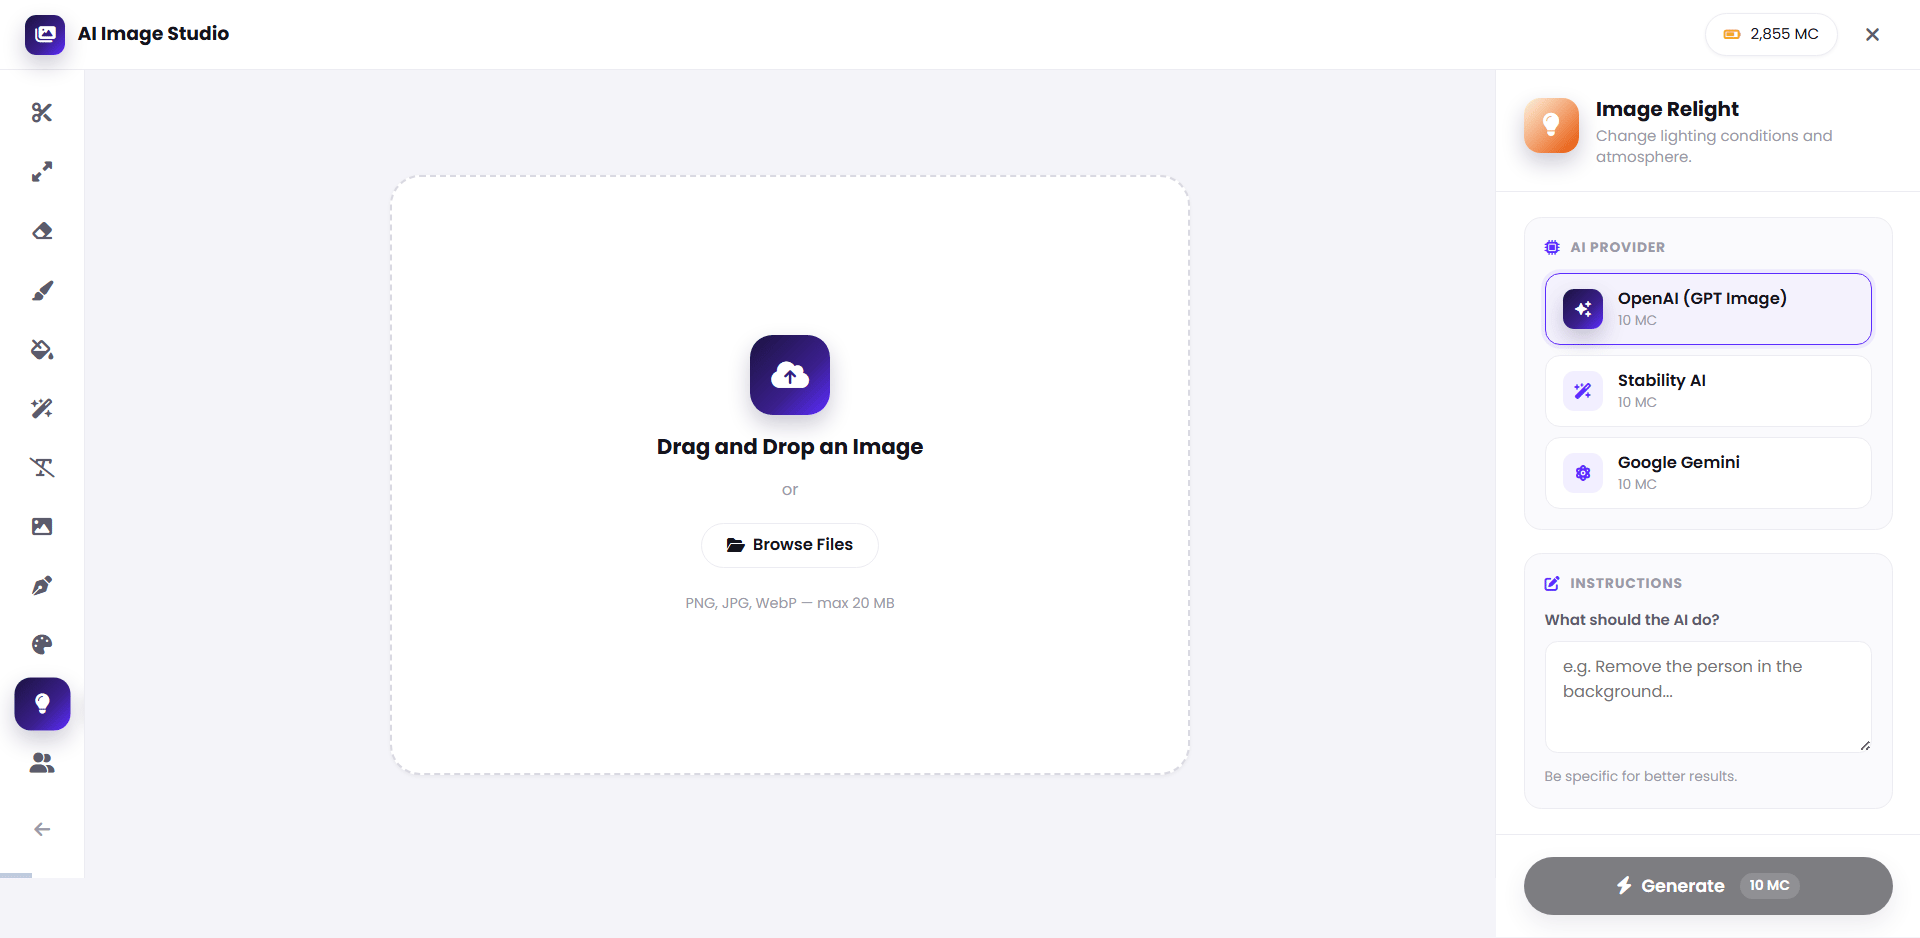 ### Step 1: Upload the image
Open **Image Relight**, then upload the source image using drag and drop or **Browse Files**.
### Step 2: Choose a provider
The current interface provides:
* OpenAI (GPT Image)
* Stability AI
* Google Gemini
### Step 3: Describe the lighting
Use **Instructions** to specify the lighting direction, quality, time of day, and atmosphere.
Example:
> Relight the image with soft golden-hour sunlight entering from the left side. Preserve the subject, composition, clothing, architecture, and objects exactly. Add realistic warm highlights, gentle shadows, and natural cinematic contrast.
### Step 4: Generate
Click **Generate** and review the result. This request consumes **10 MC** (AI Media Capacity).
### Tips
Describe:
* Light direction
* Time of day
* Warm or cool color temperature
* Shadow softness
* Contrast
* Atmosphere
## 18. Common workflow
Most AI Image Studio editing tasks follow the same pattern:
1. Open the required editing workflow.
2. Upload the source image.
3. Select an AI provider.
4. Add instructions when the workflow provides them.
5. Select **Generate**.
6. Review the result.
7. Use **Change** when you want another variation.
8. Use **Download** when the result is ready.
## 19. Prompting best practices
### Describe the outcome
Start with what you want the final image to look like.
### Tell the model what to preserve
For transformations, explicitly identify important elements that must remain unchanged.
### Be specific about placement
For edits that add or remove objects, describe the exact location and relationship to nearby elements.
### Match the existing scene
Mention perspective, lighting, materials, shadows, scale, and depth when the edit needs to look naturally integrated.
### Iterate when necessary
Use **Change** when you want another result rather than rebuilding the workflow from the beginning.
## 20. Provider selection
AI Image Studio brings multiple providers into the same workflow. Provider availability can vary by feature and can change as integrations are updated.
| Workflow | Providers shown in the current editing interfaces | Guidance |
| ------------------ | ------------------------------------------------- | --------------------------------------------------------------------------------------- |
| Merge Face | OpenAI, Stability AI, Google Gemini | Test the provider that best preserves the desired face and composition |
| Generative Fill | OpenAI, Stability AI, Google Gemini | Use precise instructions |
| Reimagine | OpenAI, Stability AI, Google Gemini | State what to preserve and what to restyle |
| Remove Background | OpenAI, Stability AI, Google Gemini | **Stability AI recommended for transparent-background output based on current testing** |
| Cleanup | OpenAI, Stability AI, Google Gemini | Describe the unwanted element precisely |
| Upscaler | OpenAI, Stability AI, Google Gemini | Use for resolution enhancement and sharpening |
| Replace Background | OpenAI, Stability AI, Google Gemini | Clearly define the new environment and preserved subject |
| Sketch to Image | OpenAI, Stability AI, Google Gemini | Describe both the preserved structure and desired rendering |
| Remove Text | OpenAI, Stability AI, Google Gemini | Use on images you have permission to modify |
| Inpainting | OpenAI, Stability AI, Google Gemini | Describe the target modification precisely |
| Style Transfer | OpenAI, Stability AI, Google Gemini | Describe the artistic direction and preserved composition |
| Image Relight | OpenAI, Stability AI, Google Gemini | Describe lighting direction and atmosphere |
## 21. Download and continue editing
After a result is generated, review it, use **Change** for another variation, or select **Download** when it is ready.
For generated images, use **Gallery** to revisit previous work.
## Quick reference
| Goal | Workflow |
| ----------------------------------- | ------------------ |
| Swap or blend a face | Merge Face |
| Add content | Generative Fill |
| Restyle a scene | Reimagine |
| Create a transparent subject cutout | Remove Background |
| Remove unwanted objects | Cleanup |
| Enhance resolution and sharpness | Upscaler |
| Replace an entire background | Replace Background |
| Turn a sketch into a polished image | Sketch to Image |
| Remove text or watermarks | Remove Text |
| Modify a specific area | Inpainting |
| Apply an artistic style | Style Transfer |
| Change lighting and atmosphere | Image Relight |
| Find previously generated images | Gallery |
## Troubleshooting
### The result does not match the prompt
Make the instruction more specific. Identify the subject, desired change, elements to preserve, placement, lighting, and style.
### The edited image changes too much
Explicitly tell the model what must remain unchanged.
### Added content does not blend naturally
Describe perspective, scale, materials, light direction, shadows, and depth of field.
### The background replacement changes the subject
State that the subject must remain unchanged, including facial features, clothing, pose, proportions, and important details.
### The upscaled result is much larger than expected
Check the output dimensions and file size before downloading or using the image in another workflow.
### Remove Background does not produce the transparency I need
Try **Stability AI**, which is the recommended provider in the current workflow for transparent-background output.
### One provider gives a weaker result
Try another available provider and compare the outputs.
## Summary
AI Image Studio brings image creation, Gallery management, and a complete set of image-editing workflows into one workspace.
The 12 editing features covered in this tutorial are:
* Merge Face
* Generative Fill
* Reimagine
* Remove Background
* Cleanup
* Upscaler
* Replace Background
* Sketch to Image
* Remove Text
* Inpainting
* Style Transfer
* Image Relight
Use the workflow that matches the job, write precise instructions when available, and compare providers when a different model may produce a better result.
### Step 1: Upload the image
Open **Image Relight**, then upload the source image using drag and drop or **Browse Files**.
### Step 2: Choose a provider
The current interface provides:
* OpenAI (GPT Image)
* Stability AI
* Google Gemini
### Step 3: Describe the lighting
Use **Instructions** to specify the lighting direction, quality, time of day, and atmosphere.
Example:
> Relight the image with soft golden-hour sunlight entering from the left side. Preserve the subject, composition, clothing, architecture, and objects exactly. Add realistic warm highlights, gentle shadows, and natural cinematic contrast.
### Step 4: Generate
Click **Generate** and review the result. This request consumes **10 MC** (AI Media Capacity).
### Tips
Describe:
* Light direction
* Time of day
* Warm or cool color temperature
* Shadow softness
* Contrast
* Atmosphere
## 18. Common workflow
Most AI Image Studio editing tasks follow the same pattern:
1. Open the required editing workflow.
2. Upload the source image.
3. Select an AI provider.
4. Add instructions when the workflow provides them.
5. Select **Generate**.
6. Review the result.
7. Use **Change** when you want another variation.
8. Use **Download** when the result is ready.
## 19. Prompting best practices
### Describe the outcome
Start with what you want the final image to look like.
### Tell the model what to preserve
For transformations, explicitly identify important elements that must remain unchanged.
### Be specific about placement
For edits that add or remove objects, describe the exact location and relationship to nearby elements.
### Match the existing scene
Mention perspective, lighting, materials, shadows, scale, and depth when the edit needs to look naturally integrated.
### Iterate when necessary
Use **Change** when you want another result rather than rebuilding the workflow from the beginning.
## 20. Provider selection
AI Image Studio brings multiple providers into the same workflow. Provider availability can vary by feature and can change as integrations are updated.
| Workflow | Providers shown in the current editing interfaces | Guidance |
| ------------------ | ------------------------------------------------- | --------------------------------------------------------------------------------------- |
| Merge Face | OpenAI, Stability AI, Google Gemini | Test the provider that best preserves the desired face and composition |
| Generative Fill | OpenAI, Stability AI, Google Gemini | Use precise instructions |
| Reimagine | OpenAI, Stability AI, Google Gemini | State what to preserve and what to restyle |
| Remove Background | OpenAI, Stability AI, Google Gemini | **Stability AI recommended for transparent-background output based on current testing** |
| Cleanup | OpenAI, Stability AI, Google Gemini | Describe the unwanted element precisely |
| Upscaler | OpenAI, Stability AI, Google Gemini | Use for resolution enhancement and sharpening |
| Replace Background | OpenAI, Stability AI, Google Gemini | Clearly define the new environment and preserved subject |
| Sketch to Image | OpenAI, Stability AI, Google Gemini | Describe both the preserved structure and desired rendering |
| Remove Text | OpenAI, Stability AI, Google Gemini | Use on images you have permission to modify |
| Inpainting | OpenAI, Stability AI, Google Gemini | Describe the target modification precisely |
| Style Transfer | OpenAI, Stability AI, Google Gemini | Describe the artistic direction and preserved composition |
| Image Relight | OpenAI, Stability AI, Google Gemini | Describe lighting direction and atmosphere |
## 21. Download and continue editing
After a result is generated, review it, use **Change** for another variation, or select **Download** when it is ready.
For generated images, use **Gallery** to revisit previous work.
## Quick reference
| Goal | Workflow |
| ----------------------------------- | ------------------ |
| Swap or blend a face | Merge Face |
| Add content | Generative Fill |
| Restyle a scene | Reimagine |
| Create a transparent subject cutout | Remove Background |
| Remove unwanted objects | Cleanup |
| Enhance resolution and sharpness | Upscaler |
| Replace an entire background | Replace Background |
| Turn a sketch into a polished image | Sketch to Image |
| Remove text or watermarks | Remove Text |
| Modify a specific area | Inpainting |
| Apply an artistic style | Style Transfer |
| Change lighting and atmosphere | Image Relight |
| Find previously generated images | Gallery |
## Troubleshooting
### The result does not match the prompt
Make the instruction more specific. Identify the subject, desired change, elements to preserve, placement, lighting, and style.
### The edited image changes too much
Explicitly tell the model what must remain unchanged.
### Added content does not blend naturally
Describe perspective, scale, materials, light direction, shadows, and depth of field.
### The background replacement changes the subject
State that the subject must remain unchanged, including facial features, clothing, pose, proportions, and important details.
### The upscaled result is much larger than expected
Check the output dimensions and file size before downloading or using the image in another workflow.
### Remove Background does not produce the transparency I need
Try **Stability AI**, which is the recommended provider in the current workflow for transparent-background output.
### One provider gives a weaker result
Try another available provider and compare the outputs.
## Summary
AI Image Studio brings image creation, Gallery management, and a complete set of image-editing workflows into one workspace.
The 12 editing features covered in this tutorial are:
* Merge Face
* Generative Fill
* Reimagine
* Remove Background
* Cleanup
* Upscaler
* Replace Background
* Sketch to Image
* Remove Text
* Inpainting
* Style Transfer
* Image Relight
Use the workflow that matches the job, write precise instructions when available, and compare providers when a different model may produce a better result.