> ## Documentation Index
> Fetch the complete documentation index at: https://docs.klyra.ai/llms.txt
> Use this file to discover all available pages before exploring further.
# AI Fashion Studio
> Learn how to create fashion photos, build outfits with Virtual Try-On, change models, and create cinematic video keyframes in Klyra AI.
[AI Fashion Studio](https://klyra.ai/apps/ai-fashion-studio) turns fashion concepts into professional visuals without requiring a traditional photo shoot. You can build a complete photoshoot from wardrobe items, dress a model with Virtual Try-On, swap models while preserving the scene, and turn still images into cinematic video keyframes.
This tutorial covers the workflows shown in the AI Fashion Studio interface.
## What you can do
AI Fashion Studio brings several fashion workflows into one workspace:
* **Photoshoot Studio**: combine wardrobe items with a model, pose, background, lighting, and aspect ratio.
* **Virtual Try-On Studio**: upload a model and add garments slot-by-slot.
* **Change Model**: replace the model while keeping the outfit, pose, and scene.
* **Create Video**: turn a fashion still into a cinematic keyframe using a motion preset.
* **My Wardrobe**: keep reusable fashion products organized in one library.
* **My Photoshoots**: browse and manage generated fashion creations.
The interface also includes **Change Style** and **Edit Image** for additional creative variations.
## Open AI Fashion Studio
From the Klyra AI workspace, open **AI Fashion Studio**.
The main screen gives you a quick overview of your fashion workspace, including photoshoots, video keyframes, wardrobe items, favorites, and the available AI tools.
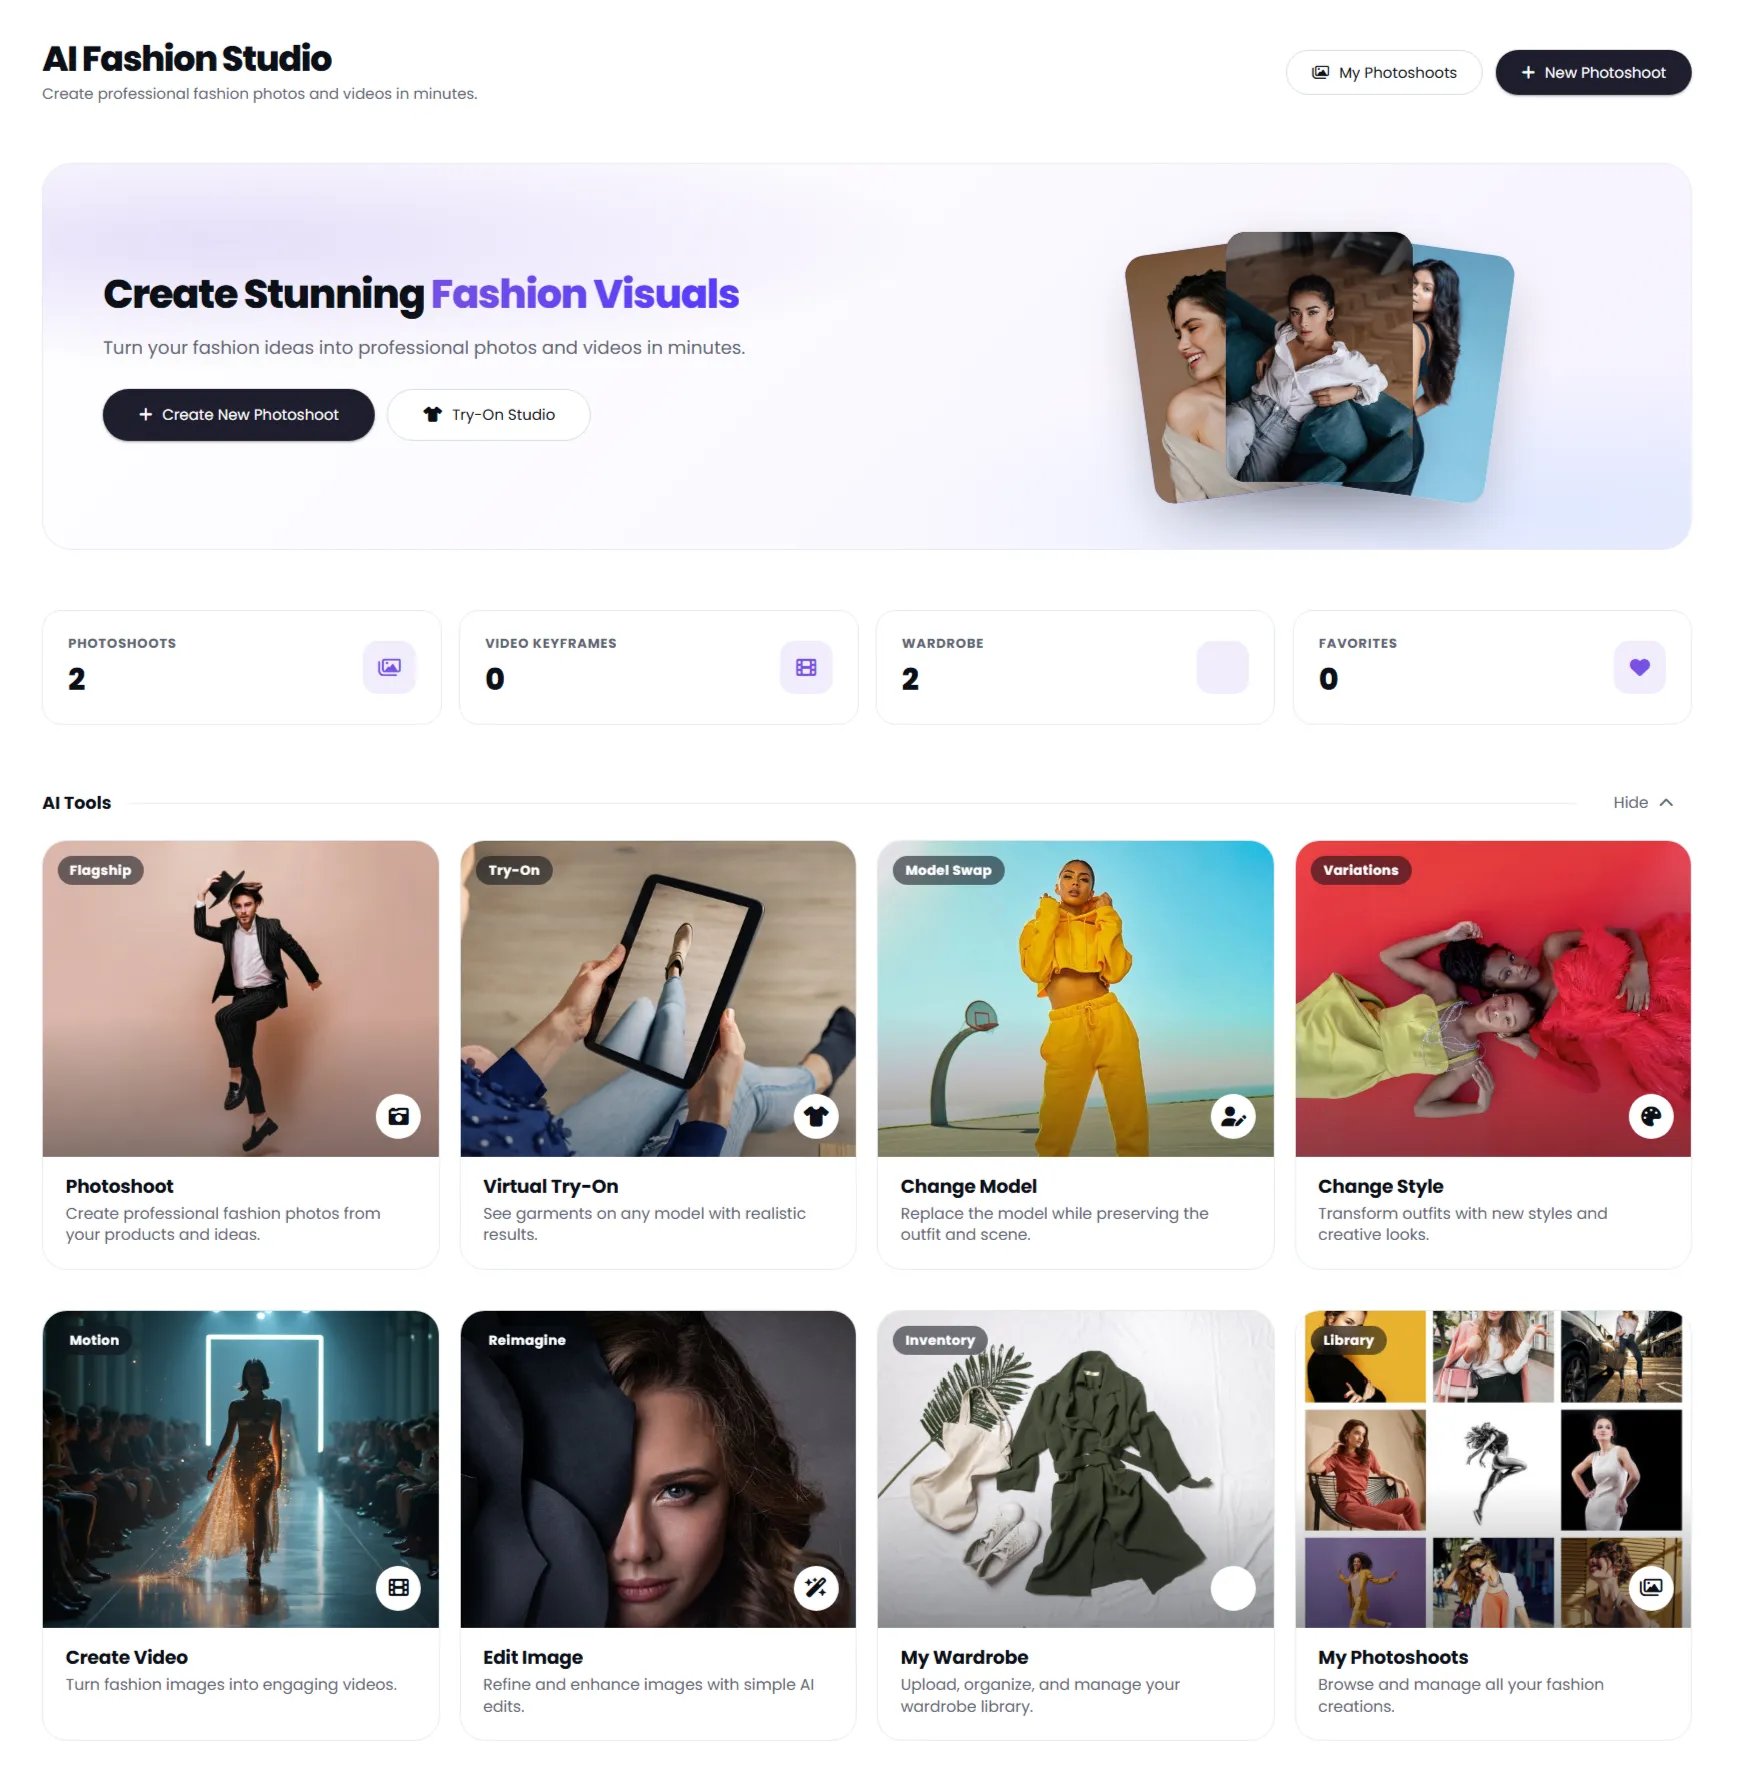 From the dashboard, you can start a new photoshoot, open Virtual Try-On Studio, or choose another fashion workflow.
## Create a photoshoot
Photoshoot Studio lets you combine products from your wardrobe and generate a complete fashion scene.
### 1. Select your products
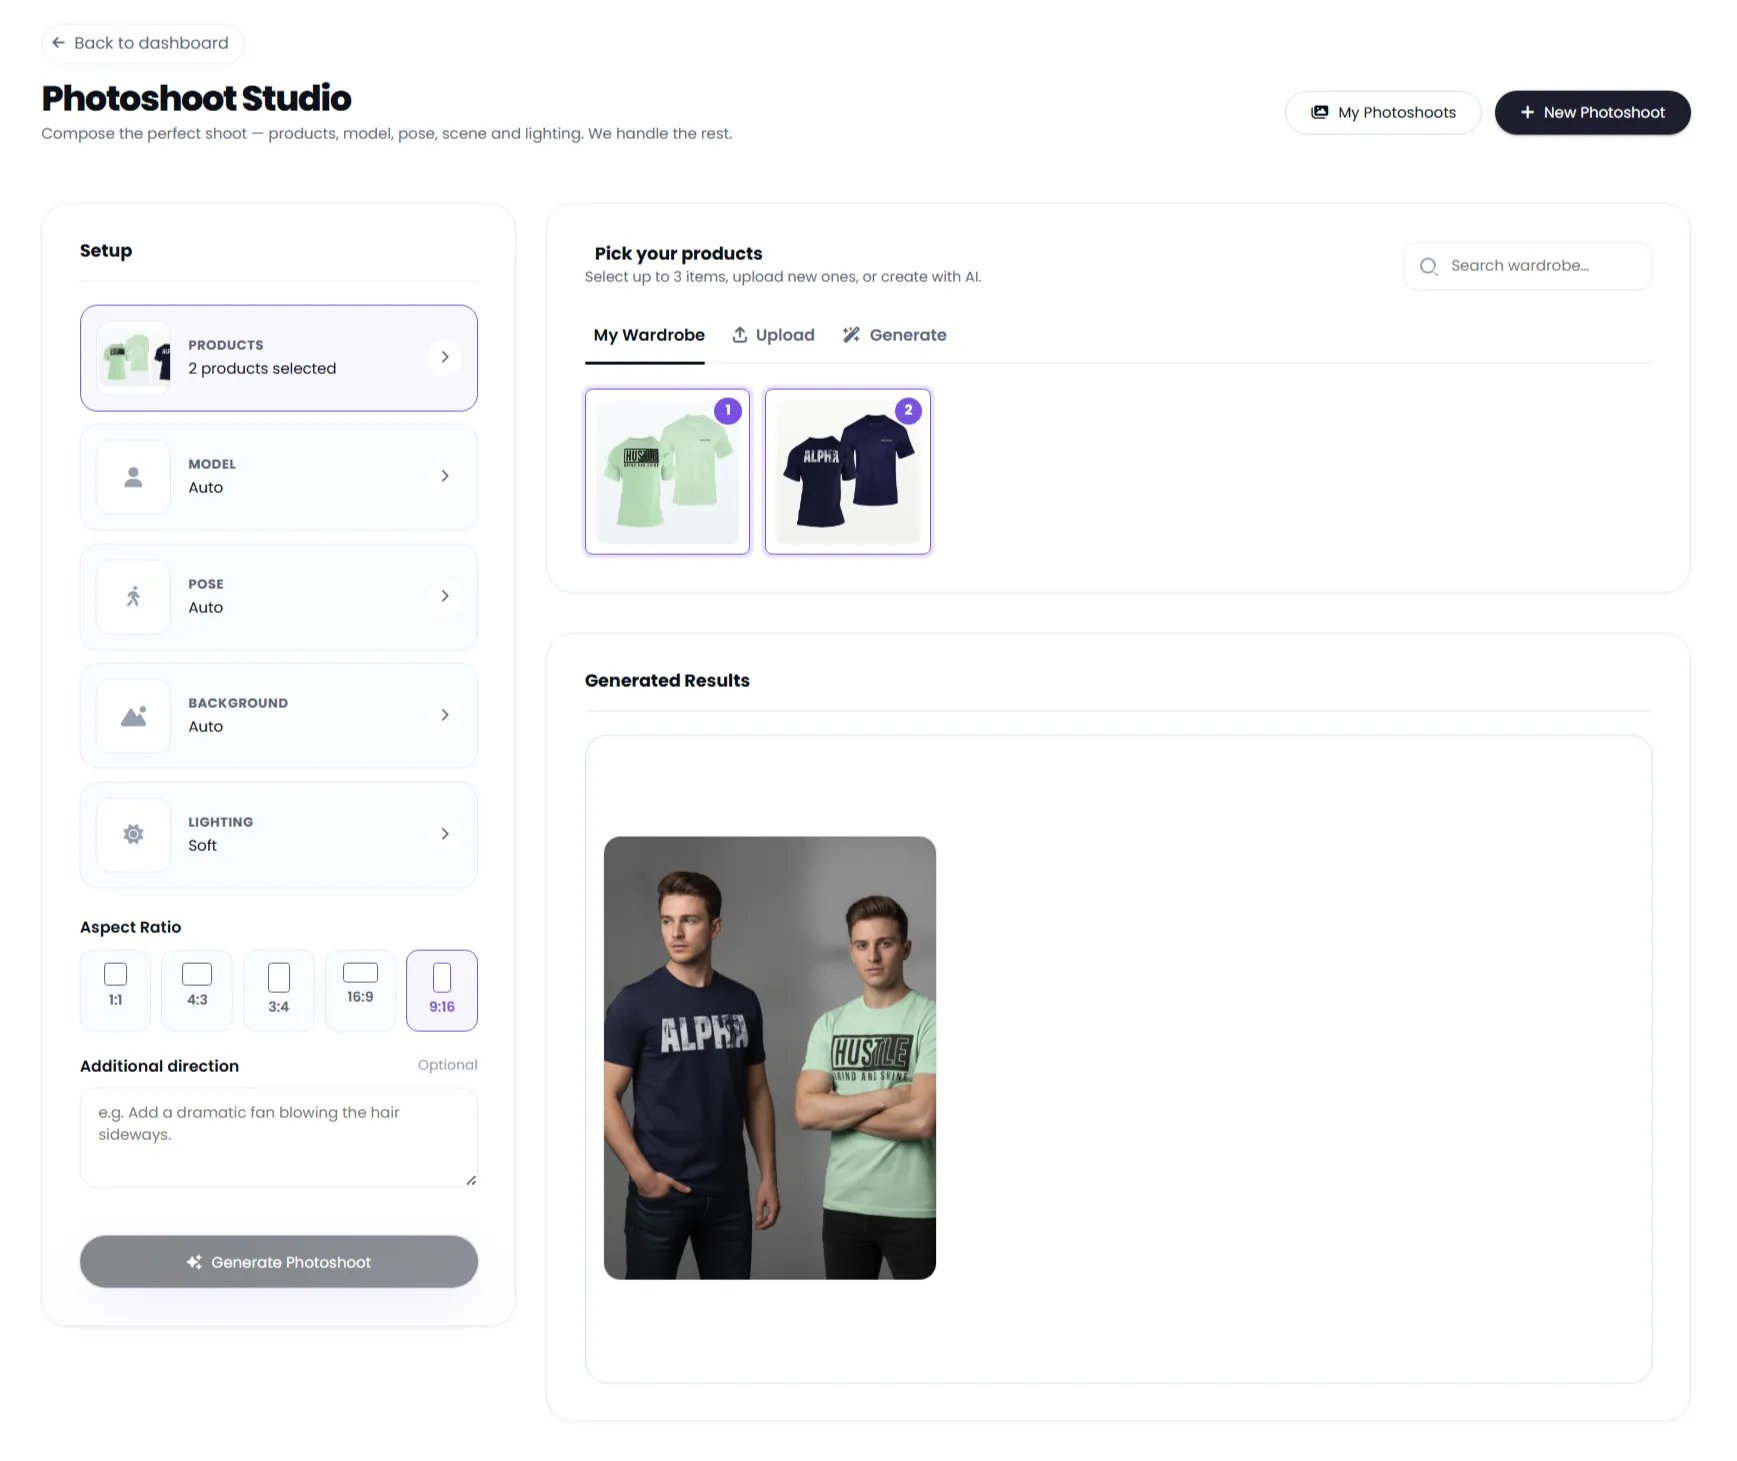
In **Pick your products**, choose up to three wardrobe items.
You can select items from **My Wardrobe**, upload new items, or generate an item with AI.
The example below has two products selected.
From the dashboard, you can start a new photoshoot, open Virtual Try-On Studio, or choose another fashion workflow.
## Create a photoshoot
Photoshoot Studio lets you combine products from your wardrobe and generate a complete fashion scene.
### 1. Select your products
In **Pick your products**, choose up to three wardrobe items.
You can select items from **My Wardrobe**, upload new items, or generate an item with AI.
The example below has two products selected.
 ### 2. Configure the shoot
The setup panel provides controls for:
* **Products**
* **Model**
* **Pose**
* **Background**
* **Lighting**
* **Aspect Ratio**
* **Additional direction**
Model, pose, and background can remain on **Auto** when you want Klyra AI to handle those choices.
For lighting, the interface shown uses **Soft**.
### 3. Choose an aspect ratio
Select the format that matches where you plan to use the image.
The available options shown are:
* 1:1
* 4:3
* 3:4
* 16:9
* 9:16
### 4. Add additional direction
Use **Additional direction** when you want to give the generation extra creative guidance.
For example, you can describe a specific visual action or atmosphere. Keep the instruction focused on what you want the final fashion image to communicate.
### 5. Generate the photoshoot
Click **Generate Photoshoot**.
Klyra AI creates the fashion visual using the selected wardrobe and creative settings.
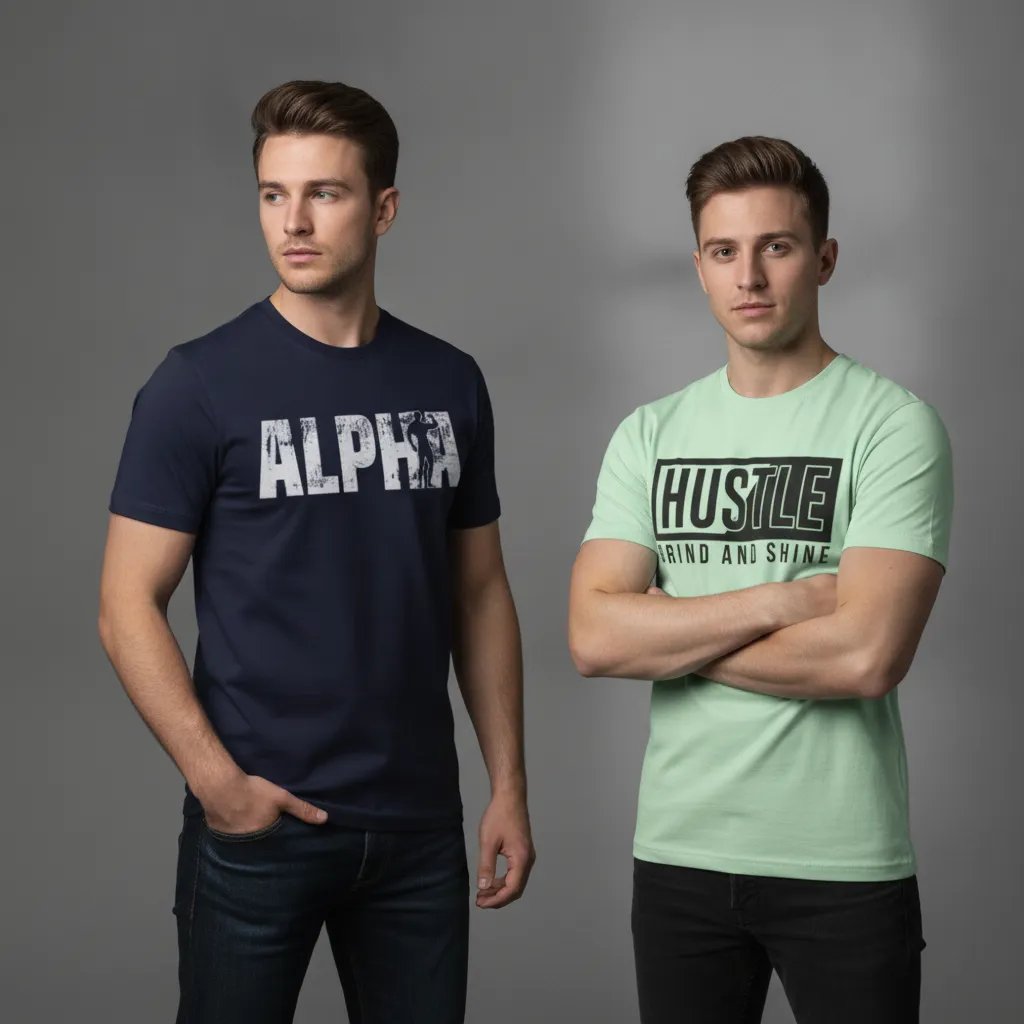
The generated result appears in the **Generated Results** area.
### 2. Configure the shoot
The setup panel provides controls for:
* **Products**
* **Model**
* **Pose**
* **Background**
* **Lighting**
* **Aspect Ratio**
* **Additional direction**
Model, pose, and background can remain on **Auto** when you want Klyra AI to handle those choices.
For lighting, the interface shown uses **Soft**.
### 3. Choose an aspect ratio
Select the format that matches where you plan to use the image.
The available options shown are:
* 1:1
* 4:3
* 3:4
* 16:9
* 9:16
### 4. Add additional direction
Use **Additional direction** when you want to give the generation extra creative guidance.
For example, you can describe a specific visual action or atmosphere. Keep the instruction focused on what you want the final fashion image to communicate.
### 5. Generate the photoshoot
Click **Generate Photoshoot**.
Klyra AI creates the fashion visual using the selected wardrobe and creative settings.
The generated result appears in the **Generated Results** area.
 ## Use Virtual Try-On Studio
Virtual Try-On Studio is designed for dressing a model with garments from separate product images.
It uses a slot-based workflow so you can build an outfit piece by piece.
## Use Virtual Try-On Studio
Virtual Try-On Studio is designed for dressing a model with garments from separate product images.
It uses a slot-based workflow so you can build an outfit piece by piece.
 ### 1. Upload the model
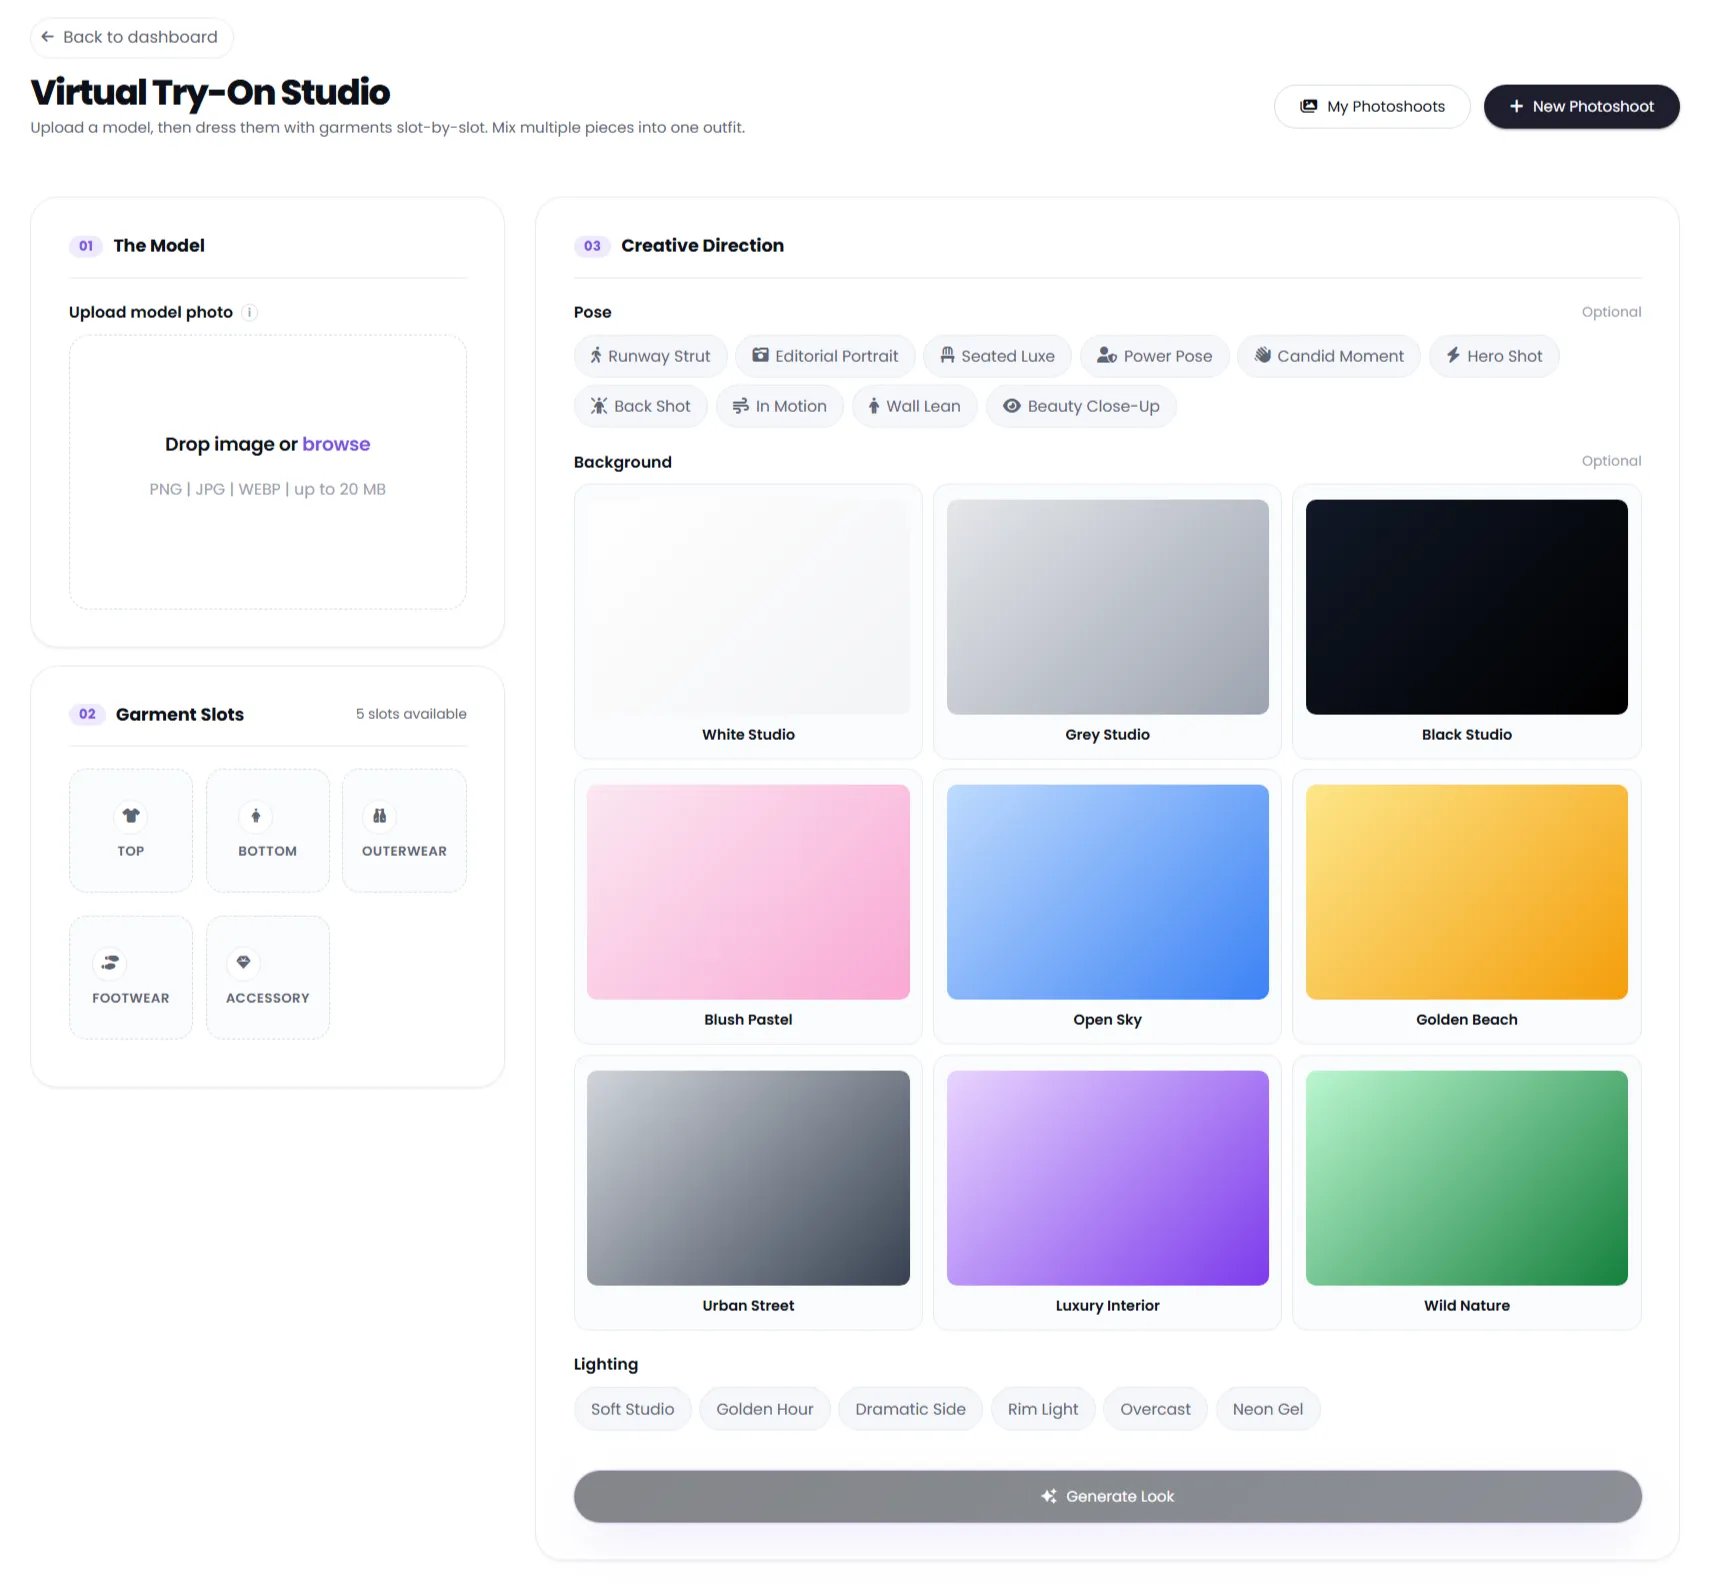
Under **The Model**, upload the model photograph.
You can drag an image into the upload area or use **browse**.
The interface accepts:
* PNG
* JPG
* WEBP
* Files up to 20 MB
### 2. Add garments to slots
The **Garment Slots** section provides five available categories:
* **Top**
* **Bottom**
* **Outerwear**
* **Footwear**
* **Accessory**
Select a slot to add the corresponding garment.
This lets you combine separate product images into one complete outfit.
### 3. Set the creative direction
The **Creative Direction** section lets you define the visual treatment.
#### Choose a pose
The interface includes pose presets such as:
* Runway Strut
* Editorial Portrait
* Seated Luxe
* Power Pose
* Candid Moment
* Hero Shot
* Back Shot
* In Motion
* Wall Lean
* Beauty Close-Up
Pose selection is optional.
#### Choose a background
You can select from studio and environmental backgrounds including:
* White Studio
* Grey Studio
* Black Studio
* Blush Pastel
* Open Sky
* Golden Beach
* Urban Street
* Luxury Interior
* Wild Nature
Background selection is optional.
#### Choose lighting
Available lighting presets shown in the interface include:
* Soft Studio
* Golden Hour
* Dramatic Side
* Rim Light
* Overcast
* Neon Gel
### 4. Generate the look
Once the model, garments, and creative direction are ready, click **Generate Look**.
Klyra AI creates the dressed model while applying the selected creative settings.
## Change the model
**Change Model** lets you replace the model in an existing fashion image while preserving the rest of the visual direction.
### 1. Upload the model
Under **The Model**, upload the model photograph.
You can drag an image into the upload area or use **browse**.
The interface accepts:
* PNG
* JPG
* WEBP
* Files up to 20 MB
### 2. Add garments to slots
The **Garment Slots** section provides five available categories:
* **Top**
* **Bottom**
* **Outerwear**
* **Footwear**
* **Accessory**
Select a slot to add the corresponding garment.
This lets you combine separate product images into one complete outfit.
### 3. Set the creative direction
The **Creative Direction** section lets you define the visual treatment.
#### Choose a pose
The interface includes pose presets such as:
* Runway Strut
* Editorial Portrait
* Seated Luxe
* Power Pose
* Candid Moment
* Hero Shot
* Back Shot
* In Motion
* Wall Lean
* Beauty Close-Up
Pose selection is optional.
#### Choose a background
You can select from studio and environmental backgrounds including:
* White Studio
* Grey Studio
* Black Studio
* Blush Pastel
* Open Sky
* Golden Beach
* Urban Street
* Luxury Interior
* Wild Nature
Background selection is optional.
#### Choose lighting
Available lighting presets shown in the interface include:
* Soft Studio
* Golden Hour
* Dramatic Side
* Rim Light
* Overcast
* Neon Gel
### 4. Generate the look
Once the model, garments, and creative direction are ready, click **Generate Look**.
Klyra AI creates the dressed model while applying the selected creative settings.
## Change the model
**Change Model** lets you replace the model in an existing fashion image while preserving the rest of the visual direction.
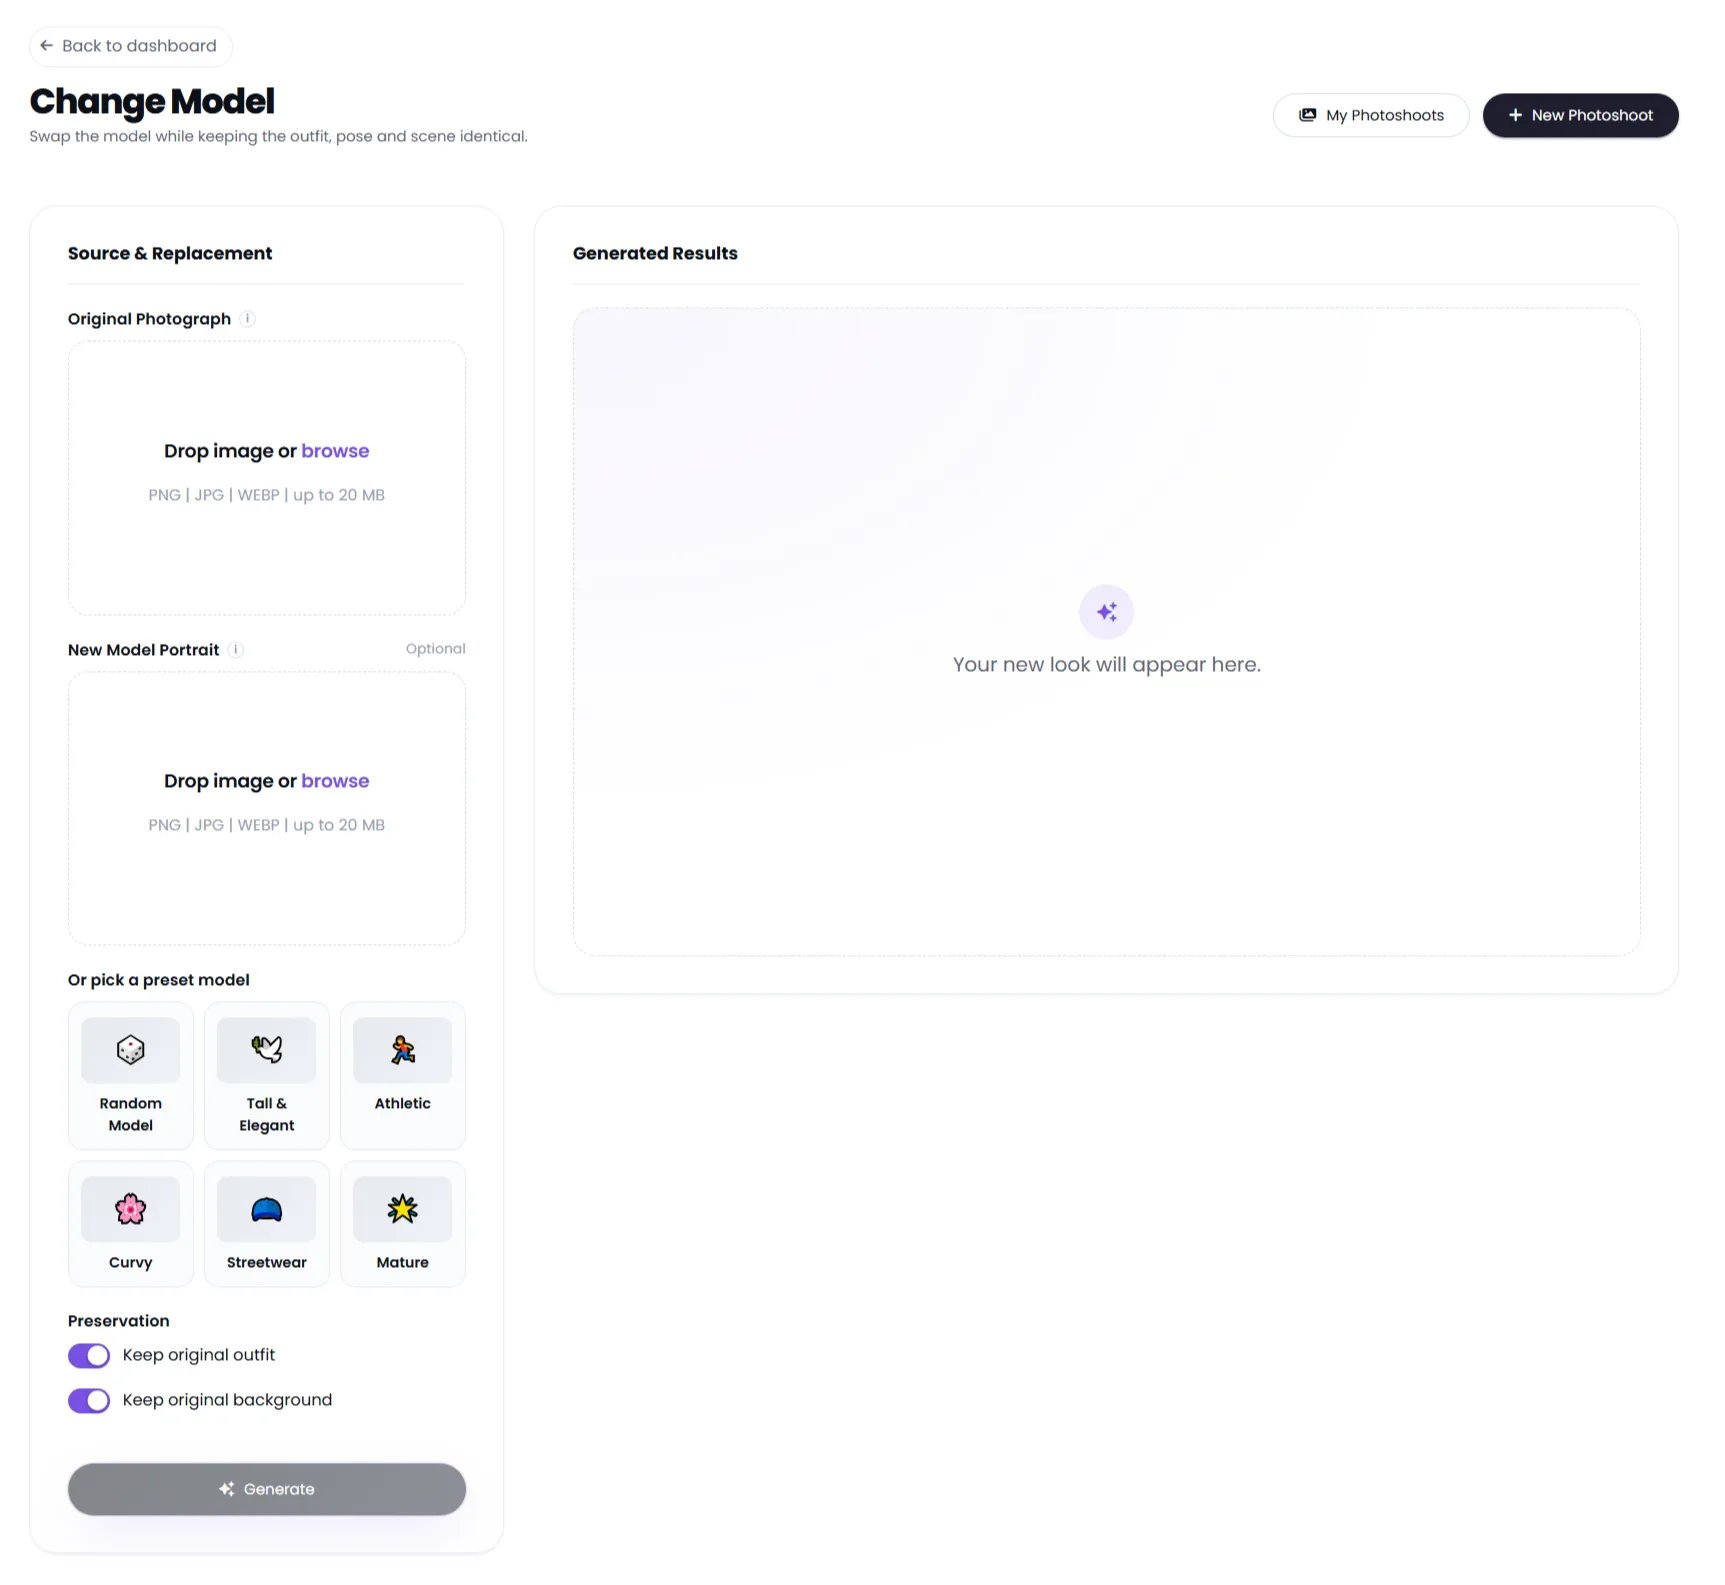 ### 1. Upload the original photograph
Under **Original Photograph**, upload the fashion image you want to modify.
You can drag the image into the upload area or use **browse**.
Supported formats shown in the interface:
* PNG
* JPG
* WEBP
* Up to 20 MB
### 2. Choose the new model
Under **New Model Portrait**, upload a portrait of the model you want to use.
This field is optional in the interface because you can instead select a preset model.
### 3. Use a preset model
The available preset choices shown are:
* Random Model
* Tall & Elegant
* Athletic
* Curvy
* Streetwear
* Mature
Select a preset when you do not want to upload a separate portrait.
### 4. Preserve the original
Two preservation controls are available:
* **Keep original outfit**
* **Keep original background**
Both are enabled in the example interface.
These controls let you specify which parts of the original image should remain unchanged while the model is replaced.
### 5. Generate
Click **Generate**.
The new result appears in **Generated Results**.
The workflow is designed specifically to change the model while keeping the outfit, pose, and scene consistent.
## Create a fashion video keyframe
The **Create Video** workflow transforms a still fashion image into a cinematic motion concept.
### 1. Upload the original photograph
Under **Original Photograph**, upload the fashion image you want to modify.
You can drag the image into the upload area or use **browse**.
Supported formats shown in the interface:
* PNG
* JPG
* WEBP
* Up to 20 MB
### 2. Choose the new model
Under **New Model Portrait**, upload a portrait of the model you want to use.
This field is optional in the interface because you can instead select a preset model.
### 3. Use a preset model
The available preset choices shown are:
* Random Model
* Tall & Elegant
* Athletic
* Curvy
* Streetwear
* Mature
Select a preset when you do not want to upload a separate portrait.
### 4. Preserve the original
Two preservation controls are available:
* **Keep original outfit**
* **Keep original background**
Both are enabled in the example interface.
These controls let you specify which parts of the original image should remain unchanged while the model is replaced.
### 5. Generate
Click **Generate**.
The new result appears in **Generated Results**.
The workflow is designed specifically to change the model while keeping the outfit, pose, and scene consistent.
## Create a fashion video keyframe
The **Create Video** workflow transforms a still fashion image into a cinematic motion concept.
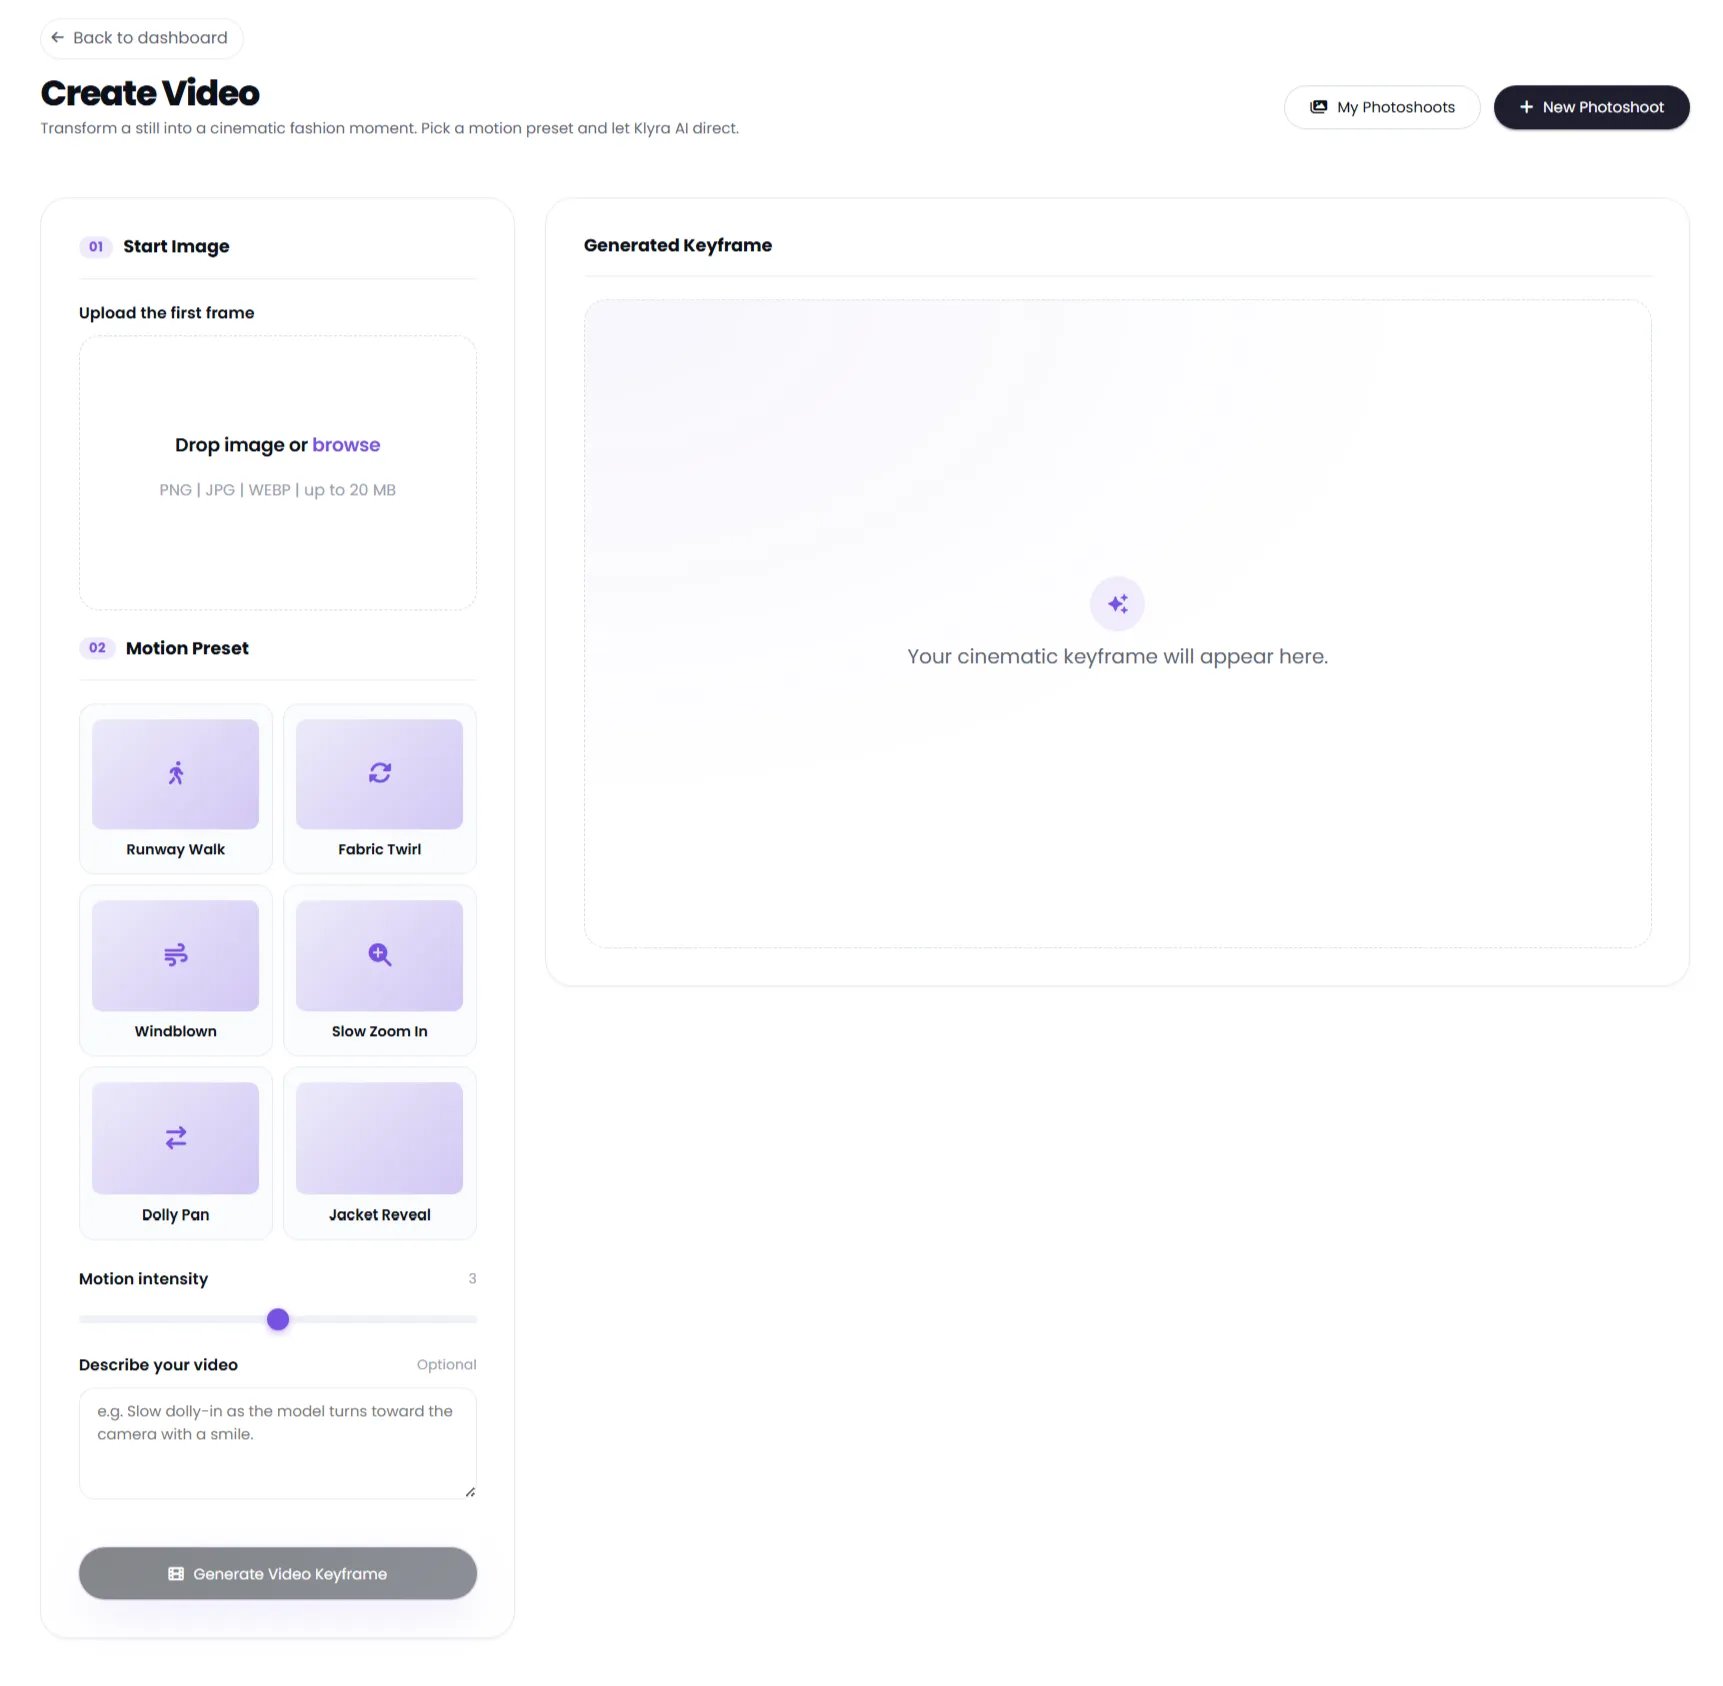 ### 1. Upload the start image
Under **Start Image**, upload the first frame.
The interface accepts:
* PNG
* JPG
* WEBP
* Up to 20 MB
### 2. Choose a motion preset
The available motion presets shown are:
* Runway Walk
* Fabric Twirl
* Windblown
* Slow Zoom In
* Dolly Pan
* Jacket Reveal
Choose the preset that best matches the movement you want to create.
### 3. Adjust motion intensity
Use the **Motion intensity** slider to control how strongly the selected motion should be expressed.
The example screen shows the intensity set to **3**.
### 4. Describe the video
The optional **Describe your video** field lets you add additional direction.
For example, you can describe the camera movement, model action, or overall cinematic behavior you want the keyframe to communicate.
### 5. Generate the keyframe
Click **Generate Video Keyframe**.
The generated result appears in **Generated Keyframe**.
## Manage your fashion assets
AI Fashion Studio is designed around reusable fashion assets.
The dashboard provides access to:
* **My Wardrobe** for organizing clothing and fashion products.
* **My Photoshoots** for browsing generated fashion creations.
* **Edit Image** for refining generated images.
* **Change Style** for creating alternate outfit aesthetics.
* **Create Video** for turning still fashion imagery into motion concepts.
Keeping products and generated work organized makes it easier to reuse the same assets across multiple creative workflows.
## Tips for better results
### Use clean source images
Upload clear product, garment, model, and portrait images. A clean source makes it easier for the AI to preserve the important visual details.
### Be intentional with pose and background
For fashion campaigns, select a pose and background that support the purpose of the image. Editorial portraits, runway movement, and lifestyle scenes can communicate very different visual directions.
### Reuse wardrobe items
Keep frequently used garments in **My Wardrobe** so they are available for future photoshoots and Virtual Try-On workflows.
### Add focused direction
When using an additional direction or video description, describe the specific result you want instead of adding unnecessary instructions.
## Quick workflow
For a fast fashion campaign:
1. Open **AI Fashion Studio**.
2. Add products to **My Wardrobe** if they are not already available.
3. Open **Photoshoot** and select up to three products.
4. Choose the model, pose, background, lighting, and aspect ratio.
5. Generate the photoshoot.
6. Use **Change Model** when you need another model with the same visual setup.
7. Use **Virtual Try-On** when you need to combine separate garments into an outfit.
8. Use **Create Video** when you want to turn a still into a cinematic motion keyframe.
9. Keep the resulting work in **My Photoshoots** for reuse and management.
### 1. Upload the start image
Under **Start Image**, upload the first frame.
The interface accepts:
* PNG
* JPG
* WEBP
* Up to 20 MB
### 2. Choose a motion preset
The available motion presets shown are:
* Runway Walk
* Fabric Twirl
* Windblown
* Slow Zoom In
* Dolly Pan
* Jacket Reveal
Choose the preset that best matches the movement you want to create.
### 3. Adjust motion intensity
Use the **Motion intensity** slider to control how strongly the selected motion should be expressed.
The example screen shows the intensity set to **3**.
### 4. Describe the video
The optional **Describe your video** field lets you add additional direction.
For example, you can describe the camera movement, model action, or overall cinematic behavior you want the keyframe to communicate.
### 5. Generate the keyframe
Click **Generate Video Keyframe**.
The generated result appears in **Generated Keyframe**.
## Manage your fashion assets
AI Fashion Studio is designed around reusable fashion assets.
The dashboard provides access to:
* **My Wardrobe** for organizing clothing and fashion products.
* **My Photoshoots** for browsing generated fashion creations.
* **Edit Image** for refining generated images.
* **Change Style** for creating alternate outfit aesthetics.
* **Create Video** for turning still fashion imagery into motion concepts.
Keeping products and generated work organized makes it easier to reuse the same assets across multiple creative workflows.
## Tips for better results
### Use clean source images
Upload clear product, garment, model, and portrait images. A clean source makes it easier for the AI to preserve the important visual details.
### Be intentional with pose and background
For fashion campaigns, select a pose and background that support the purpose of the image. Editorial portraits, runway movement, and lifestyle scenes can communicate very different visual directions.
### Reuse wardrobe items
Keep frequently used garments in **My Wardrobe** so they are available for future photoshoots and Virtual Try-On workflows.
### Add focused direction
When using an additional direction or video description, describe the specific result you want instead of adding unnecessary instructions.
## Quick workflow
For a fast fashion campaign:
1. Open **AI Fashion Studio**.
2. Add products to **My Wardrobe** if they are not already available.
3. Open **Photoshoot** and select up to three products.
4. Choose the model, pose, background, lighting, and aspect ratio.
5. Generate the photoshoot.
6. Use **Change Model** when you need another model with the same visual setup.
7. Use **Virtual Try-On** when you need to combine separate garments into an outfit.
8. Use **Create Video** when you want to turn a still into a cinematic motion keyframe.
9. Keep the resulting work in **My Photoshoots** for reuse and management.