> ## Documentation Index
> Fetch the complete documentation index at: https://docs.klyra.ai/llms.txt
> Use this file to discover all available pages before exploring further.
# WordPress Integration
> Take advantage of Klyra AI’s powerful AI tools to generate, schedule, and publish posts directly to your WordPress websites.
## Introduction
The [**WordPress Integration**](https://klyra.ai/page/wordpress-integration) feature in Klyra AI enables you to seamlessly post AI-generated content to your WordPress websites.
You can:
* **Generate posts** with AI Writer or from saved documents.
* **Publish instantly** to connected WordPress domains.
* **Schedule posts** for a specific date and time.
This integration streamlines your content pipeline, reducing manual copy-paste and giving you full control of your publishing strategy.
## WordPress Account Setup
Before connecting WordPress to Klyra AI, configure your WordPress site:
* Log in to your **WordPress Admin Dashboard**.
* Turn off two-factor authentication for smoother integration.
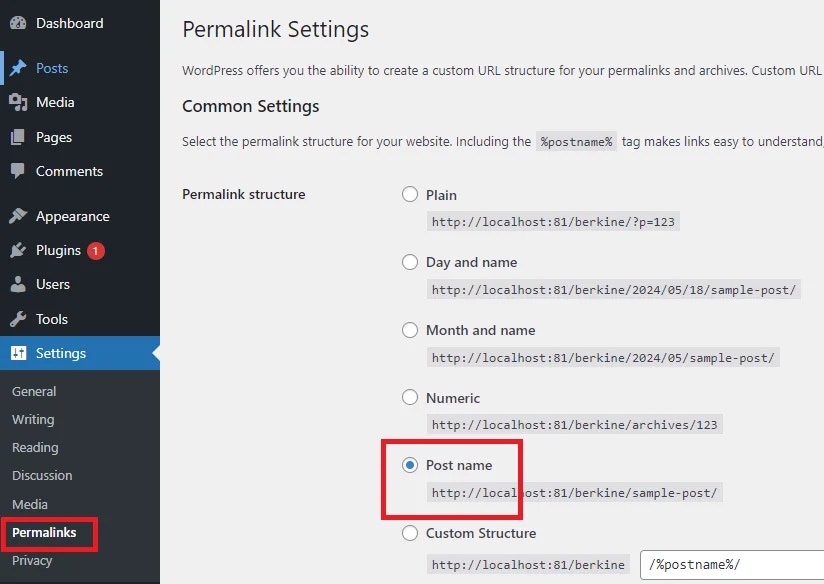
* Navigate to **Settings → Permalinks**.
* Select **Post Name**.
 * Go to **Plugins → Add New Plugin**.
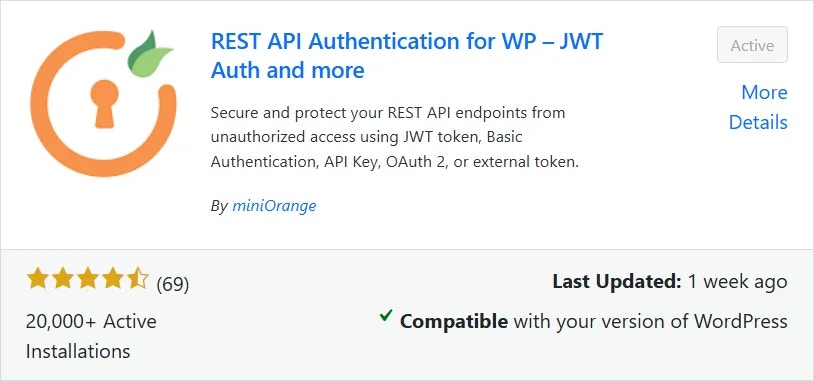
* Install **WREST API Authentication for WP – JWT Auth and more** by Mini Orange.
* After installation, ensure the plugin is **Activated**.
* Go to **Plugins → Add New Plugin**.
* Install **WREST API Authentication for WP – JWT Auth and more** by Mini Orange.
* After installation, ensure the plugin is **Activated**.
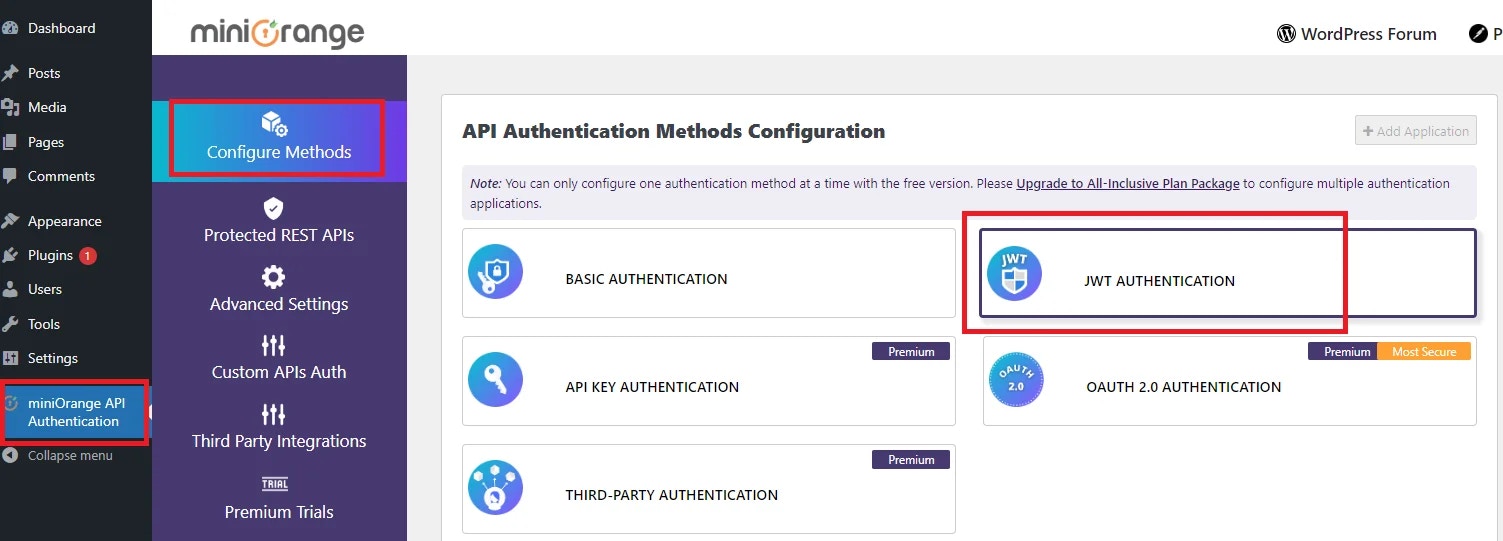
 * Go to **miniOrange API Authentication**.
* Click **JWT Authentication**.
* Go to **miniOrange API Authentication**.
* Click **JWT Authentication**.
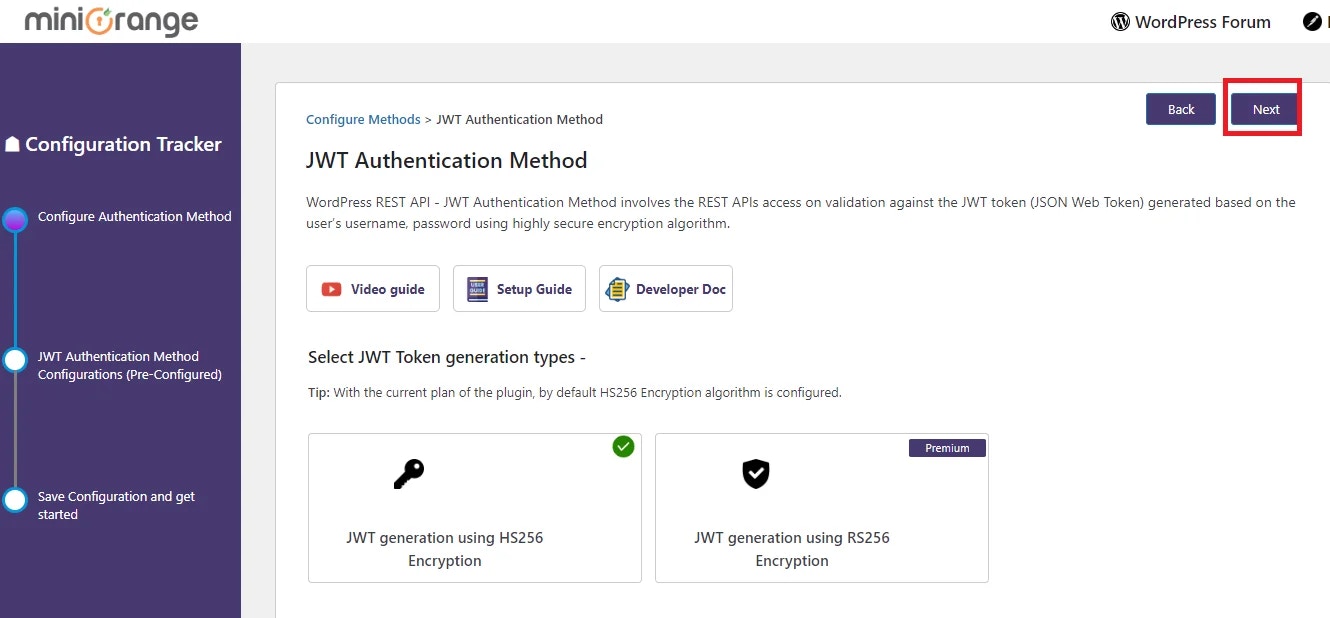
 * Follow the wizard: **Next → Finish**.
 ## 🔗 How to Add WordPress Website in Klyra AI
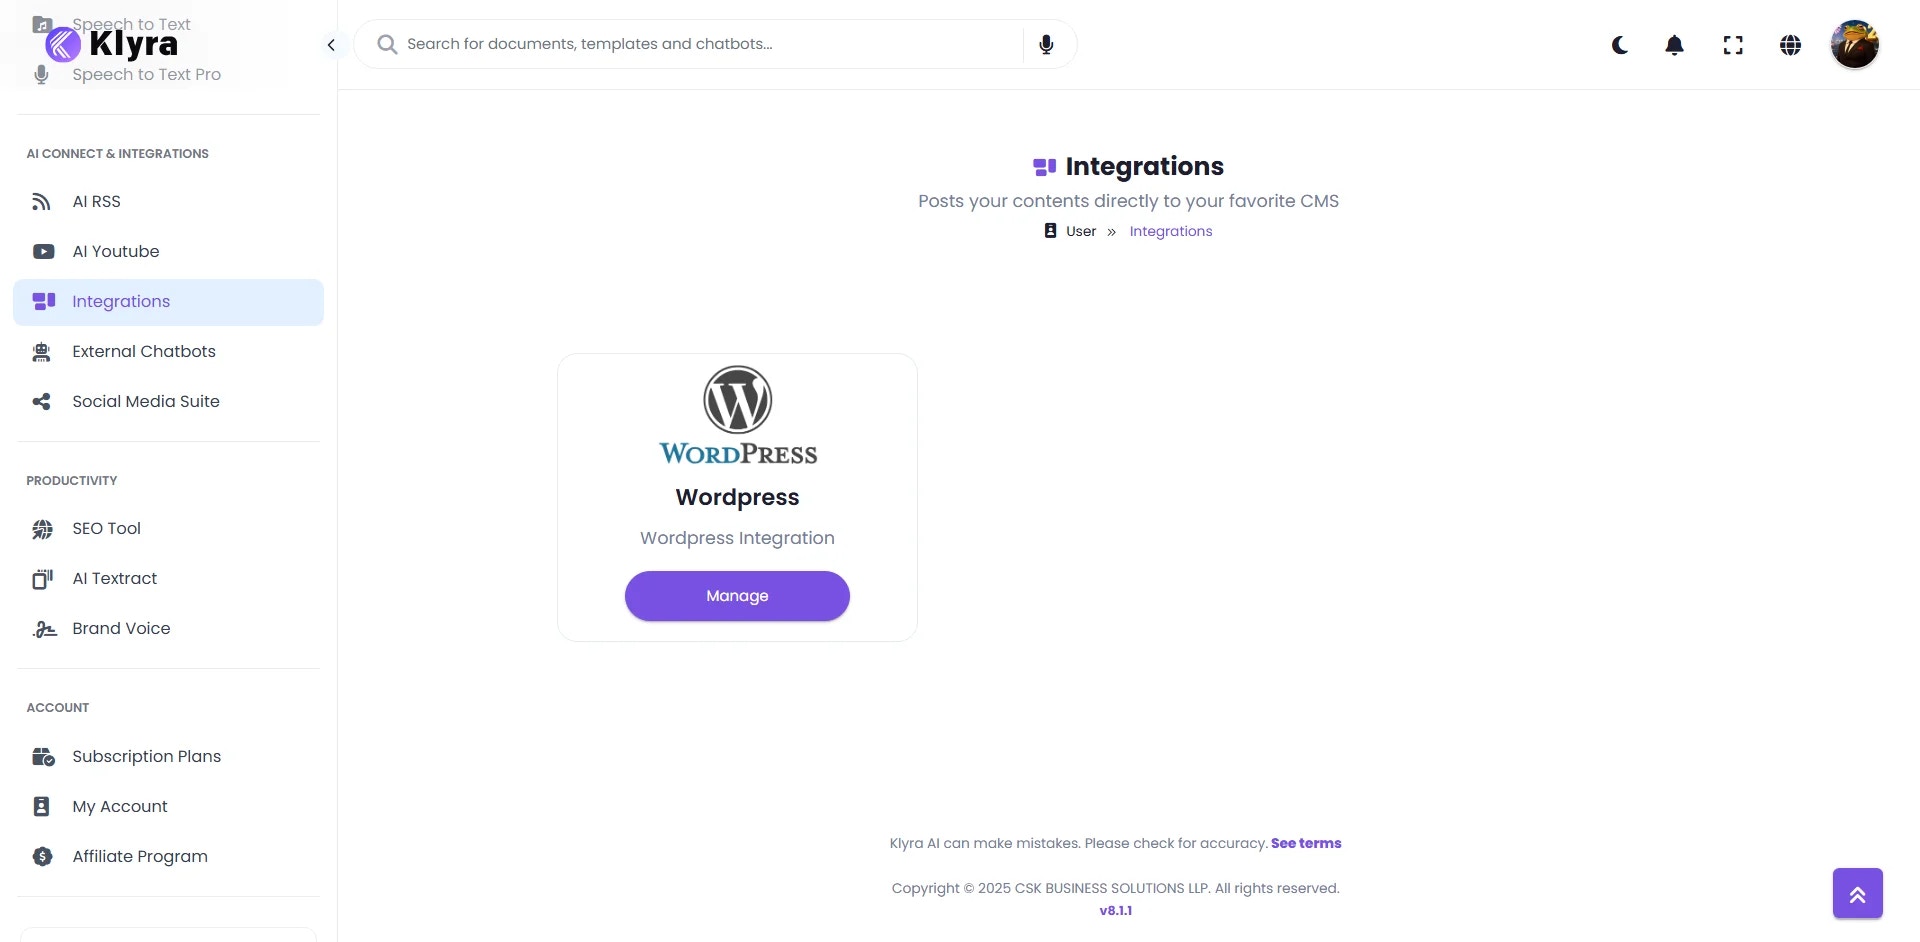
> 🔎 **Navigation:** Dashboard → Left Panel → AI Connect & Integrations → Integrations
Access to this feature is only available with a **Starter** or **Premium** subscription plan.
Click **Manage** under WordPress Integration.
## 🔗 How to Add WordPress Website in Klyra AI
> 🔎 **Navigation:** Dashboard → Left Panel → AI Connect & Integrations → Integrations
Access to this feature is only available with a **Starter** or **Premium** subscription plan.
Click **Manage** under WordPress Integration.
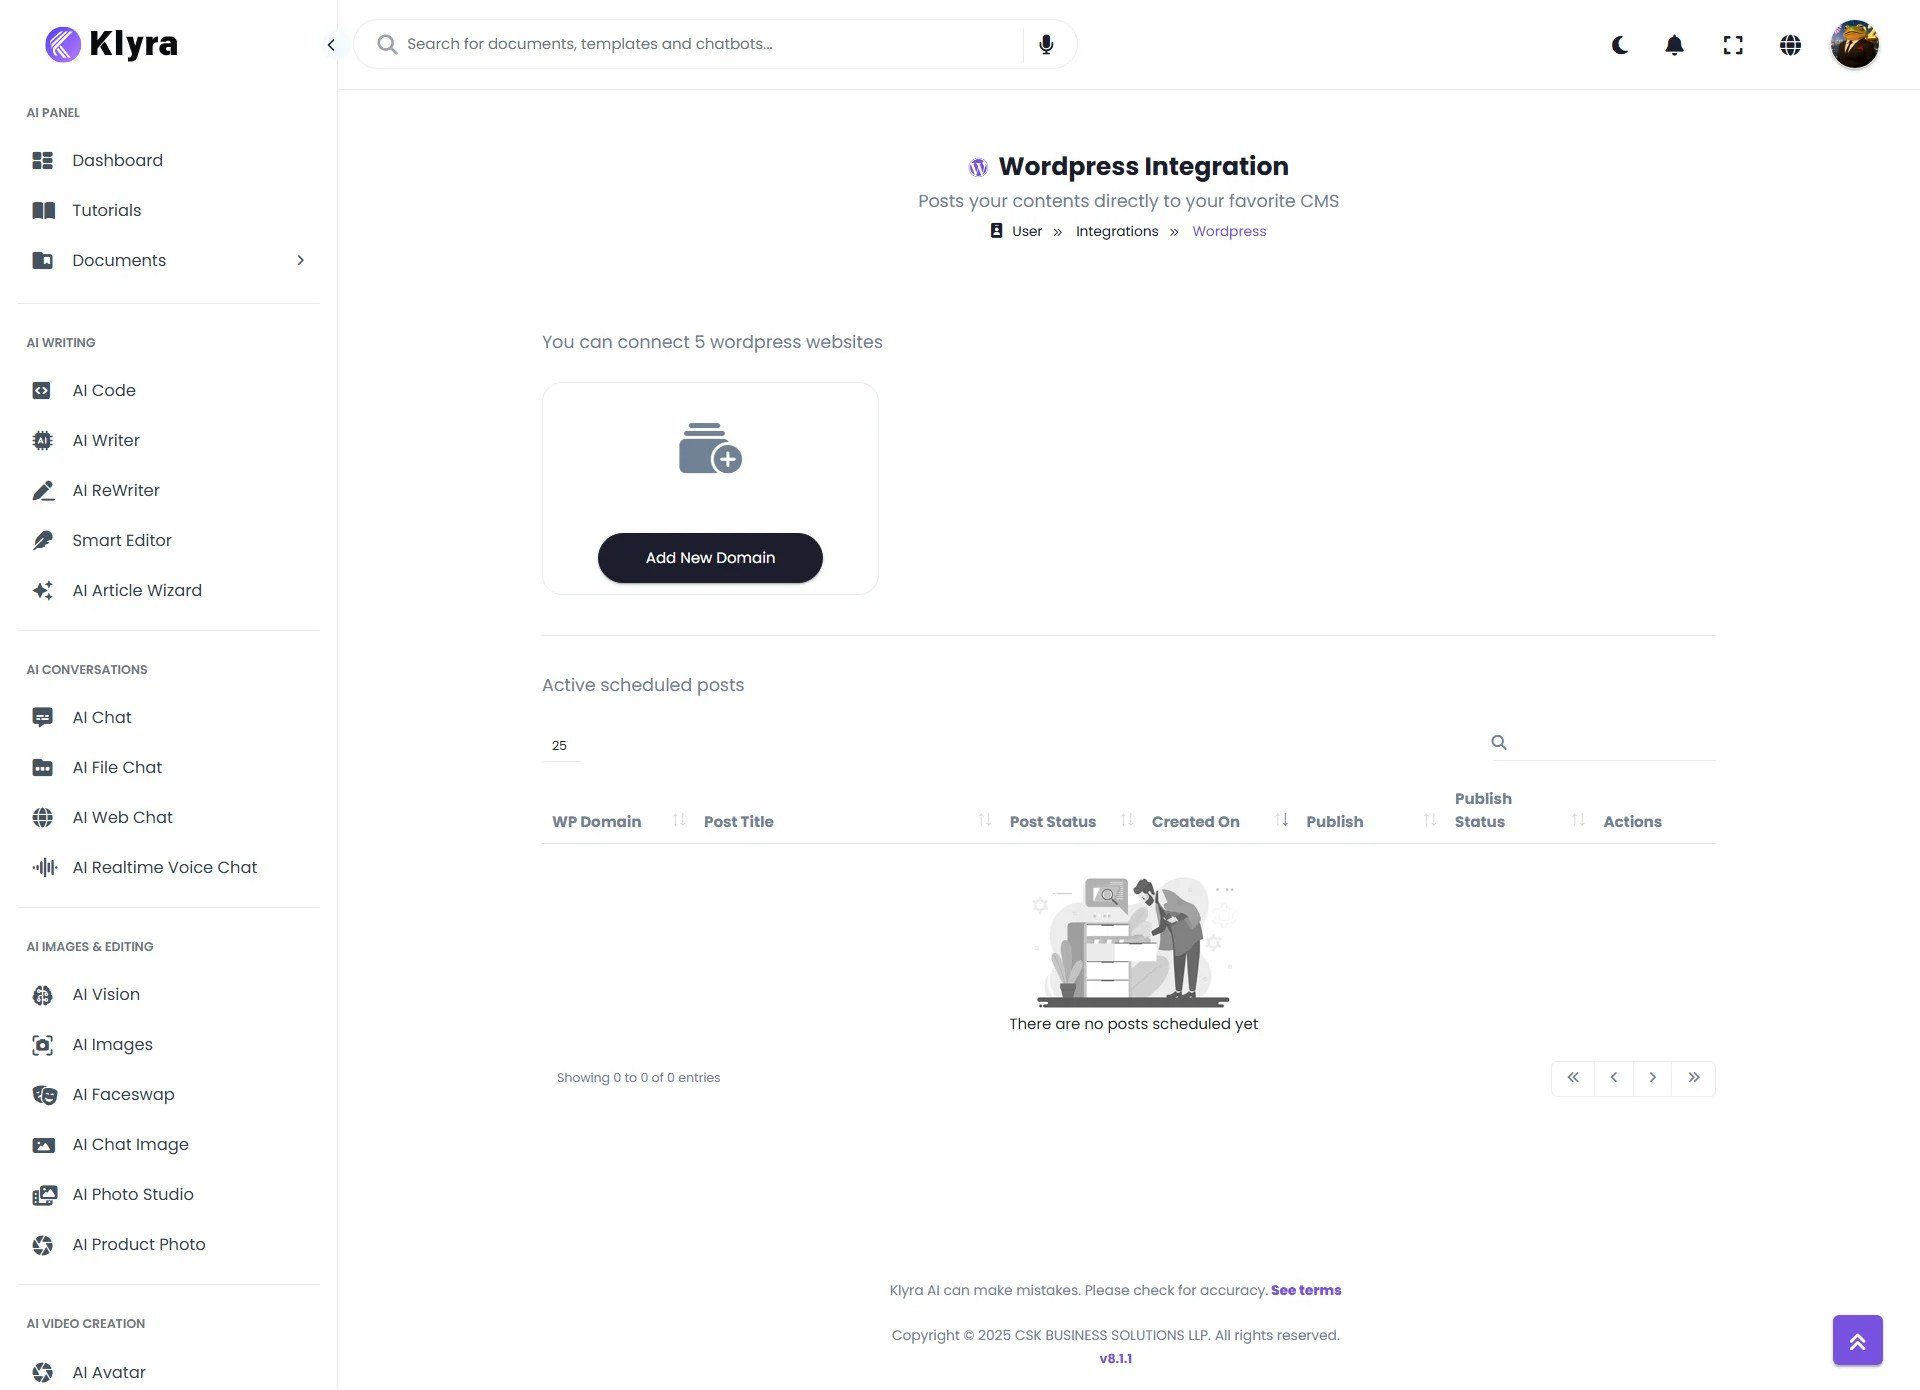
 Select Add New Domain.
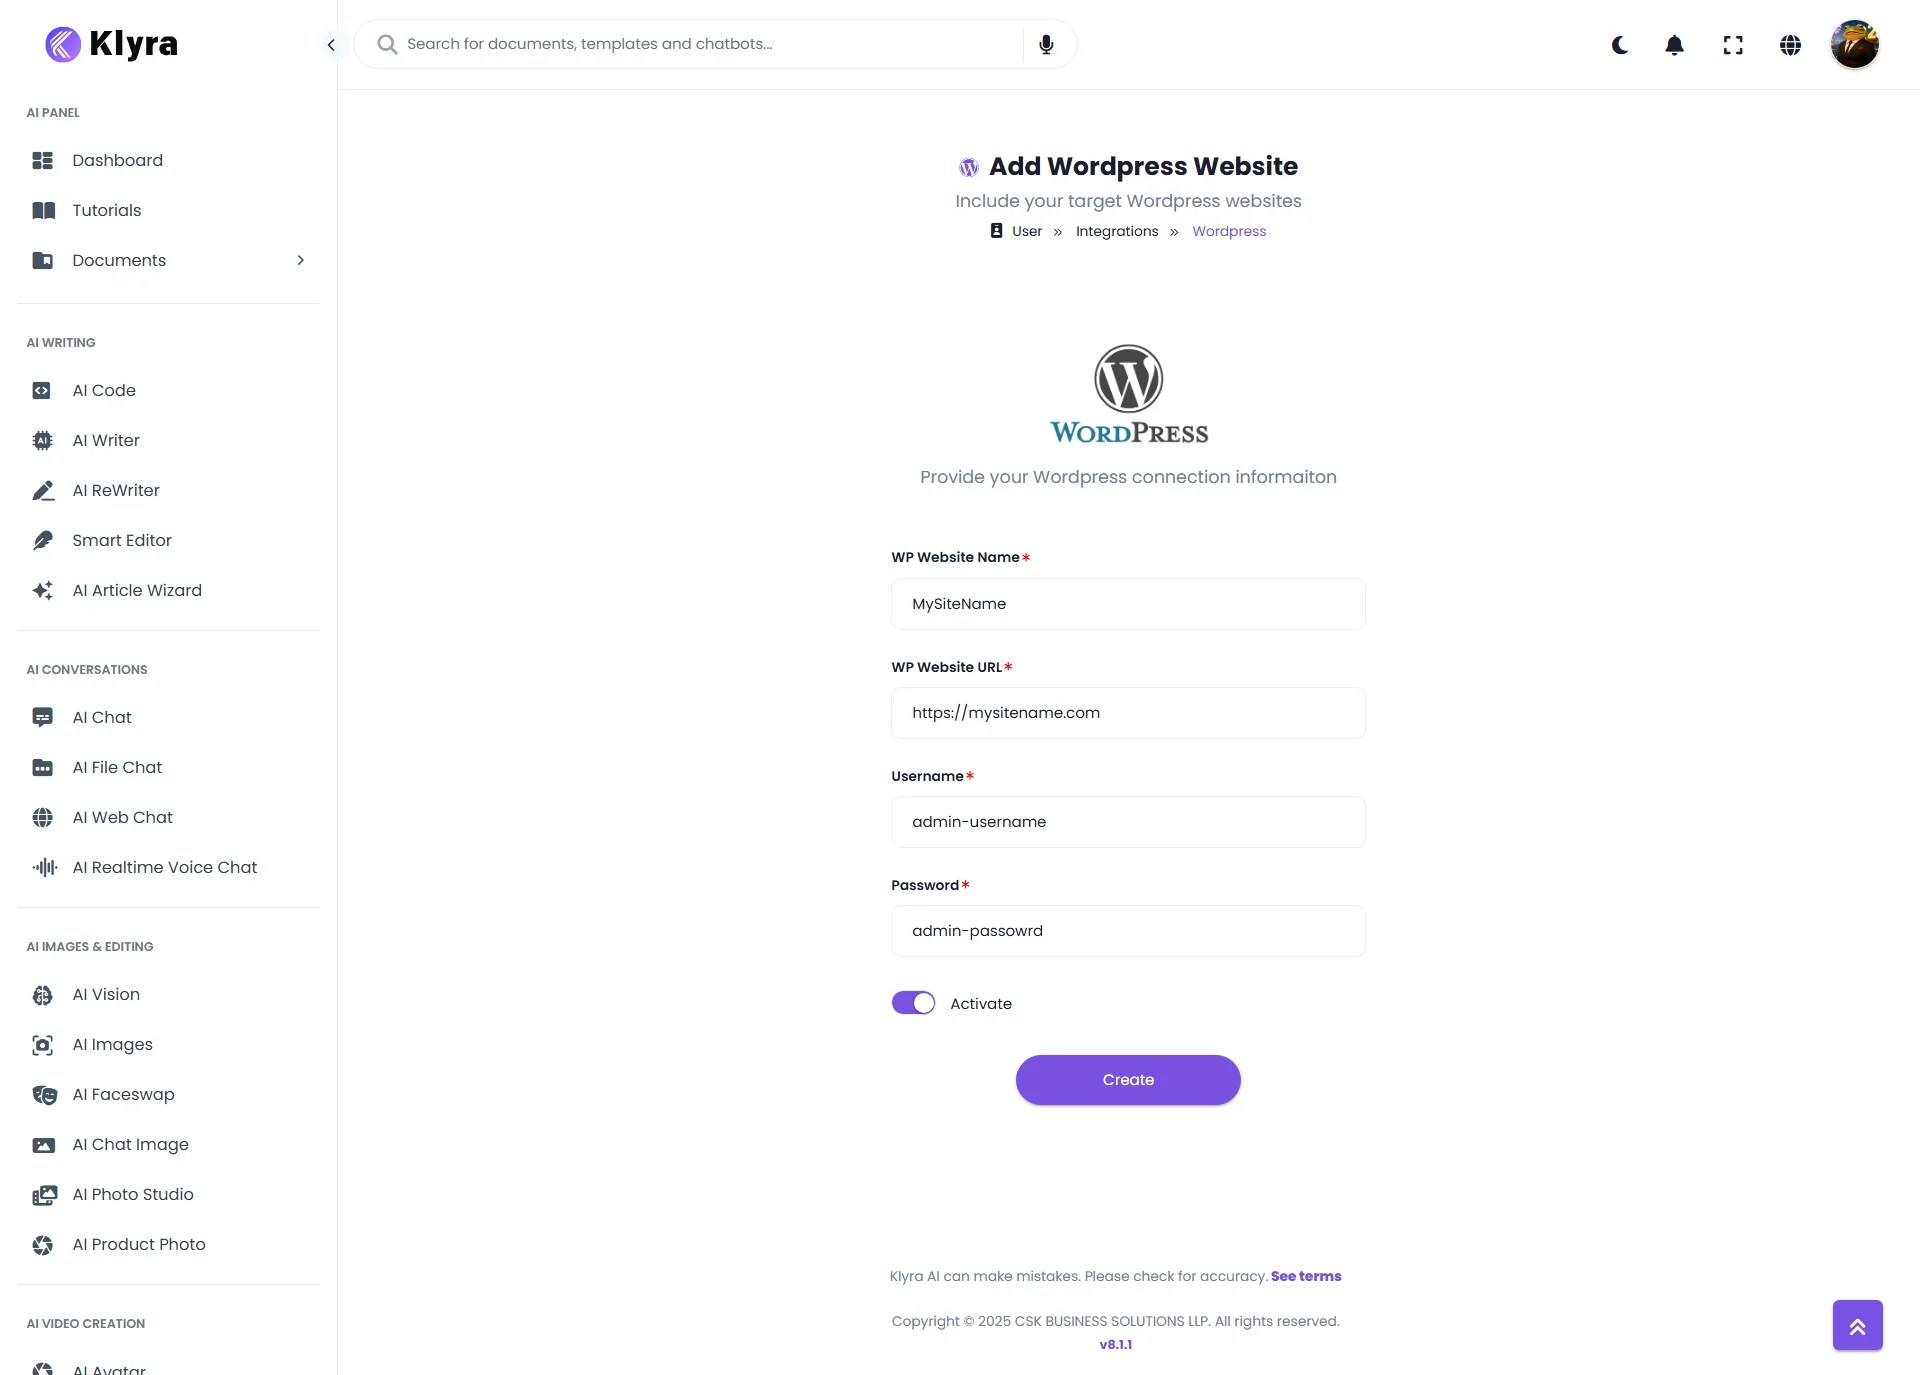
 Provide the following connection details:
* **WP Website Name** (for identification in Klyra AI).
* **WP Website URL** (no trailing “/”).
* **WordPress Admin Username**. (not emailid)
* **WordPress Admin Password**.
* **Activate checkbox** (toggle on).
Provide the following connection details:
* **WP Website Name** (for identification in Klyra AI).
* **WP Website URL** (no trailing “/”).
* **WordPress Admin Username**. (not emailid)
* **WordPress Admin Password**.
* **Activate checkbox** (toggle on).
 Click Create
* Klyra AI will validate the connection and generate a secure token.
If successful, you’ll see a confirmation message and the domain will appear in your connected list.
You can connect multiple domains depending on your subscription plan.
## How to Use WordPress Integration
Once connected, you can start publishing AI-generated posts.
* AI Writer
* Documents Results
### Steps to Publish or Schedule
Navigate to **Dashboard → AI Writing → AI Writer** from the Left Panel to create new content, or access **AI Panel → Documents → All Documents** to work with previously generated documents.
Choose a template from AI Writer, or open any previously generated document.
On the left/right side of the document, click the **Publish** button → **Publish to WordPress**.
Click Create
* Klyra AI will validate the connection and generate a secure token.
If successful, you’ll see a confirmation message and the domain will appear in your connected list.
You can connect multiple domains depending on your subscription plan.
## How to Use WordPress Integration
Once connected, you can start publishing AI-generated posts.
* AI Writer
* Documents Results
### Steps to Publish or Schedule
Navigate to **Dashboard → AI Writing → AI Writer** from the Left Panel to create new content, or access **AI Panel → Documents → All Documents** to work with previously generated documents.
Choose a template from AI Writer, or open any previously generated document.
On the left/right side of the document, click the **Publish** button → **Publish to WordPress**.
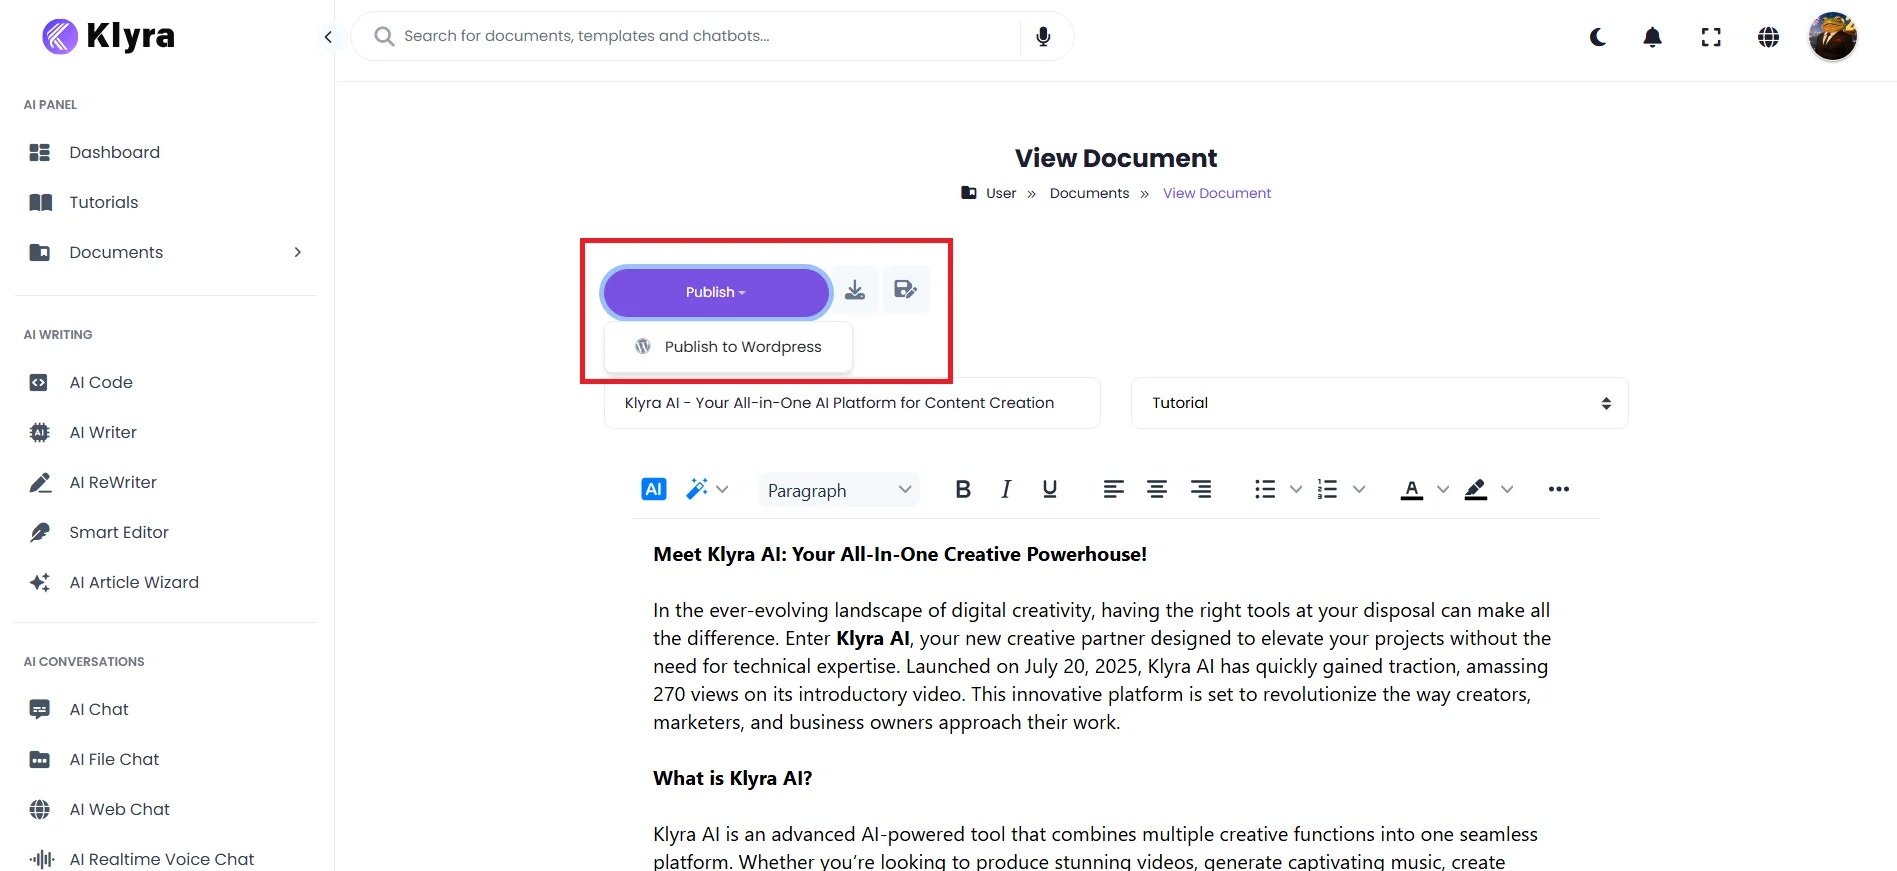 You’ll be redirected to the **Publish to WordPress page** with your generated content preloaded. Complete the form fields as needed, fields marked with a red **\*** are mandatory.
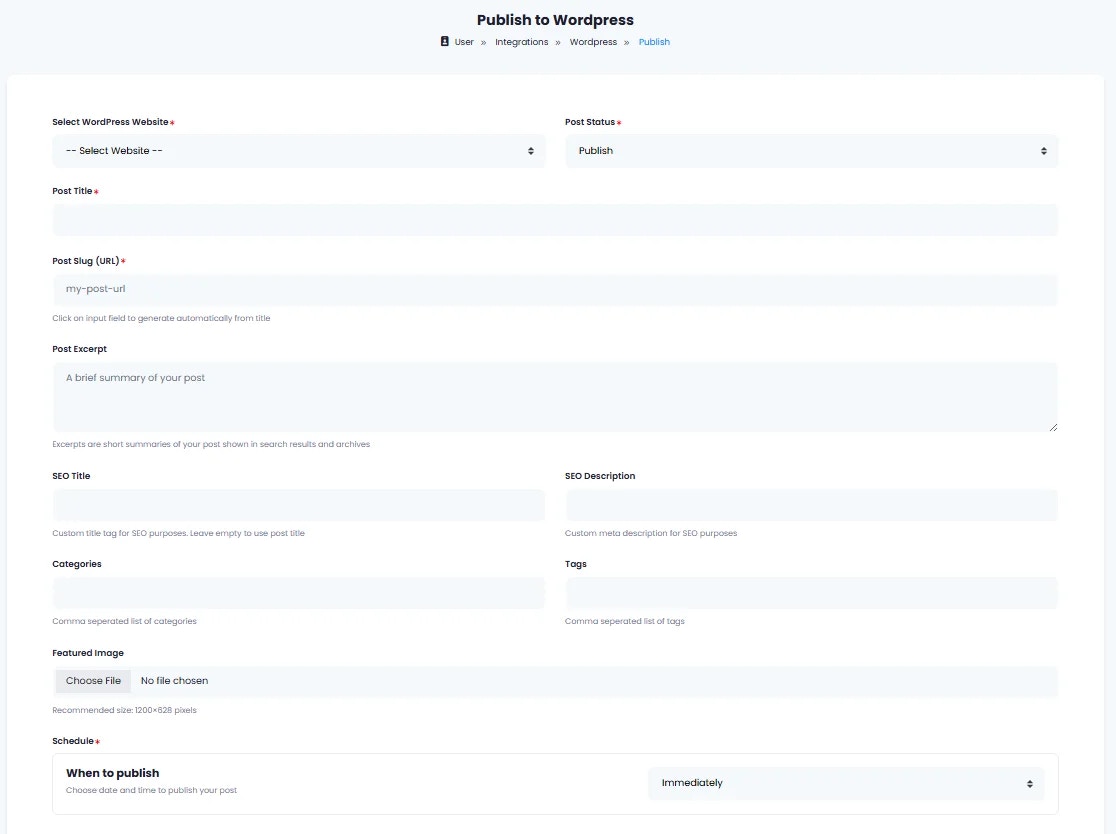 Choose when to publish:
* **Immediately** — Publish now.
* **Schedule Date & Time** — Publish later.
Confirm by clicking **Publish**.
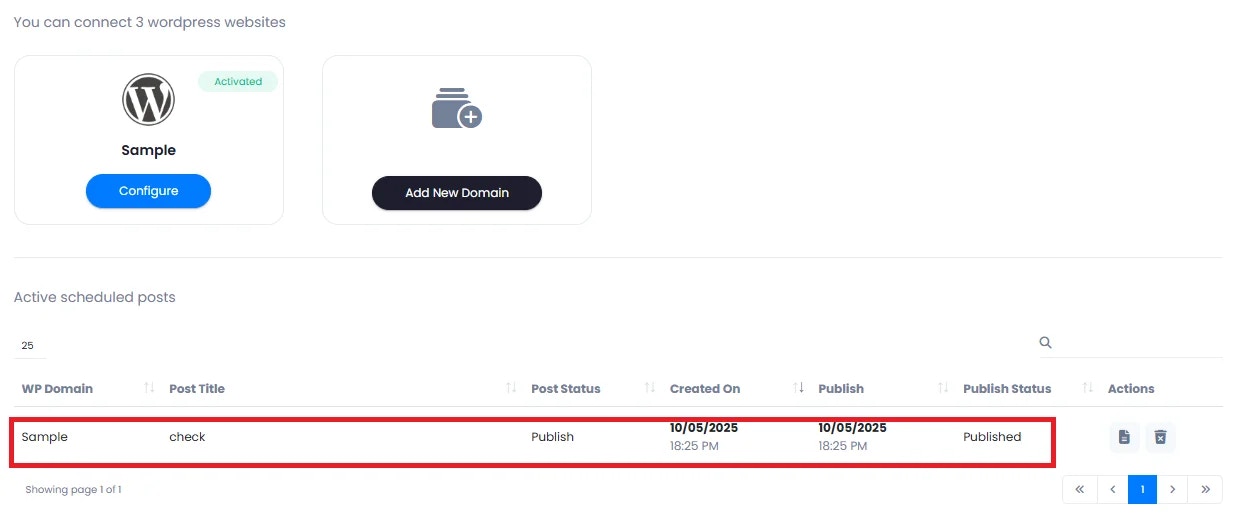
All posts (scheduled or published) appear in:
* **Integrations → WordPress** (inside Klyra AI).
* **Your WordPress dashboard** as published posts.
Choose when to publish:
* **Immediately** — Publish now.
* **Schedule Date & Time** — Publish later.
Confirm by clicking **Publish**.
All posts (scheduled or published) appear in:
* **Integrations → WordPress** (inside Klyra AI).
* **Your WordPress dashboard** as published posts.
 ### 💡 Tips
* **Always generate content first** before clicking Publish to WordPress.
* **Use scheduling** to build a consistent posting pipeline across multiple domains.
* **Multiple domains:** Add more than one WordPress site if your plan allows — perfect for agencies managing client websites.
* **Preview before posting:** Ensure formatting and metadata are correct in the Publish page.
* **Centralized management:** Track all posts (scheduled, live, or drafts) directly inside the WordPress integration panel in Klyra AI.
### 📌 Example Use Cases
* **Content Creators & Bloggers**\
Generate full blog posts in **AI Writer** and publish them directly to WordPress without copy-paste.
* **Digital Marketing Agencies**\
Manage multiple client websites by connecting different WordPress domains in Klyra AI and scheduling posts in advance.
* **Small Businesses**\
Use AI to draft **product announcements, promotions, or newsletters**, then schedule them to auto-publish at peak hours.
* **E-commerce Stores**\
Create **SEO-optimized product descriptions or category pages** and instantly push them to your WordPress shop.
* **Corporate Teams**\
Share **company news, event recaps, or press releases** directly to the corporate WordPress site with centralized approval.
* **SEO Specialists**\
Use AI Writer to generate **keyword-rich articles** and publish them regularly, ensuring fresh content for search engines.
### 💡 Tips
* **Always generate content first** before clicking Publish to WordPress.
* **Use scheduling** to build a consistent posting pipeline across multiple domains.
* **Multiple domains:** Add more than one WordPress site if your plan allows — perfect for agencies managing client websites.
* **Preview before posting:** Ensure formatting and metadata are correct in the Publish page.
* **Centralized management:** Track all posts (scheduled, live, or drafts) directly inside the WordPress integration panel in Klyra AI.
### 📌 Example Use Cases
* **Content Creators & Bloggers**\
Generate full blog posts in **AI Writer** and publish them directly to WordPress without copy-paste.
* **Digital Marketing Agencies**\
Manage multiple client websites by connecting different WordPress domains in Klyra AI and scheduling posts in advance.
* **Small Businesses**\
Use AI to draft **product announcements, promotions, or newsletters**, then schedule them to auto-publish at peak hours.
* **E-commerce Stores**\
Create **SEO-optimized product descriptions or category pages** and instantly push them to your WordPress shop.
* **Corporate Teams**\
Share **company news, event recaps, or press releases** directly to the corporate WordPress site with centralized approval.
* **SEO Specialists**\
Use AI Writer to generate **keyword-rich articles** and publish them regularly, ensuring fresh content for search engines.