> ## Documentation Index
> Fetch the complete documentation index at: https://docs.klyra.ai/llms.txt
> Use this file to discover all available pages before exploring further.
# Ai blogger
# AI Blogger
AI Blogger helps you build a repeatable blogging workflow inside Klyra. Create an AI Blogger Agent with your topics, writing style, SEO preferences, WordPress connection, and publishing cadence. Then use the agent to generate posts as drafts, review them, and publish or schedule them.
AI Blogger is designed around a review-first workflow. Generating posts creates drafts for you to review before publishing.
## How AI Blogger works
Define what the agent should write about, how it should sound, how its content should be structured for SEO, where it should publish, and how often it should publish.
Use the agent to generate one or more new blog posts. Generated posts are added as drafts.
Open a draft, review the title and article, update the content if needed, and review categories, tags, and SEO metadata.
Publish the post immediately or schedule it for a future date and time.
## Before you start
You will need:
* Access to Klyra AI.
* A WordPress website if you want the agent to publish automatically to WordPress.
* A WordPress username with the required permissions.
* A WordPress Application Password for the connection.
Do not use your normal WordPress account password in the WordPress connection. AI Blogger uses a WordPress Application Password.
## Create your first AI Blogger Agent
Open **AI Blogger** from the Klyra sidebar, then choose **Create AI Blogger**.
The agent setup contains five steps:
1. Topics
2. Voice & Tone
3. SEO
4. WordPress
5. Schedule
 ### Step 1: Define your topics
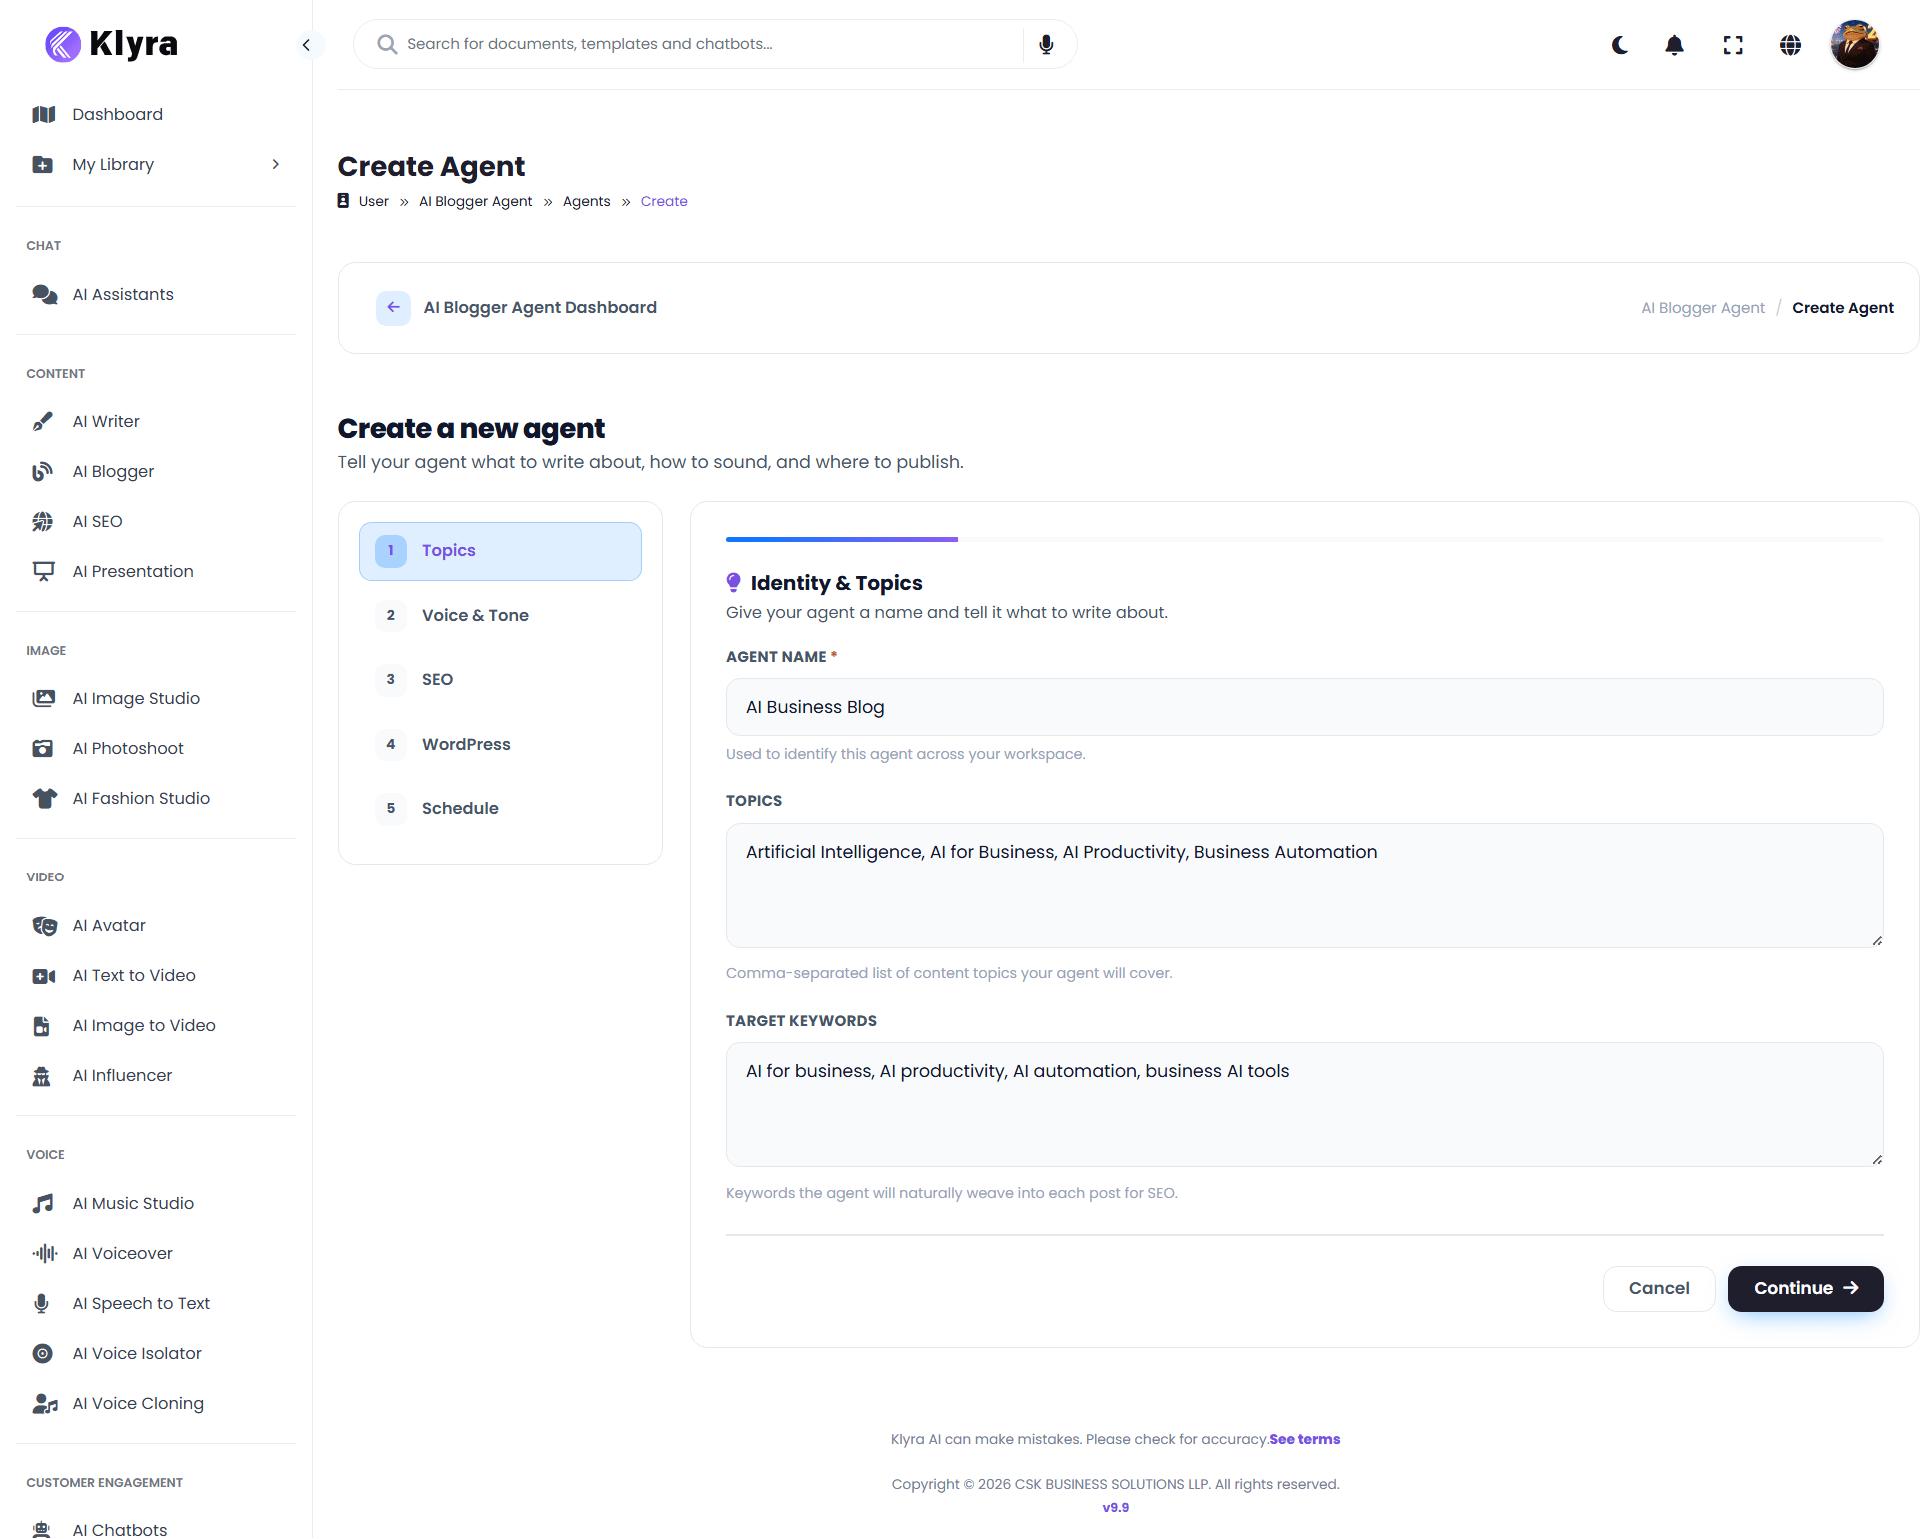
The **Topics** step tells your agent what it should write about.
Enter:
* **Agent Name**: The name you will use to identify the agent in Klyra.
* **Topics**: The subjects the agent should cover.
* **Target Keywords**: Keywords the agent should naturally use in its posts.
Example:
| Field | Example |
| --------------- | ------------------------------------------------------------------------------ |
| Agent Name | AI Business Blog |
| Topics | Artificial Intelligence, AI for Business, AI Productivity, Business Automation |
| Target Keywords | AI for business, AI productivity, AI automation, business AI tools |
### Step 1: Define your topics
The **Topics** step tells your agent what it should write about.
Enter:
* **Agent Name**: The name you will use to identify the agent in Klyra.
* **Topics**: The subjects the agent should cover.
* **Target Keywords**: Keywords the agent should naturally use in its posts.
Example:
| Field | Example |
| --------------- | ------------------------------------------------------------------------------ |
| Agent Name | AI Business Blog |
| Topics | Artificial Intelligence, AI for Business, AI Productivity, Business Automation |
| Target Keywords | AI for business, AI productivity, AI automation, business AI tools |
 Keep your topics focused. An agent with a clear subject area is easier to keep consistent than an agent that covers unrelated subjects.
Click **Continue**.
### Step 2: Set the voice and tone
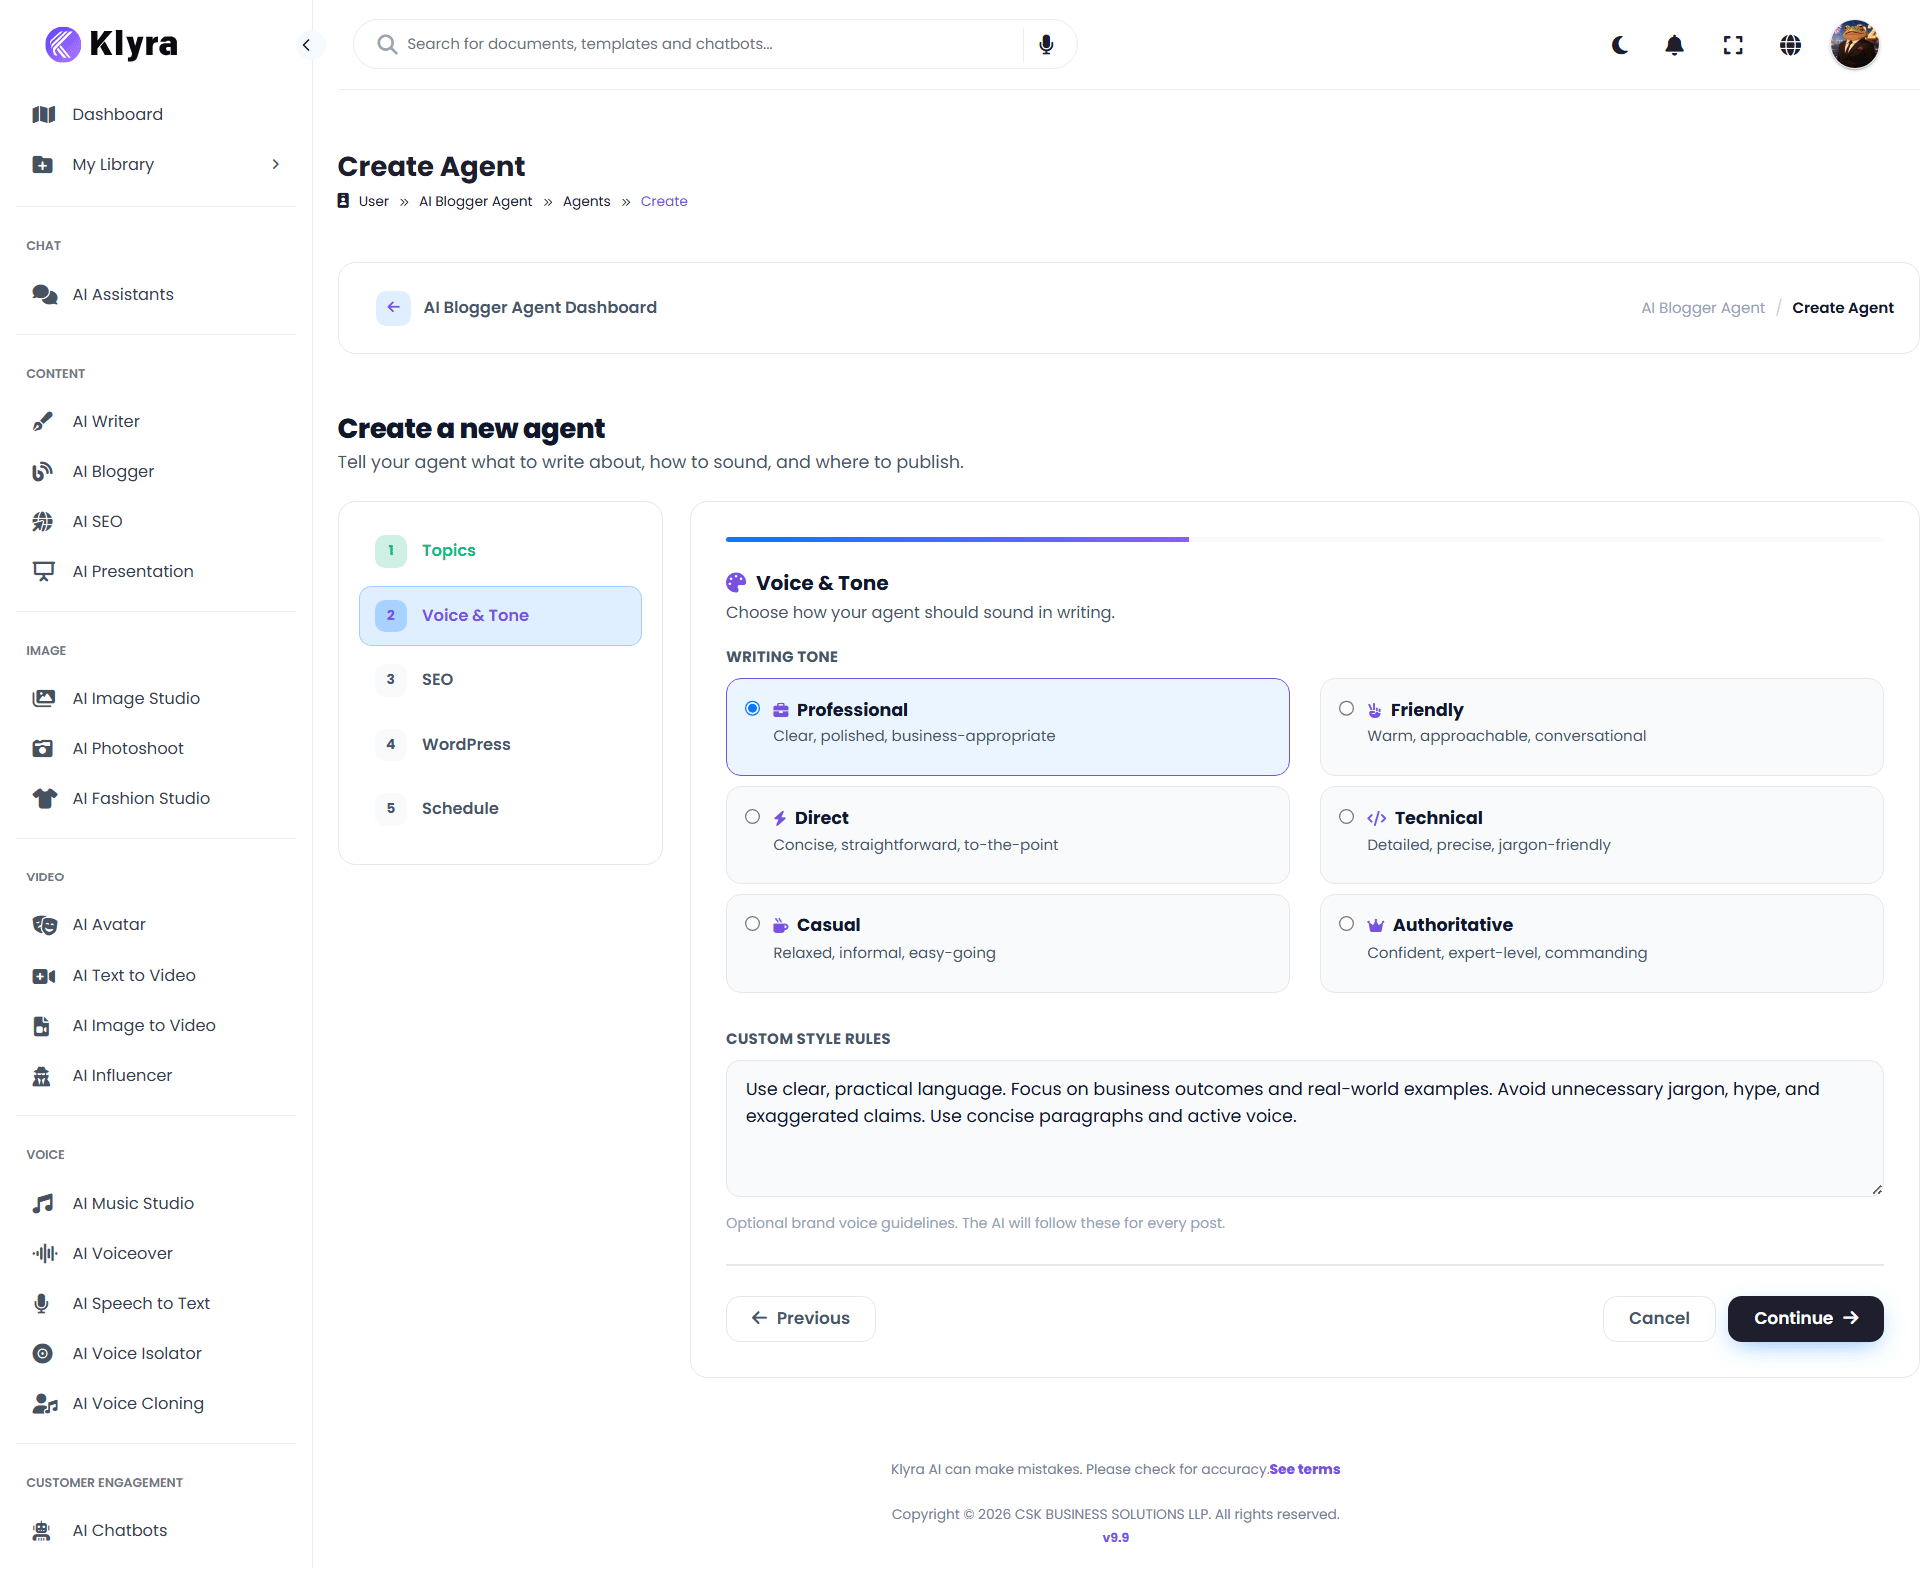
The **Voice & Tone** step controls how your agent should sound.
The writing tone options shown in the interface include:
* Professional
* Friendly
* Direct
* Technical
* Casual
* Authoritative
You can also add **Custom Style Rules** for repeatable writing guidance.
Example:
> Use clear, practical language. Focus on business outcomes and real-world examples. Avoid unnecessary jargon, hype, and exaggerated claims. Use concise paragraphs and active voice.
Keep your topics focused. An agent with a clear subject area is easier to keep consistent than an agent that covers unrelated subjects.
Click **Continue**.
### Step 2: Set the voice and tone
The **Voice & Tone** step controls how your agent should sound.
The writing tone options shown in the interface include:
* Professional
* Friendly
* Direct
* Technical
* Casual
* Authoritative
You can also add **Custom Style Rules** for repeatable writing guidance.
Example:
> Use clear, practical language. Focus on business outcomes and real-world examples. Avoid unnecessary jargon, hype, and exaggerated claims. Use concise paragraphs and active voice.
 Click **Continue**.
### Step 3: Configure SEO preferences
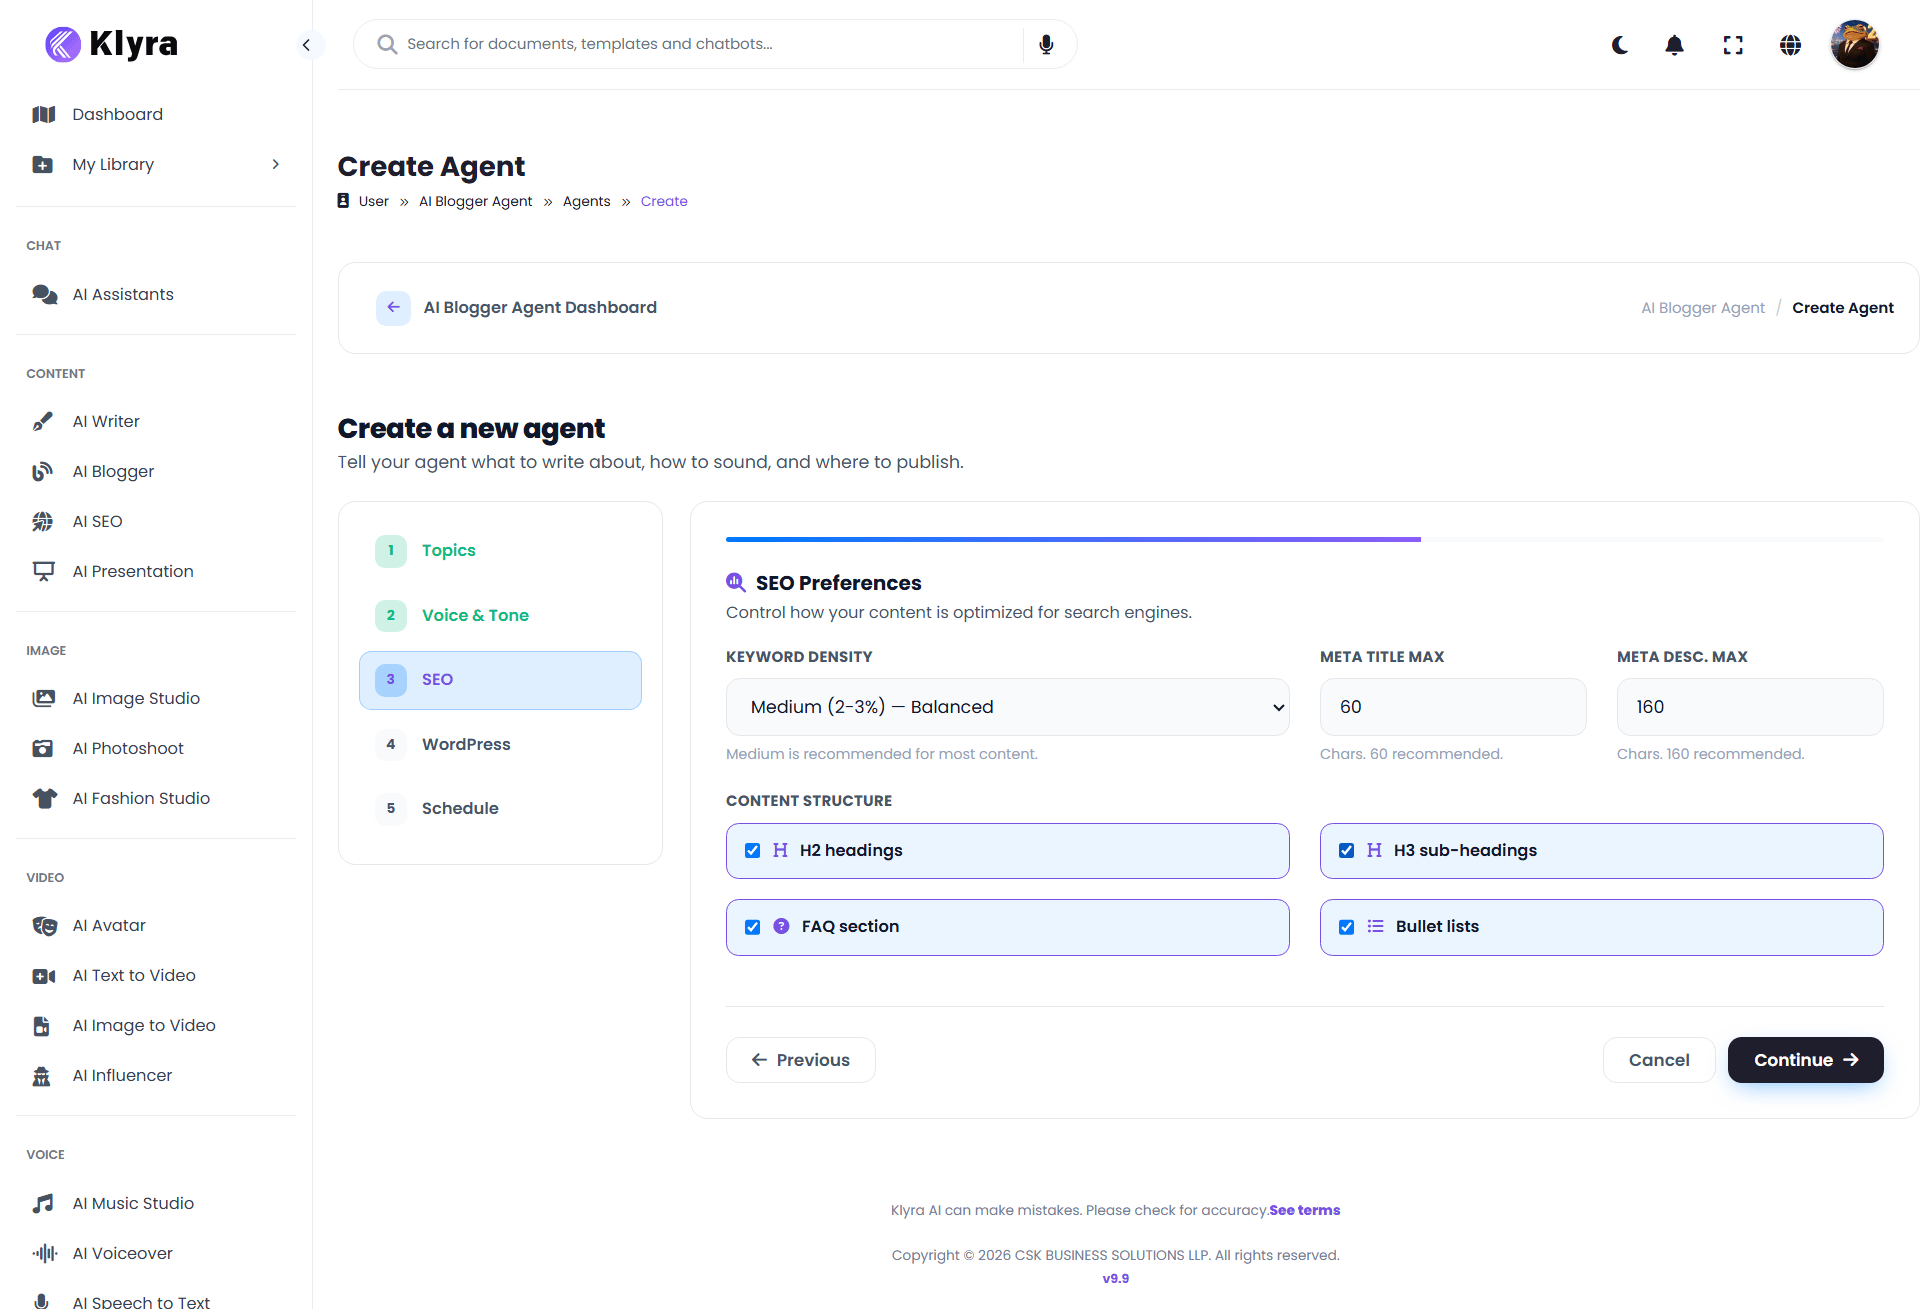
The **SEO** step controls the default search-focused structure of generated content.
#### Keyword density
The screenshot shows:
**Medium (2-3%) - Balanced**
The interface recommends Medium for most content.
#### Metadata limits
Set:
* **Meta Title Max**
* **Meta Desc. Max**
The example configuration uses:
* Meta Title Max: **60**
* Meta Desc. Max: **160**
#### Content structure
You can enable:
* **H2 headings**
* **H3 sub-headings**
* **FAQ section**
* **Bullet lists**
Click **Continue**.
### Step 3: Configure SEO preferences
The **SEO** step controls the default search-focused structure of generated content.
#### Keyword density
The screenshot shows:
**Medium (2-3%) - Balanced**
The interface recommends Medium for most content.
#### Metadata limits
Set:
* **Meta Title Max**
* **Meta Desc. Max**
The example configuration uses:
* Meta Title Max: **60**
* Meta Desc. Max: **160**
#### Content structure
You can enable:
* **H2 headings**
* **H3 sub-headings**
* **FAQ section**
* **Bullet lists**
 Click **Continue**.
### Step 4: Connect WordPress
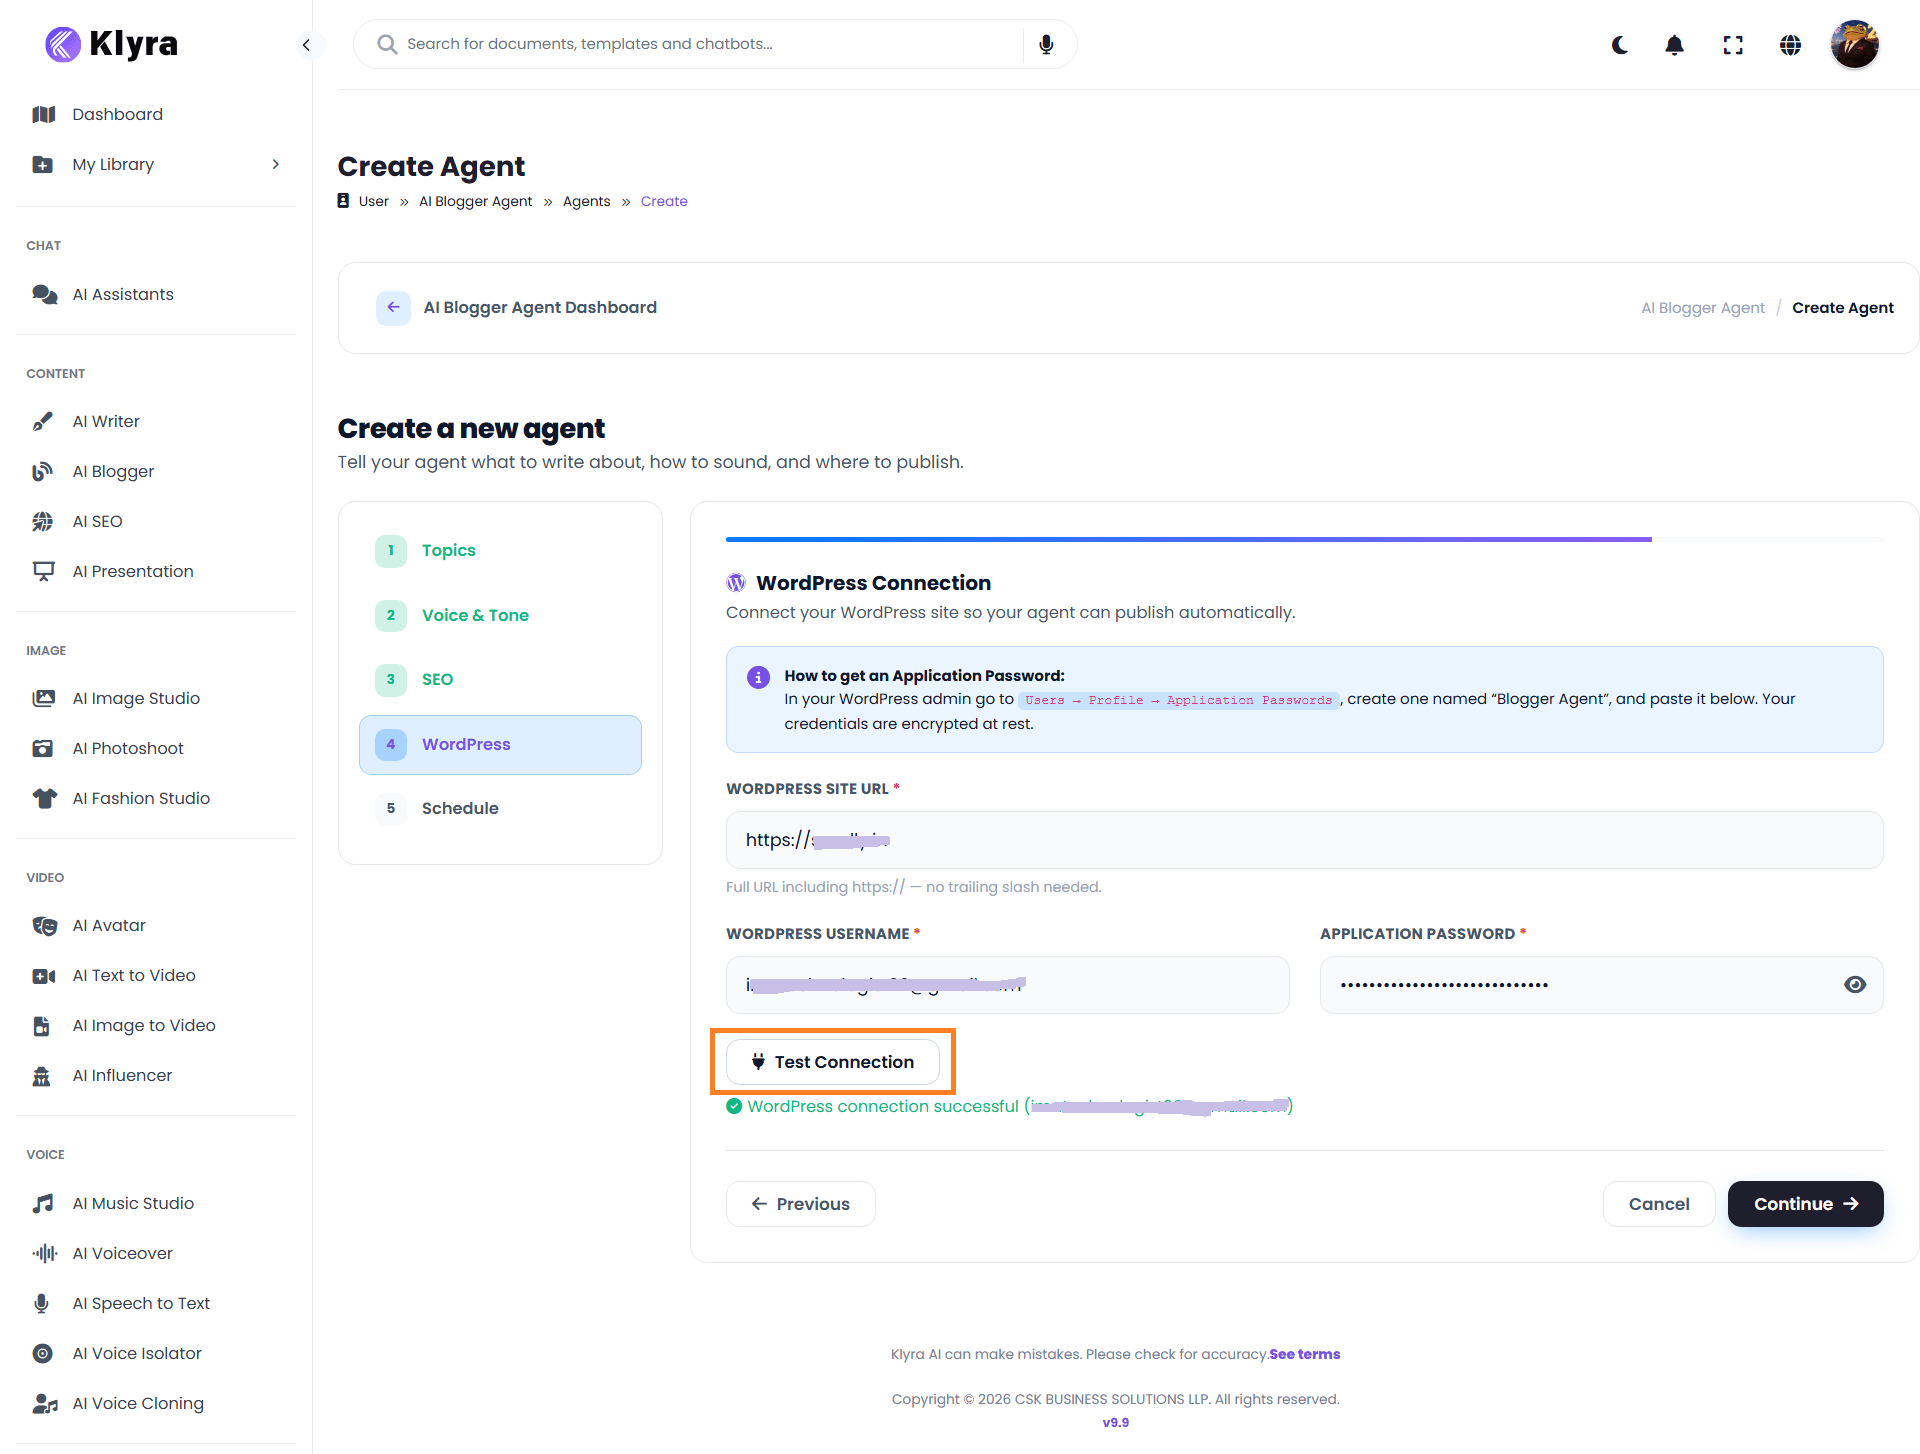
The **WordPress Connection** step connects your website so the agent can publish automatically.
Enter:
* **WordPress Site URL**
* **WordPress Username**
* **Application Password**
The Site URL should include `https://`. The interface indicates that no trailing slash is needed.
Click **Continue**.
### Step 4: Connect WordPress
The **WordPress Connection** step connects your website so the agent can publish automatically.
Enter:
* **WordPress Site URL**
* **WordPress Username**
* **Application Password**
The Site URL should include `https://`. The interface indicates that no trailing slash is needed.
 #### Create a WordPress Application Password
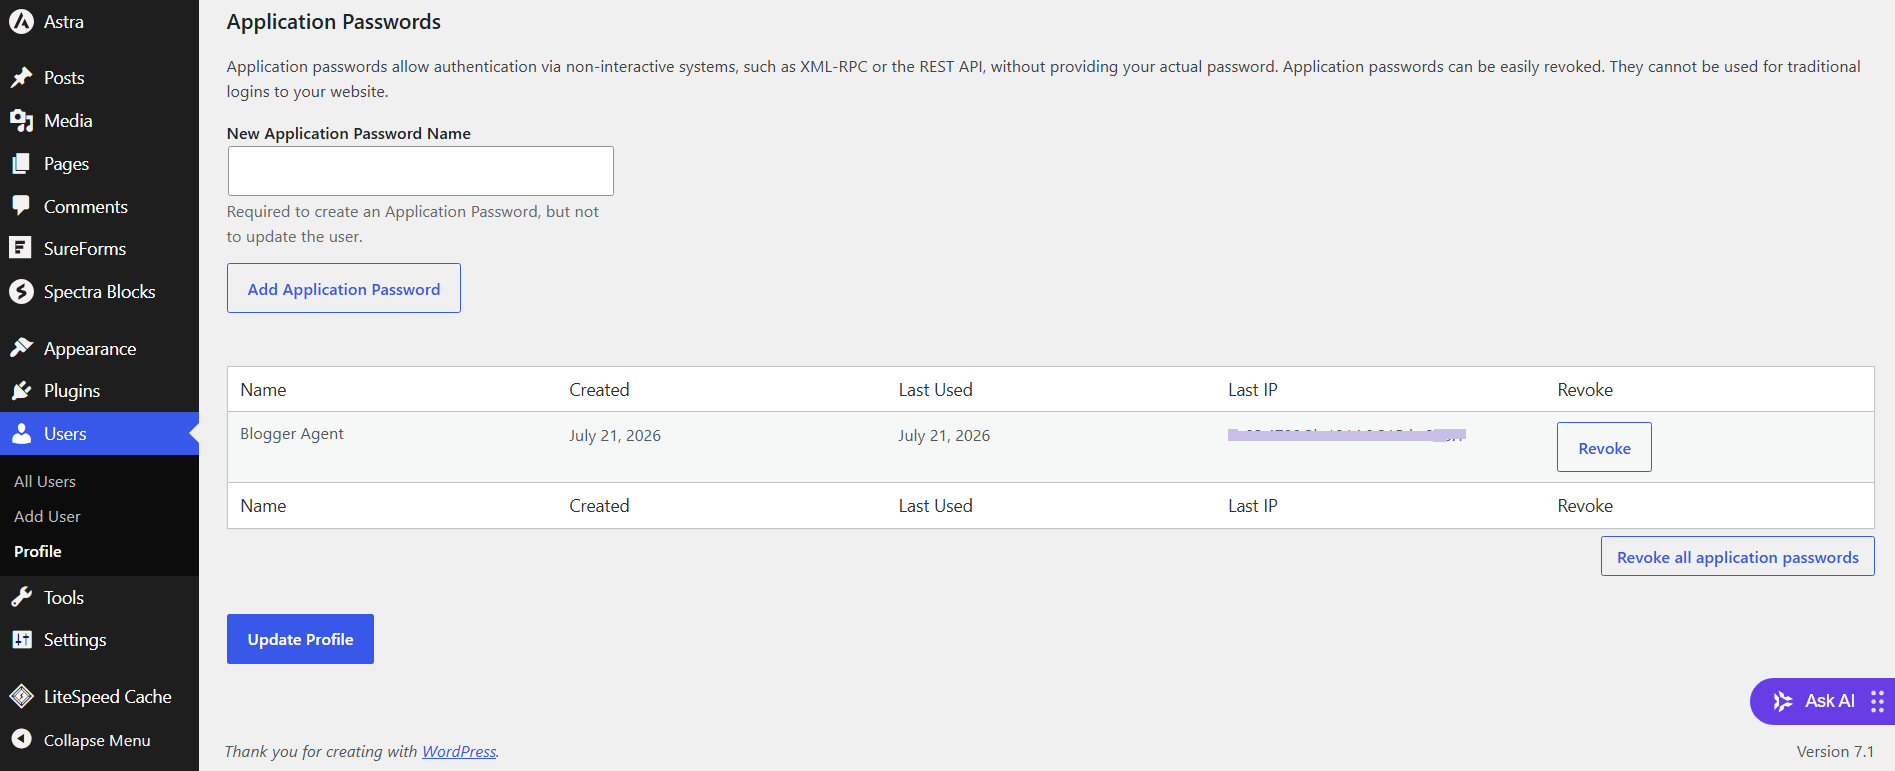
If you do not already have one:
1. Sign in to your WordPress administrator dashboard.
2. Open your user profile.
3. Find **Application Passwords**.
4. Enter a name, such as `Blogger Agent`.
5. Create the application password.
6. Copy the generated password and enter it into Klyra.
#### Create a WordPress Application Password
If you do not already have one:
1. Sign in to your WordPress administrator dashboard.
2. Open your user profile.
3. Find **Application Passwords**.
4. Enter a name, such as `Blogger Agent`.
5. Create the application password.
6. Copy the generated password and enter it into Klyra.
 Treat the Application Password like a credential. Do not publish it in documentation, screenshots, messages, or source code. Revoke it from WordPress when it is no longer needed.
#### Test the connection
Click **Test Connection**.
A successful connection is confirmed by the success message shown in Klyra.
Treat the Application Password like a credential. Do not publish it in documentation, screenshots, messages, or source code. Revoke it from WordPress when it is no longer needed.
#### Test the connection
Click **Test Connection**.
A successful connection is confirmed by the success message shown in Klyra.
 Click **Continue**.
### Step 5: Choose the publishing cadence
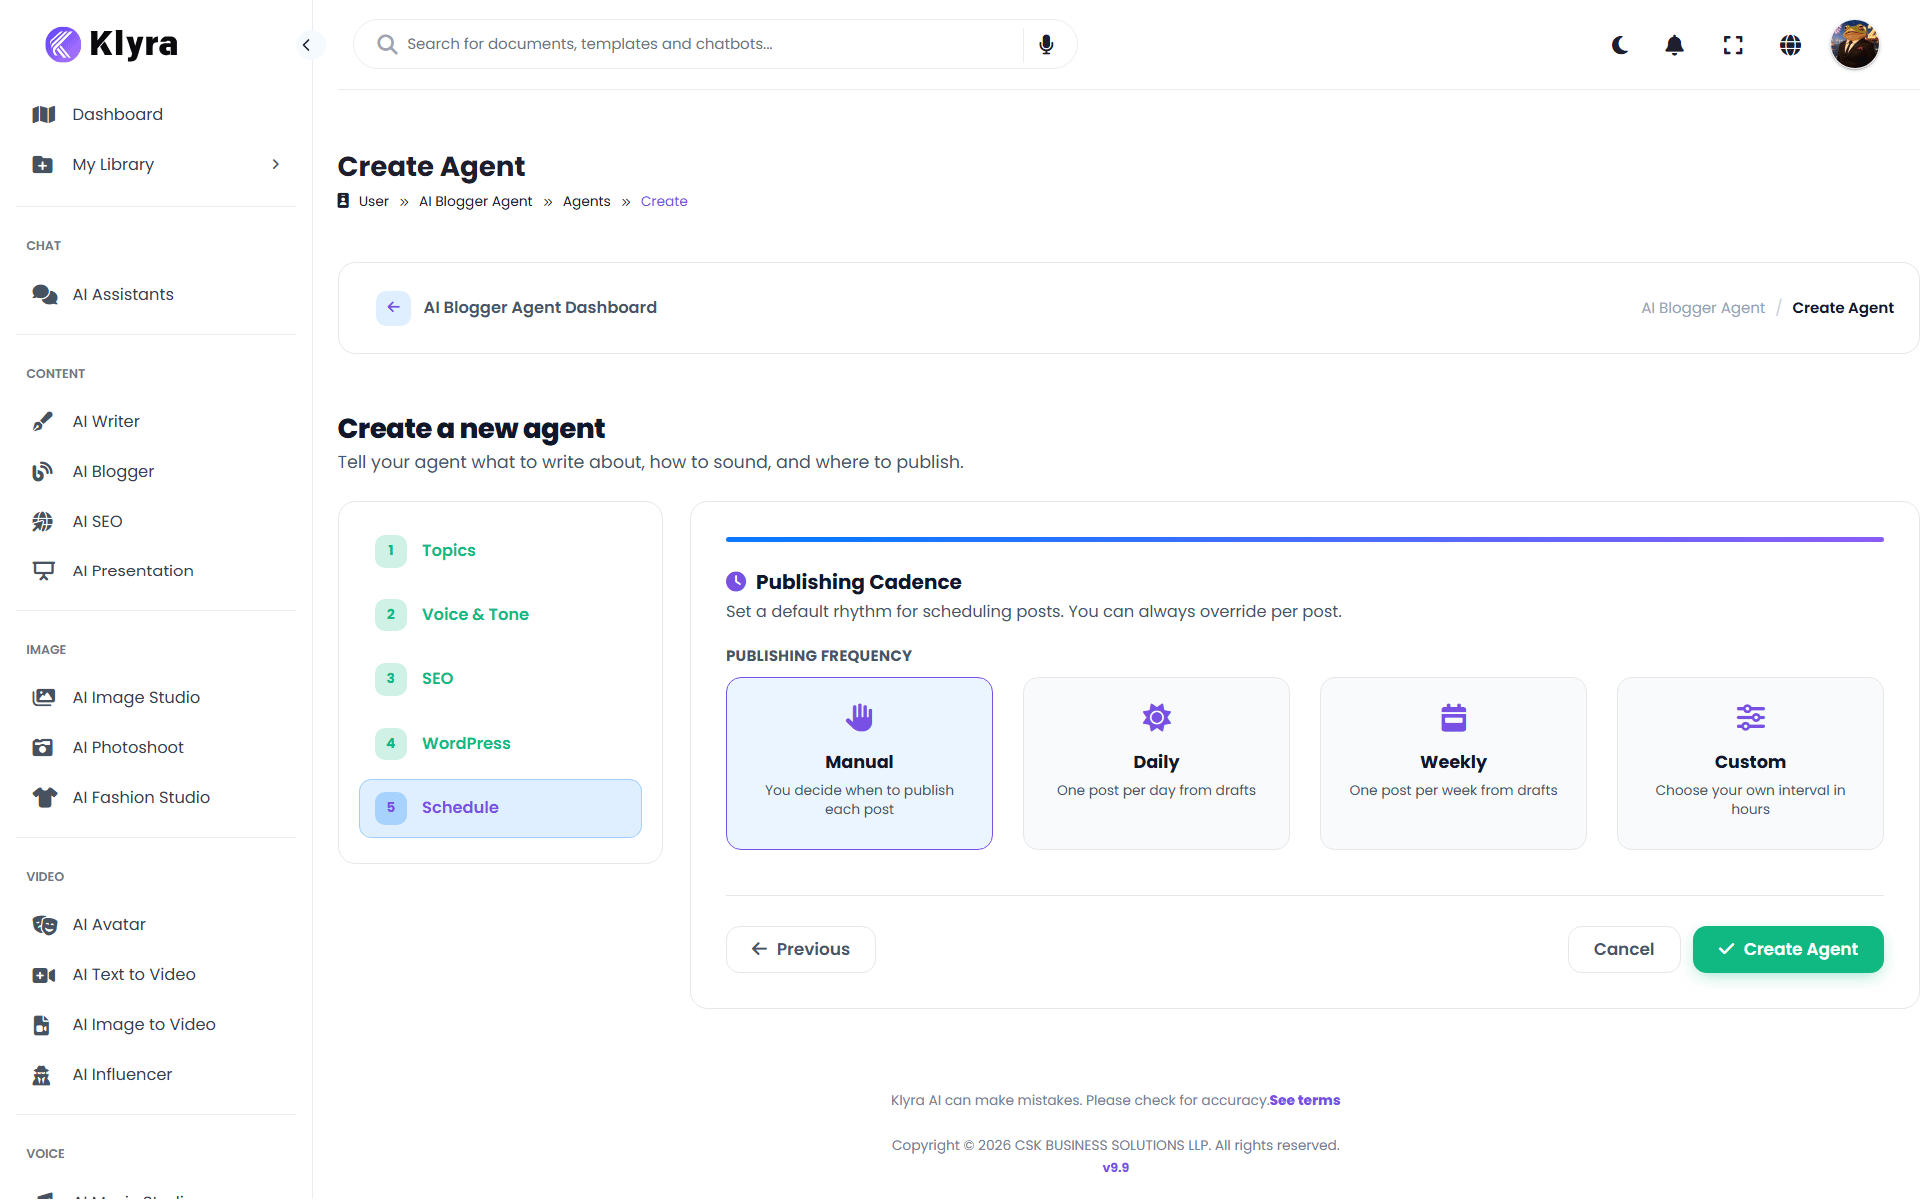
The **Schedule** step defines the agent's default publishing cadence.
| Option | What it means |
| ---------- | ------------------------------------- |
| **Manual** | You decide when to publish each post. |
| **Daily** | One post per day from drafts. |
| **Weekly** | One post per week from drafts. |
| **Custom** | Choose your own interval in hours. |
The interface notes that the publishing cadence can be overridden per post.
Click **Continue**.
### Step 5: Choose the publishing cadence
The **Schedule** step defines the agent's default publishing cadence.
| Option | What it means |
| ---------- | ------------------------------------- |
| **Manual** | You decide when to publish each post. |
| **Daily** | One post per day from drafts. |
| **Weekly** | One post per week from drafts. |
| **Custom** | Choose your own interval in hours. |
The interface notes that the publishing cadence can be overridden per post.
 Agent-level Publishing Cadence is different from scheduling one specific post from the Edit Post screen.
### Create the agent
After completing all five steps, click **Create Agent**.
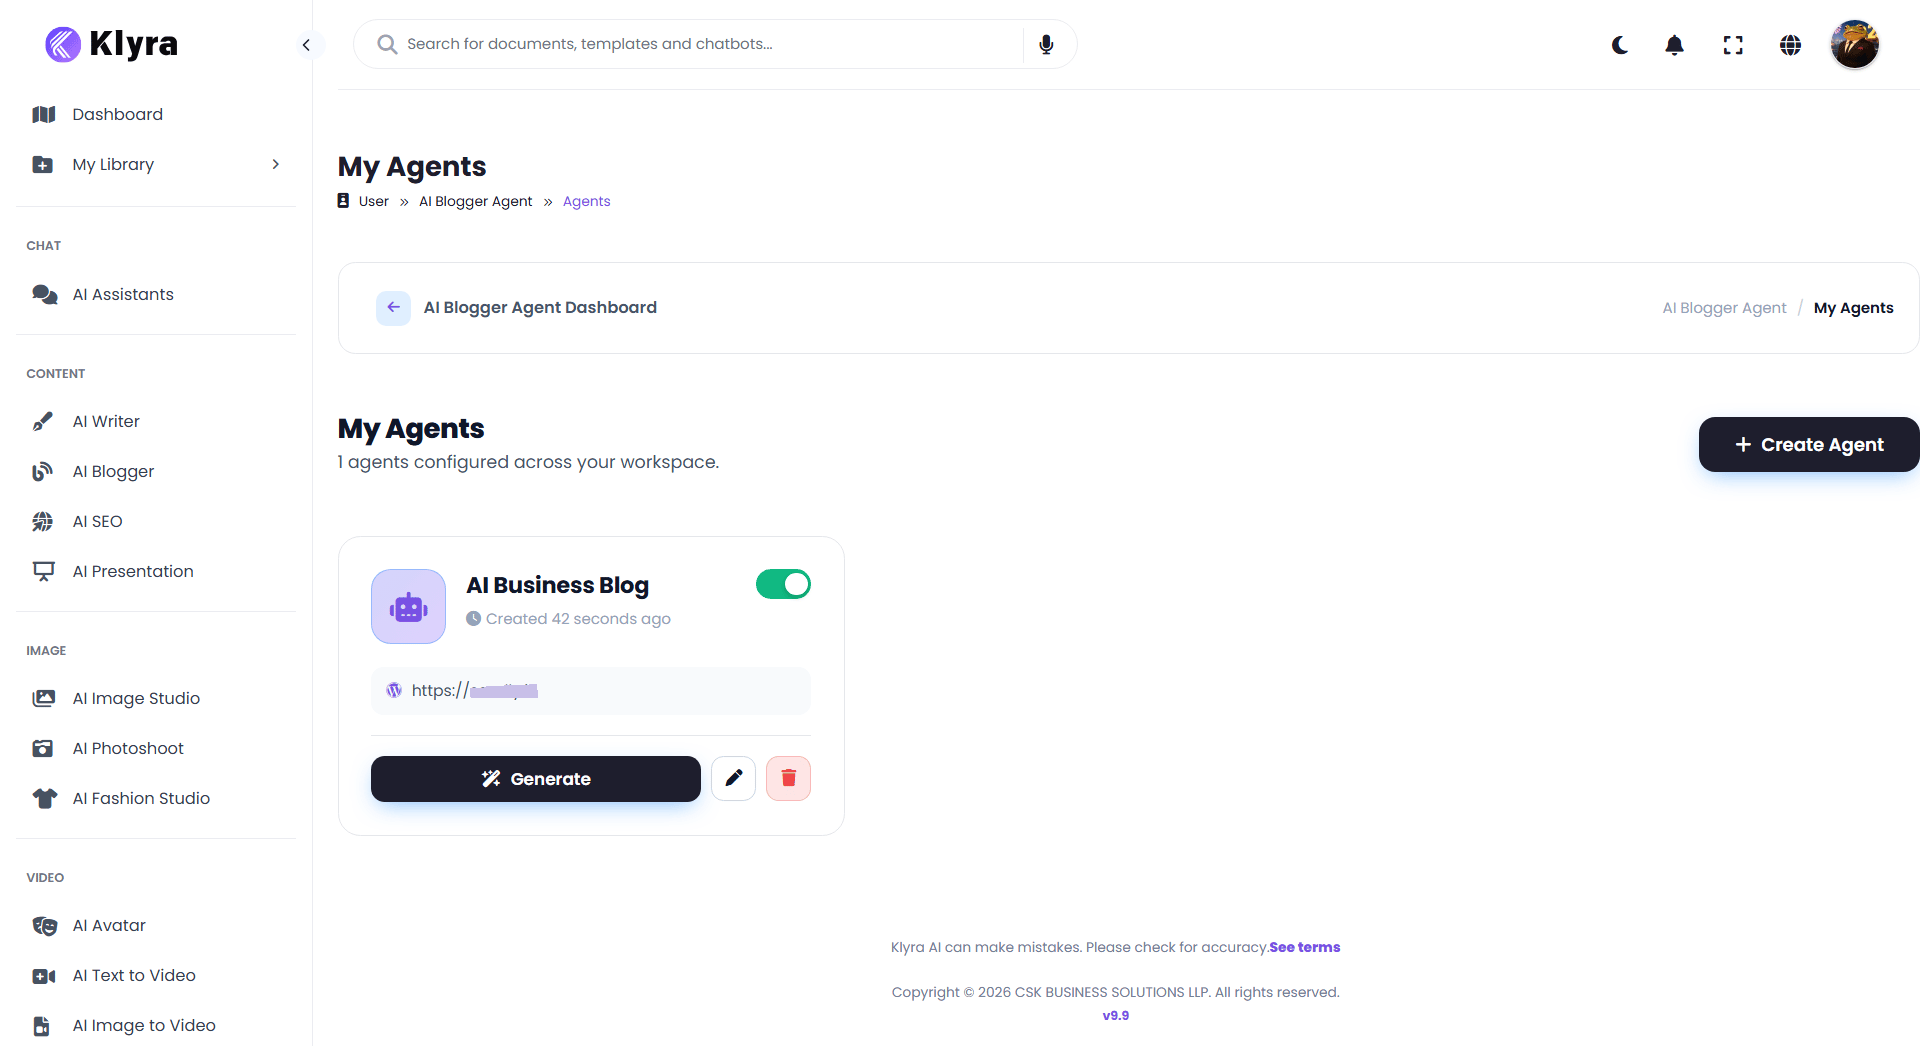
Your new agent appears under **My Agents**.
An agent card can include:
* Agent name
* Active or inactive status
* Connected WordPress site
* **Generate**
* **Edit**
* **Delete**
## Generate blog posts
From **My Agents**, click **Generate** on the agent you want to use.
The **Generate Posts** dialog opens.
Enter the number of posts you want to create. The interface allows up to **100 posts at a time**.
For your first run, start with a small batch so you can review the output and refine the agent if needed.
Agent-level Publishing Cadence is different from scheduling one specific post from the Edit Post screen.
### Create the agent
After completing all five steps, click **Create Agent**.
Your new agent appears under **My Agents**.
An agent card can include:
* Agent name
* Active or inactive status
* Connected WordPress site
* **Generate**
* **Edit**
* **Delete**
## Generate blog posts
From **My Agents**, click **Generate** on the agent you want to use.
The **Generate Posts** dialog opens.
Enter the number of posts you want to create. The interface allows up to **100 posts at a time**.
For your first run, start with a small batch so you can review the output and refine the agent if needed.
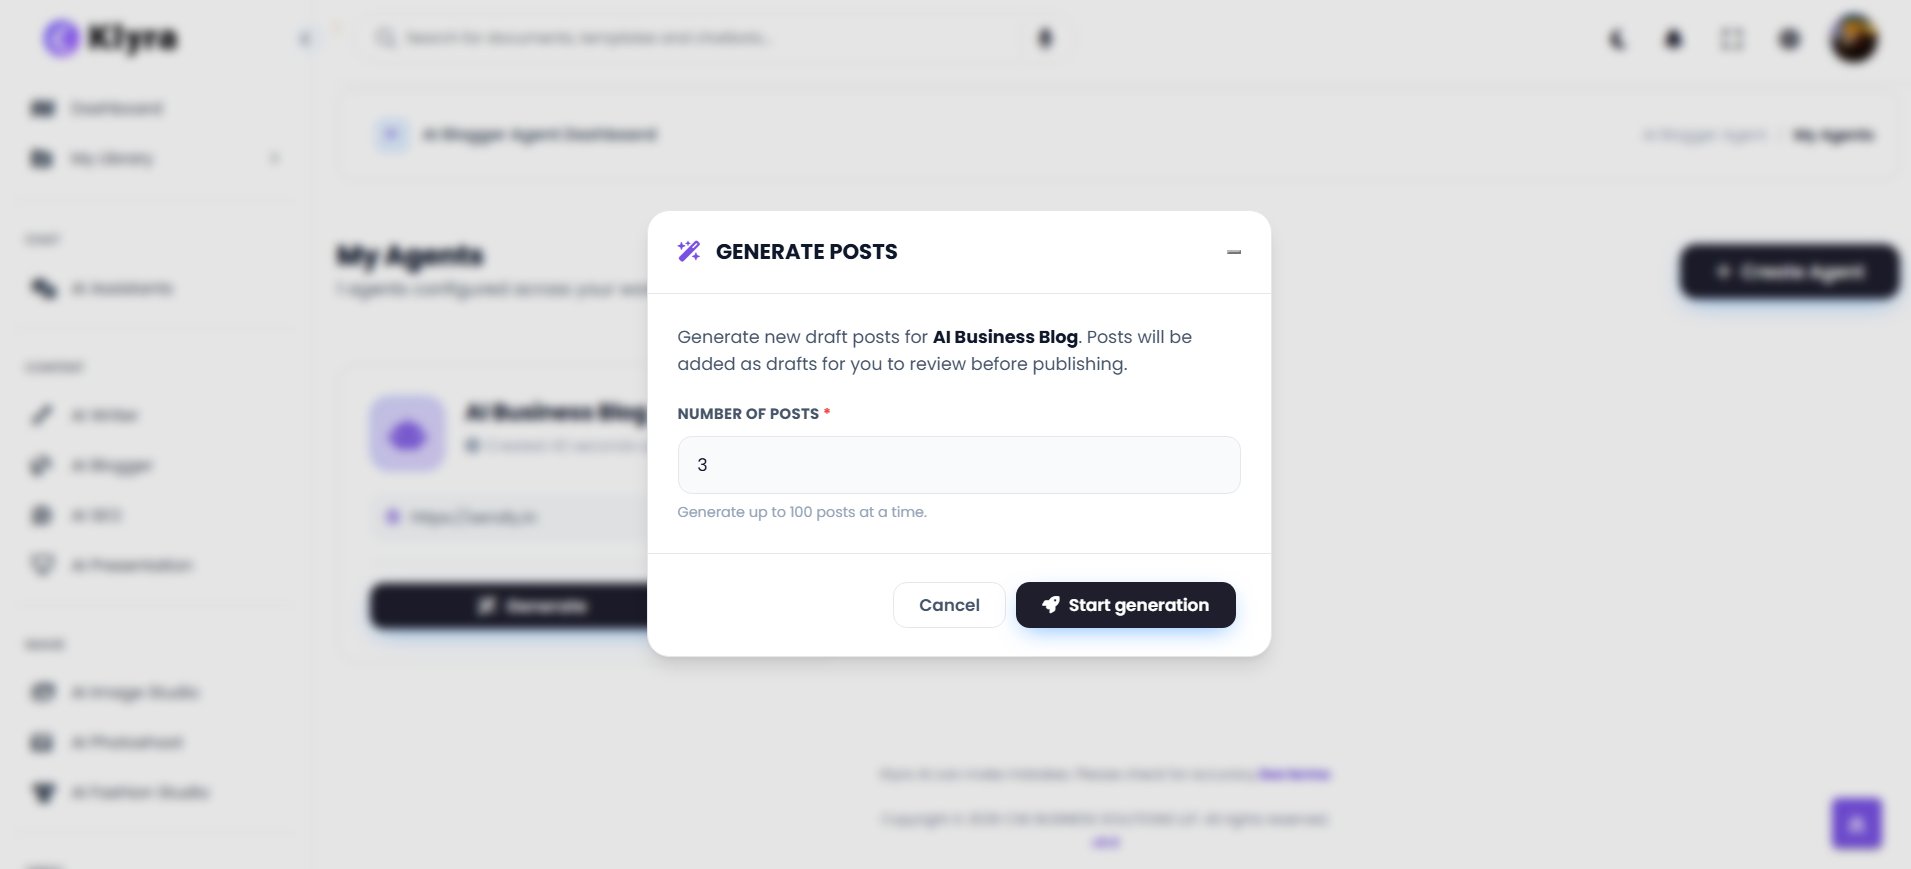 Click **Start generation**.
Generated posts are added as drafts. Generation does not mean that posts are immediately published.
## Review your generated posts
Open **Posts** from the AI Blogger workspace.
The Posts page provides status filters for:
* **All**
* **Drafts**
* **Scheduled**
* **Published**
* **Failed**
Click **Start generation**.
Generated posts are added as drafts. Generation does not mean that posts are immediately published.
## Review your generated posts
Open **Posts** from the AI Blogger workspace.
The Posts page provides status filters for:
* **All**
* **Drafts**
* **Scheduled**
* **Published**
* **Failed**
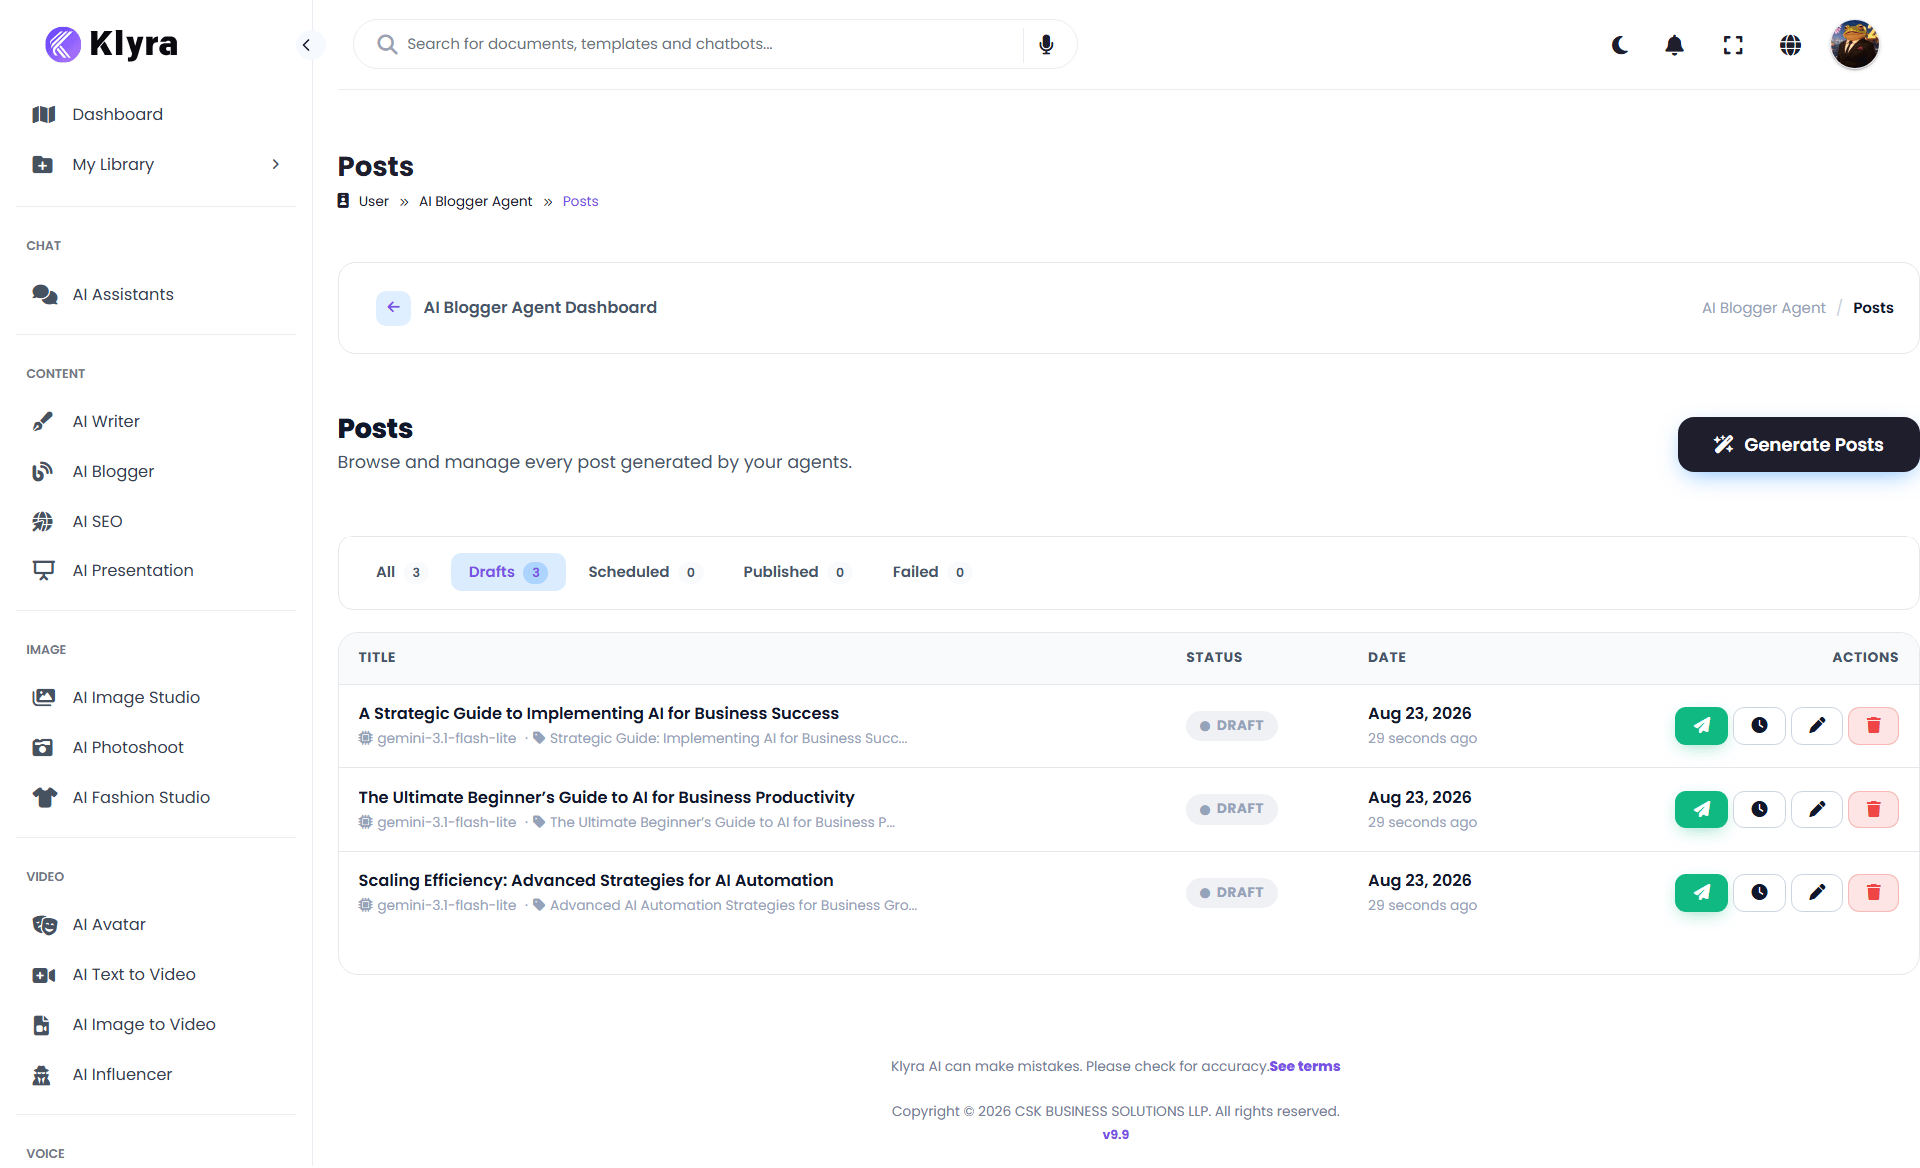 Post rows can show the:
* Title
* AI model
* Topic or tag information
* Status
* Date
* Available actions
Available actions shown include:
* **Publish**
* **Schedule**
* **Edit**
* **Delete**
### Understand the post lifecycle
```text theme={null}
Generated
↓
Draft
↓
Review and edit
↓
Publish now OR schedule
↓
Published
```
A post that does not publish successfully can appear under **Failed**.
## Edit and review a post
Open a draft using **Edit**.
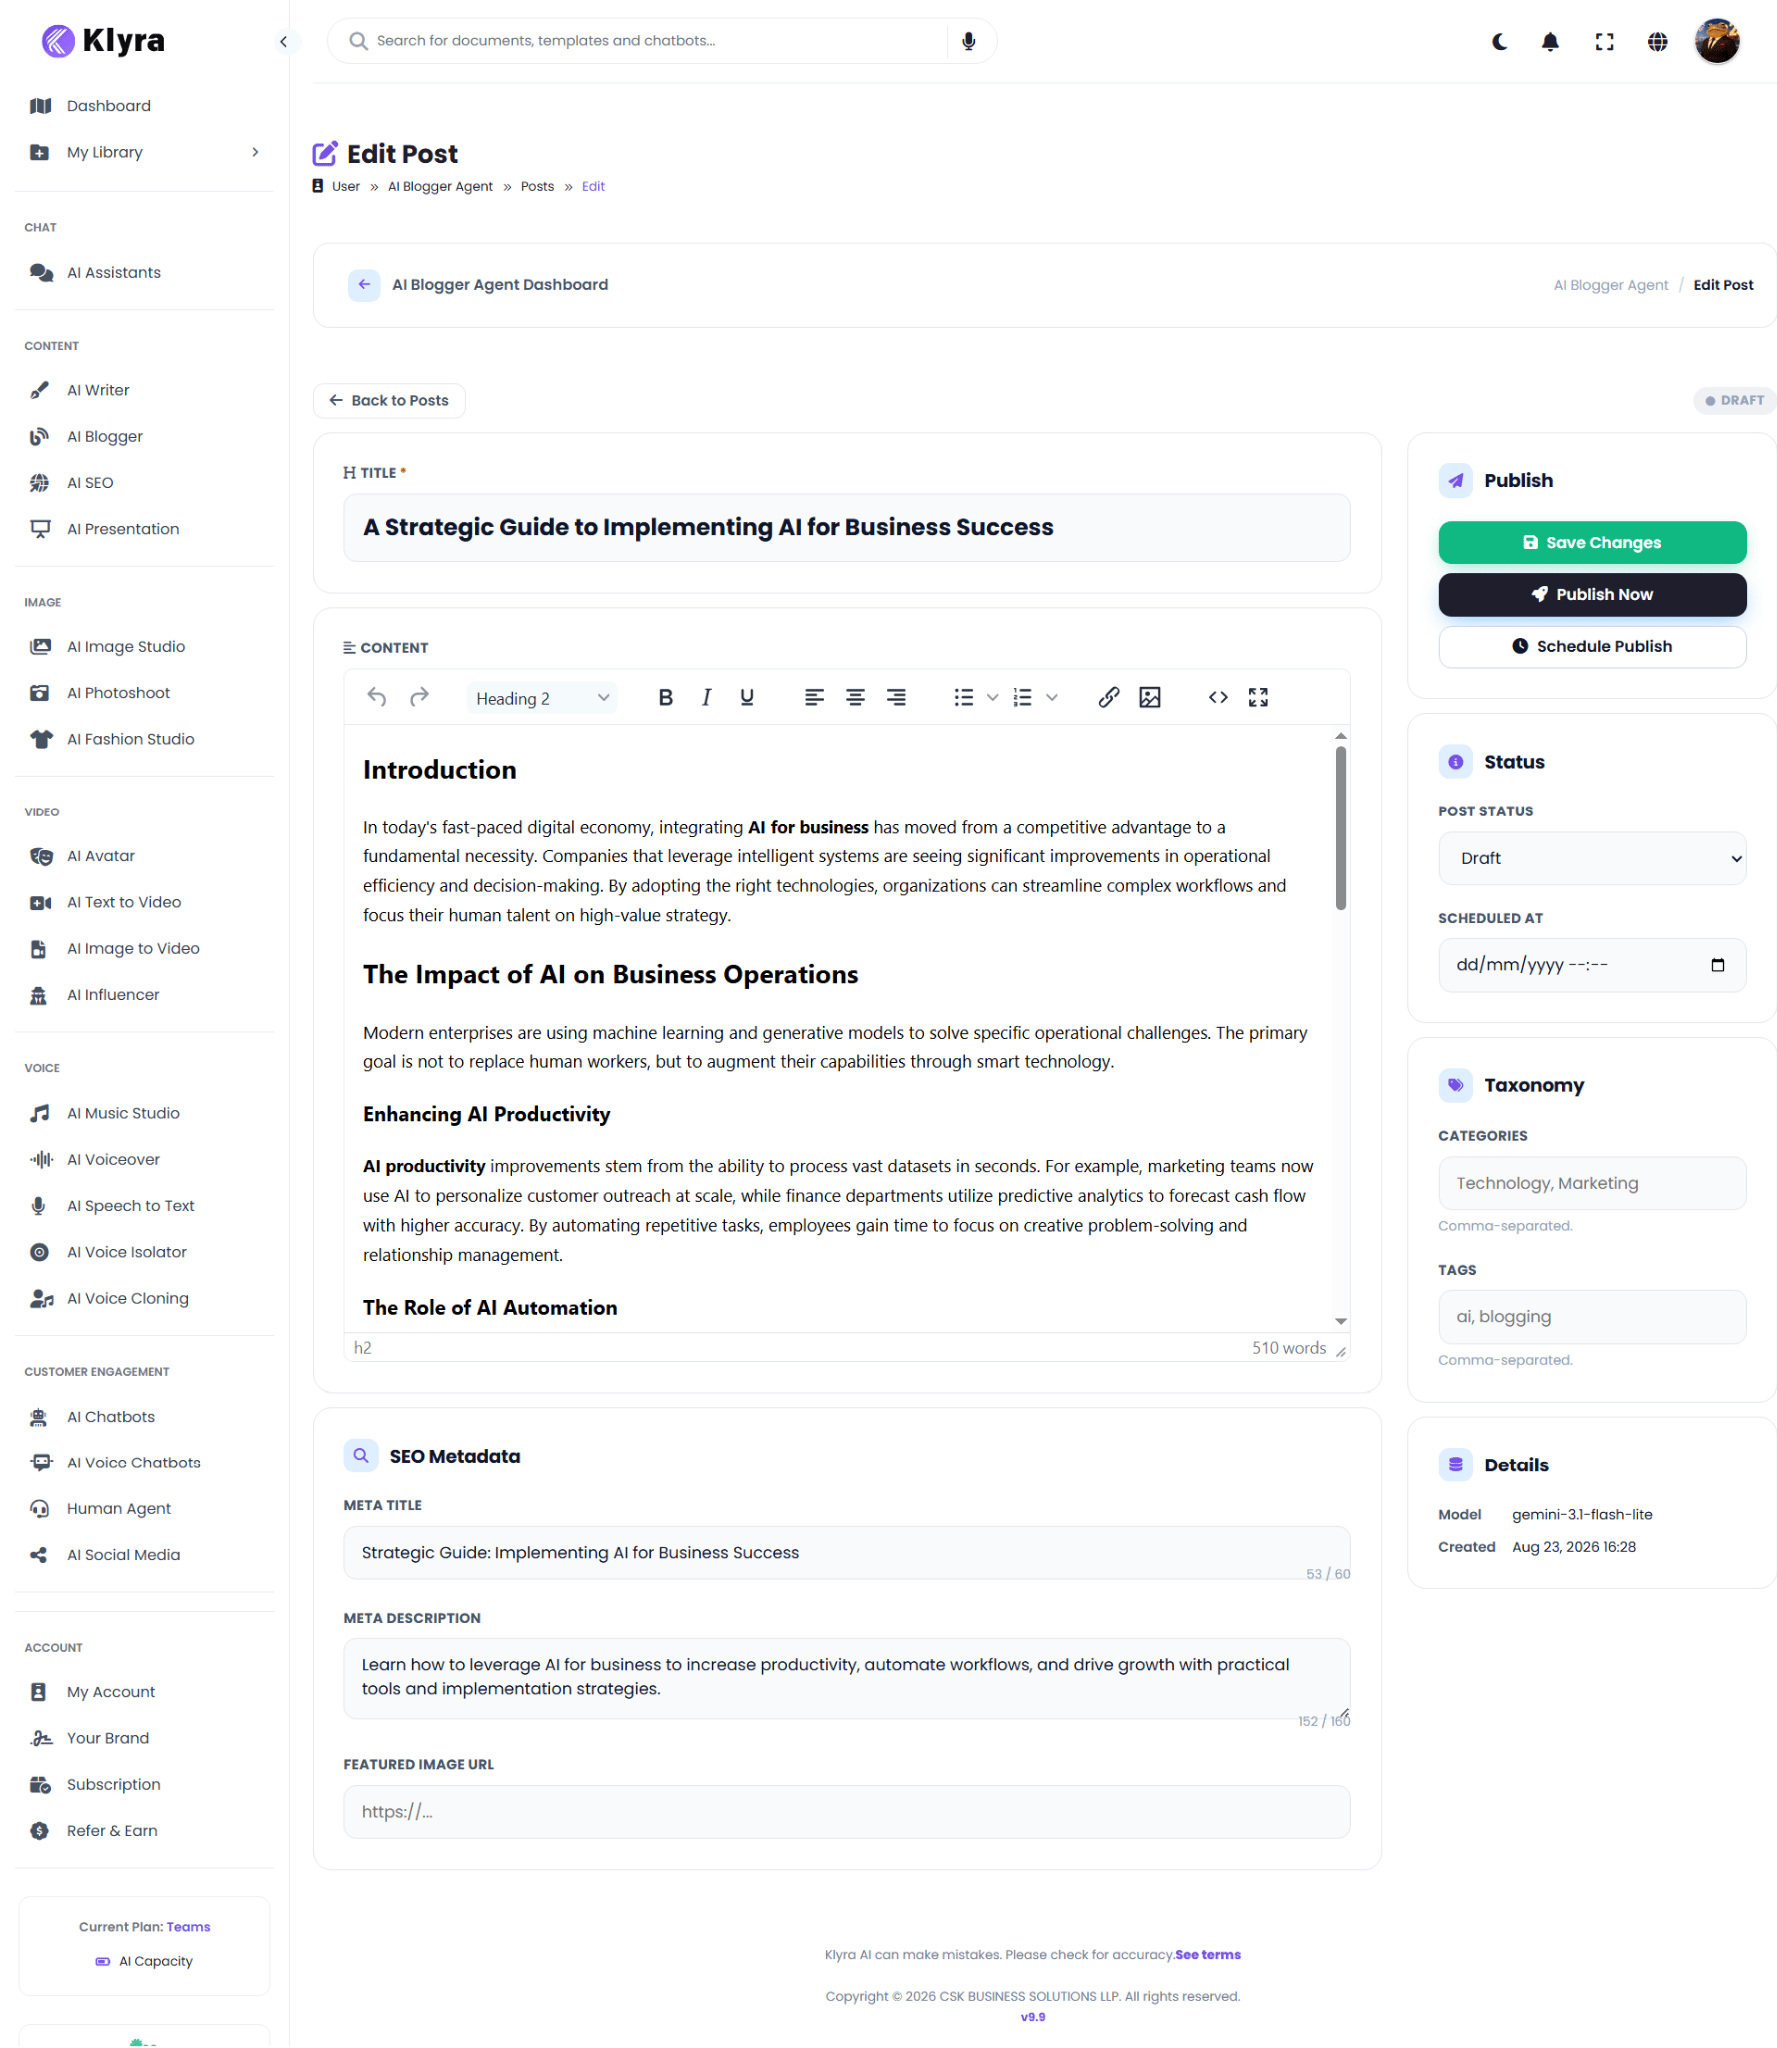
The **Edit Post** screen provides the content editor and publishing controls.
Post rows can show the:
* Title
* AI model
* Topic or tag information
* Status
* Date
* Available actions
Available actions shown include:
* **Publish**
* **Schedule**
* **Edit**
* **Delete**
### Understand the post lifecycle
```text theme={null}
Generated
↓
Draft
↓
Review and edit
↓
Publish now OR schedule
↓
Published
```
A post that does not publish successfully can appear under **Failed**.
## Edit and review a post
Open a draft using **Edit**.
The **Edit Post** screen provides the content editor and publishing controls.
 ### Edit the title
The generated title appears at the top of the editor and can be changed before publishing.
### Edit the article
The article is displayed in a rich text editor. Review and modify the generated content, including headings, formatting, lists, links, and other supported editor elements.
Review AI-generated content before publishing. Check factual claims, examples, names, statistics, links, formatting, and whether the article meets your intended search intent.
### Review categories and tags
The **Taxonomy** section contains:
* **Categories**
* **Tags**
Both fields use comma-separated values.
Example:
**Categories**
> Technology, Marketing
**Tags**
> ai, blogging
### Review SEO metadata
The **SEO Metadata** section includes:
* **Meta Title**
* **Meta Description**
* **Featured Image URL**
The interface displays character counters for the meta title and description.
### Review post details
The **Details** panel shows information such as the AI model used and when the post was created.
## Save, publish, or schedule
### Save Changes
Use **Save Changes** to keep your edits without publishing the article.
### Publish Now
Use **Publish Now** when the article is ready to be published immediately.
Before publishing, confirm the title, content, taxonomy, SEO metadata, and WordPress connection.
### Schedule Publish
Use **Schedule Publish** when you want the article to go live at a future date and time.
Remember:
* **Publishing Cadence** = the agent's default publishing rhythm.
* **Schedule Publish** = the publication schedule for an individual post.
## Manage your AI Blogger Agents
Return to **My Agents** to manage configured agents.
### Enable or disable an agent
Use the toggle on the agent card to control whether the agent is active.
### Edit an agent
Use **Edit** when you want to change topics, keywords, voice, SEO preferences, WordPress settings, or publishing cadence.
### Generate more posts
Use **Generate** to create another batch of draft posts.
### Delete an agent
Use **Delete** when the agent is no longer needed.
Deleting an agent is different from deleting an individual post. Review what you are removing before confirming the action.
## Recommended first workflow
Create an agent around one clear blog subject.
Choose a tone and add Custom Style Rules for repeatable brand guidance.
Set keyword density, metadata limits, and the content structure you want.
Create a dedicated Application Password and test the connection.
Start with a few posts and evaluate the results.
Check the article, metadata, categories, tags, and factual accuracy.
Publish immediately or schedule the post for later.
## Quick reference
| Task | Where to do it |
| ------------------------------ | ---------------------------------- |
| Create an agent | **AI Blogger → Create AI Blogger** |
| Define topics | **Create Agent → Topics** |
| Set writing style | **Create Agent → Voice & Tone** |
| Configure SEO | **Create Agent → SEO** |
| Connect WordPress | **Create Agent → WordPress** |
| Set default publishing cadence | **Create Agent → Schedule** |
| Generate posts | **My Agents → Generate** |
| Review drafts | **Posts → Drafts** |
| Edit a post | **Posts → Edit** |
| Save edits | **Edit Post → Save Changes** |
| Publish immediately | **Edit Post → Publish Now** |
| Schedule one post | **Edit Post → Schedule Publish** |
| Manage agents | **My Agents** |
## Best practices
### Keep each agent focused
Use separate agents for substantially different content strategies.
### Use relevant target keywords
Add keywords that genuinely match the topics you want the agent to cover.
### Make Custom Style Rules specific
Good rules describe observable writing behavior, such as using active voice, concise paragraphs, practical examples, and plain language.
### Review before publishing
Check factual accuracy, statistics, links, claims, structure, and SEO metadata before publishing.
### Start with drafts
For a new agent, generate a small batch first. Refine the configuration before scaling up.
## Troubleshooting
### The WordPress connection fails
Check:
1. The WordPress URL includes `https://`.
2. There is no unnecessary trailing slash.
3. The username is correct.
4. You used a WordPress Application Password.
5. The Application Password has not been revoked.
6. You can run **Test Connection** again.
### The generated posts do not match my preferred style
Review **Voice & Tone**, including the selected tone and Custom Style Rules. Also review your Topics and Target Keywords.
### I generated posts but they are not published
Generated posts are added as **drafts**. Open **Posts → Drafts**, review the content, then use **Publish Now** or **Schedule Publish**.
### I want to change when a specific post goes live
Open the post and use **Schedule Publish**. This is separate from the agent-level **Publishing Cadence**.
## You're ready to blog with AI
You now know how to:
* Create an AI Blogger Agent
* Define topics and target keywords
* Set the writing voice and custom style
* Configure SEO preferences
* Connect WordPress
* Choose a publishing cadence
* Generate posts in batches
* Review and edit drafts
* Manage categories and tags
* Review SEO metadata
* Publish immediately
* Schedule individual posts
* Manage AI Blogger Agents
### Edit the title
The generated title appears at the top of the editor and can be changed before publishing.
### Edit the article
The article is displayed in a rich text editor. Review and modify the generated content, including headings, formatting, lists, links, and other supported editor elements.
Review AI-generated content before publishing. Check factual claims, examples, names, statistics, links, formatting, and whether the article meets your intended search intent.
### Review categories and tags
The **Taxonomy** section contains:
* **Categories**
* **Tags**
Both fields use comma-separated values.
Example:
**Categories**
> Technology, Marketing
**Tags**
> ai, blogging
### Review SEO metadata
The **SEO Metadata** section includes:
* **Meta Title**
* **Meta Description**
* **Featured Image URL**
The interface displays character counters for the meta title and description.
### Review post details
The **Details** panel shows information such as the AI model used and when the post was created.
## Save, publish, or schedule
### Save Changes
Use **Save Changes** to keep your edits without publishing the article.
### Publish Now
Use **Publish Now** when the article is ready to be published immediately.
Before publishing, confirm the title, content, taxonomy, SEO metadata, and WordPress connection.
### Schedule Publish
Use **Schedule Publish** when you want the article to go live at a future date and time.
Remember:
* **Publishing Cadence** = the agent's default publishing rhythm.
* **Schedule Publish** = the publication schedule for an individual post.
## Manage your AI Blogger Agents
Return to **My Agents** to manage configured agents.
### Enable or disable an agent
Use the toggle on the agent card to control whether the agent is active.
### Edit an agent
Use **Edit** when you want to change topics, keywords, voice, SEO preferences, WordPress settings, or publishing cadence.
### Generate more posts
Use **Generate** to create another batch of draft posts.
### Delete an agent
Use **Delete** when the agent is no longer needed.
Deleting an agent is different from deleting an individual post. Review what you are removing before confirming the action.
## Recommended first workflow
Create an agent around one clear blog subject.
Choose a tone and add Custom Style Rules for repeatable brand guidance.
Set keyword density, metadata limits, and the content structure you want.
Create a dedicated Application Password and test the connection.
Start with a few posts and evaluate the results.
Check the article, metadata, categories, tags, and factual accuracy.
Publish immediately or schedule the post for later.
## Quick reference
| Task | Where to do it |
| ------------------------------ | ---------------------------------- |
| Create an agent | **AI Blogger → Create AI Blogger** |
| Define topics | **Create Agent → Topics** |
| Set writing style | **Create Agent → Voice & Tone** |
| Configure SEO | **Create Agent → SEO** |
| Connect WordPress | **Create Agent → WordPress** |
| Set default publishing cadence | **Create Agent → Schedule** |
| Generate posts | **My Agents → Generate** |
| Review drafts | **Posts → Drafts** |
| Edit a post | **Posts → Edit** |
| Save edits | **Edit Post → Save Changes** |
| Publish immediately | **Edit Post → Publish Now** |
| Schedule one post | **Edit Post → Schedule Publish** |
| Manage agents | **My Agents** |
## Best practices
### Keep each agent focused
Use separate agents for substantially different content strategies.
### Use relevant target keywords
Add keywords that genuinely match the topics you want the agent to cover.
### Make Custom Style Rules specific
Good rules describe observable writing behavior, such as using active voice, concise paragraphs, practical examples, and plain language.
### Review before publishing
Check factual accuracy, statistics, links, claims, structure, and SEO metadata before publishing.
### Start with drafts
For a new agent, generate a small batch first. Refine the configuration before scaling up.
## Troubleshooting
### The WordPress connection fails
Check:
1. The WordPress URL includes `https://`.
2. There is no unnecessary trailing slash.
3. The username is correct.
4. You used a WordPress Application Password.
5. The Application Password has not been revoked.
6. You can run **Test Connection** again.
### The generated posts do not match my preferred style
Review **Voice & Tone**, including the selected tone and Custom Style Rules. Also review your Topics and Target Keywords.
### I generated posts but they are not published
Generated posts are added as **drafts**. Open **Posts → Drafts**, review the content, then use **Publish Now** or **Schedule Publish**.
### I want to change when a specific post goes live
Open the post and use **Schedule Publish**. This is separate from the agent-level **Publishing Cadence**.
## You're ready to blog with AI
You now know how to:
* Create an AI Blogger Agent
* Define topics and target keywords
* Set the writing voice and custom style
* Configure SEO preferences
* Connect WordPress
* Choose a publishing cadence
* Generate posts in batches
* Review and edit drafts
* Manage categories and tags
* Review SEO metadata
* Publish immediately
* Schedule individual posts
* Manage AI Blogger Agents