> ## Documentation Index
> Fetch the complete documentation index at: https://docs.klyra.ai/llms.txt
> Use this file to discover all available pages before exploring further.
# Ai avatar generator
# AI Avatar
AI Avatar brings your digital avatars to life and helps you create professional videos without a traditional recording workflow. Choose an avatar, add a voice and script, configure the video, and generate the final result from one workspace.
Klyra AI's AI Avatar experience supports both **AI Avatar Photos** and **AI Avatar Videos**, powered by HeyGen. The app includes prebuilt avatar assets, custom avatar options, a large voice library, customizable video settings, and background controls. fileciteturn0file0
AI Avatar is designed to keep the video creation workflow simple: choose an avatar, provide the content, configure the presentation, and generate the video.
## What you can create
AI Avatar has two main creation workflows:
| Workflow | Best for |
| -------------------------------------- | ----------------------------------------------------------------------------- |
| **Create Video from AI Avatar Photos** | Create an avatar video from a still AI avatar image or your own avatar photo. |
| **Create Video from AI Avatar Videos** | Create a video using a prebuilt or uploaded avatar video asset. |
The AI Avatar app also provides access to avatar and voice assets, uploads, and generated video results. fileciteturn0file0
## How AI Avatar works
Select an AI Avatar Photo or an AI Avatar Video from the available assets.
Choose a voice and enter the words your avatar should speak.
Set the title, dimensions, avatar presentation, and background.
Click **Generate Video** and let Klyra create the final avatar video.
## Open AI Avatar
Open **AI Avatar** from the **Video** section of the Klyra AI workspace.
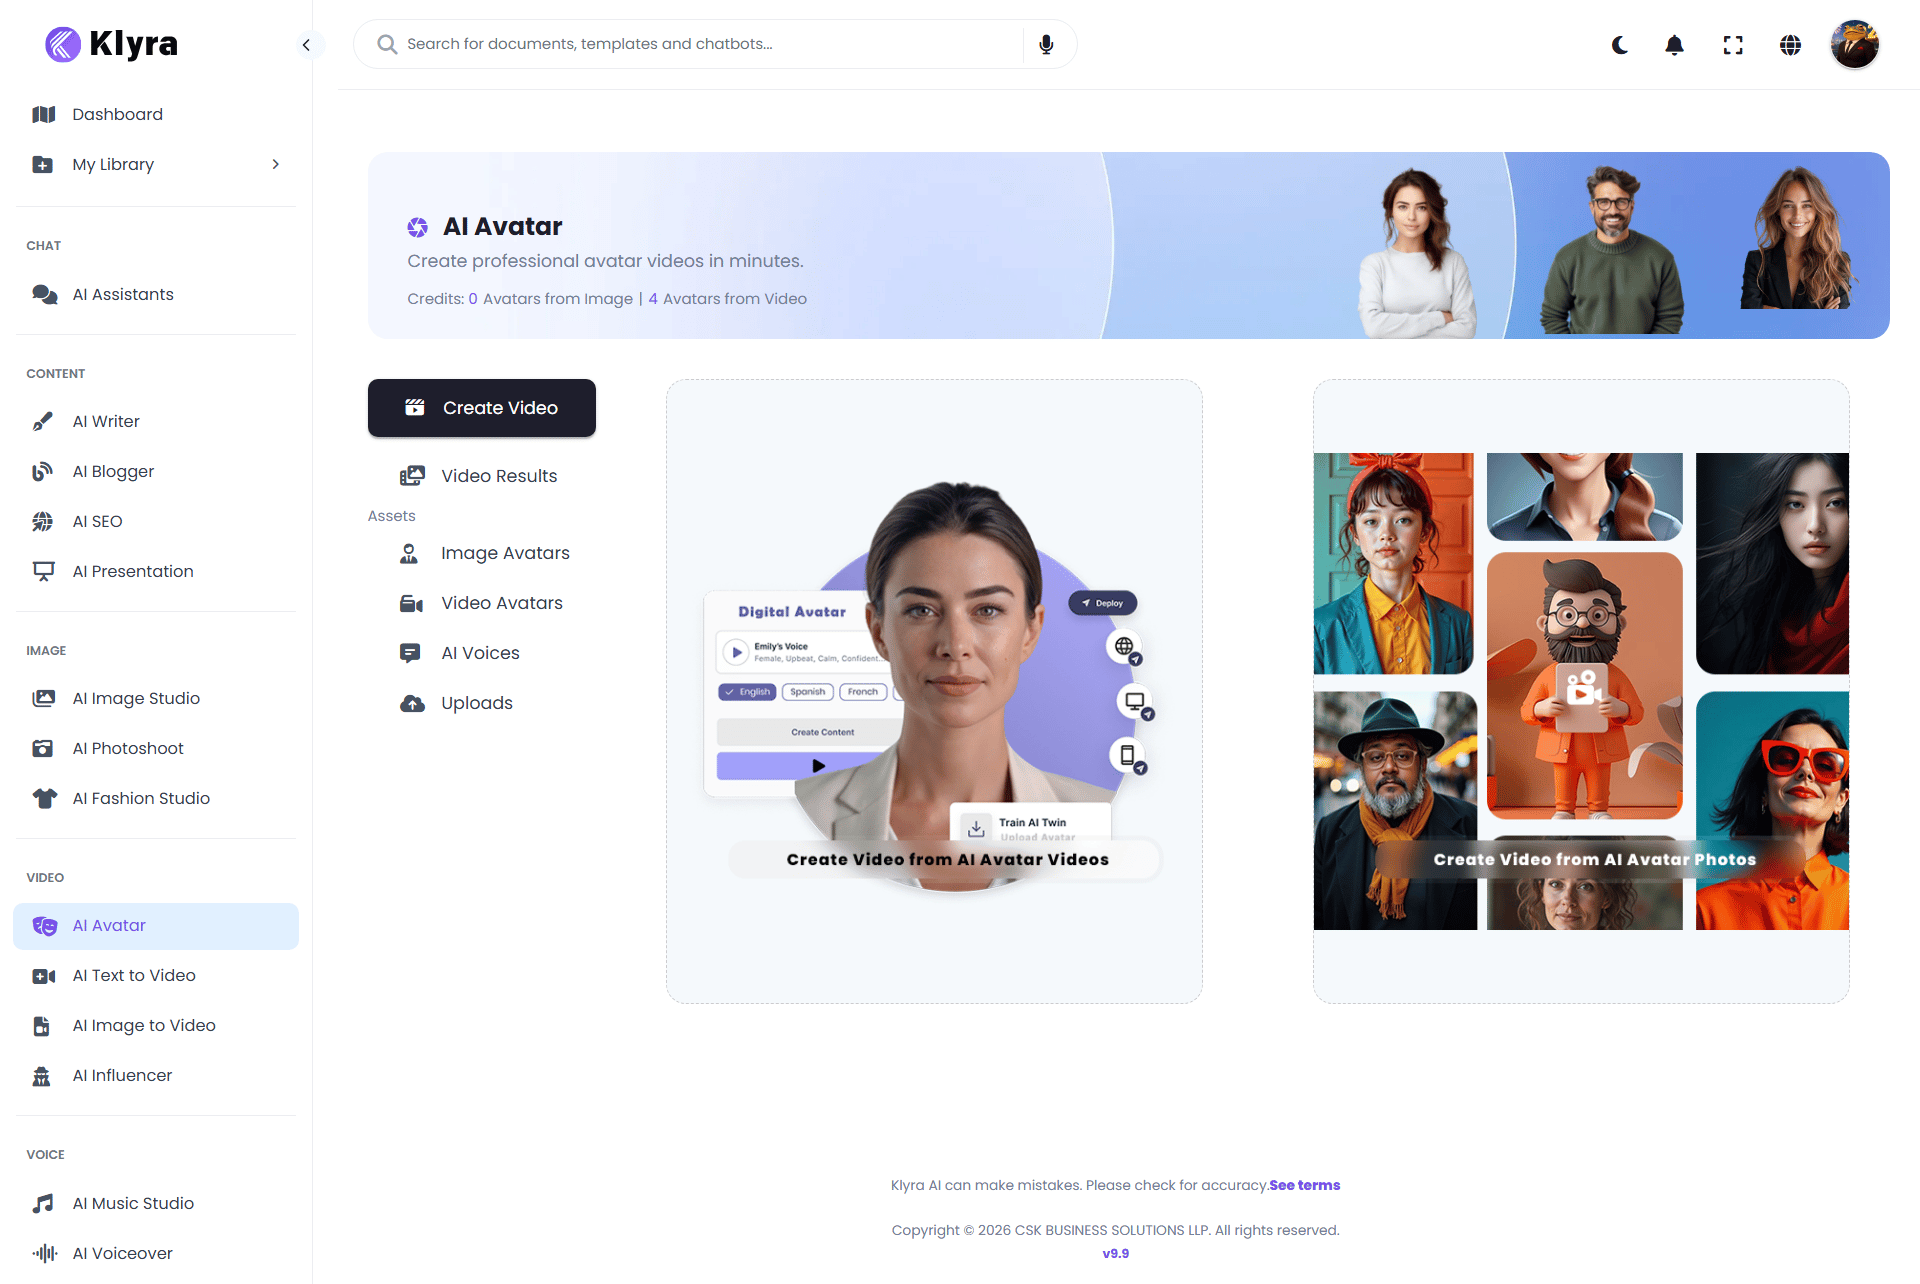
The AI Avatar landing screen presents the two primary creation paths:
* **Create Video from AI Avatar Videos**
* **Create Video from AI Avatar Photos**
It also provides access to:
* Video Results
* Image Avatars
* Video Avatars
* AI Voices
* Uploads
 The exact asset gallery available to you depends on the avatar assets configured in your Klyra workspace.
## Create a video from an AI Avatar Video
Choose **Create Video from AI Avatar Videos** when you want to start from a video avatar asset rather than a still image.
This workflow is useful when you want to use a prepared avatar performance and focus on the voice, script, and final presentation.
### Step 1: Select your Avatar Video
The first step changes to **Select your Avatar Video**.
The gallery displays available video avatar assets. The screenshot includes assets such as:
* Giulia Office Front
* Giulia Office Front 2
* Giulia Office Side
* Giulia Office Side 2
* Giulia Sofa Front
* Giulia Sofa Side
* Other available avatar video assets
Select the video avatar you want to use.
The exact asset gallery available to you depends on the avatar assets configured in your Klyra workspace.
## Create a video from an AI Avatar Video
Choose **Create Video from AI Avatar Videos** when you want to start from a video avatar asset rather than a still image.
This workflow is useful when you want to use a prepared avatar performance and focus on the voice, script, and final presentation.
### Step 1: Select your Avatar Video
The first step changes to **Select your Avatar Video**.
The gallery displays available video avatar assets. The screenshot includes assets such as:
* Giulia Office Front
* Giulia Office Front 2
* Giulia Office Side
* Giulia Office Side 2
* Giulia Sofa Front
* Giulia Sofa Side
* Other available avatar video assets
Select the video avatar you want to use.
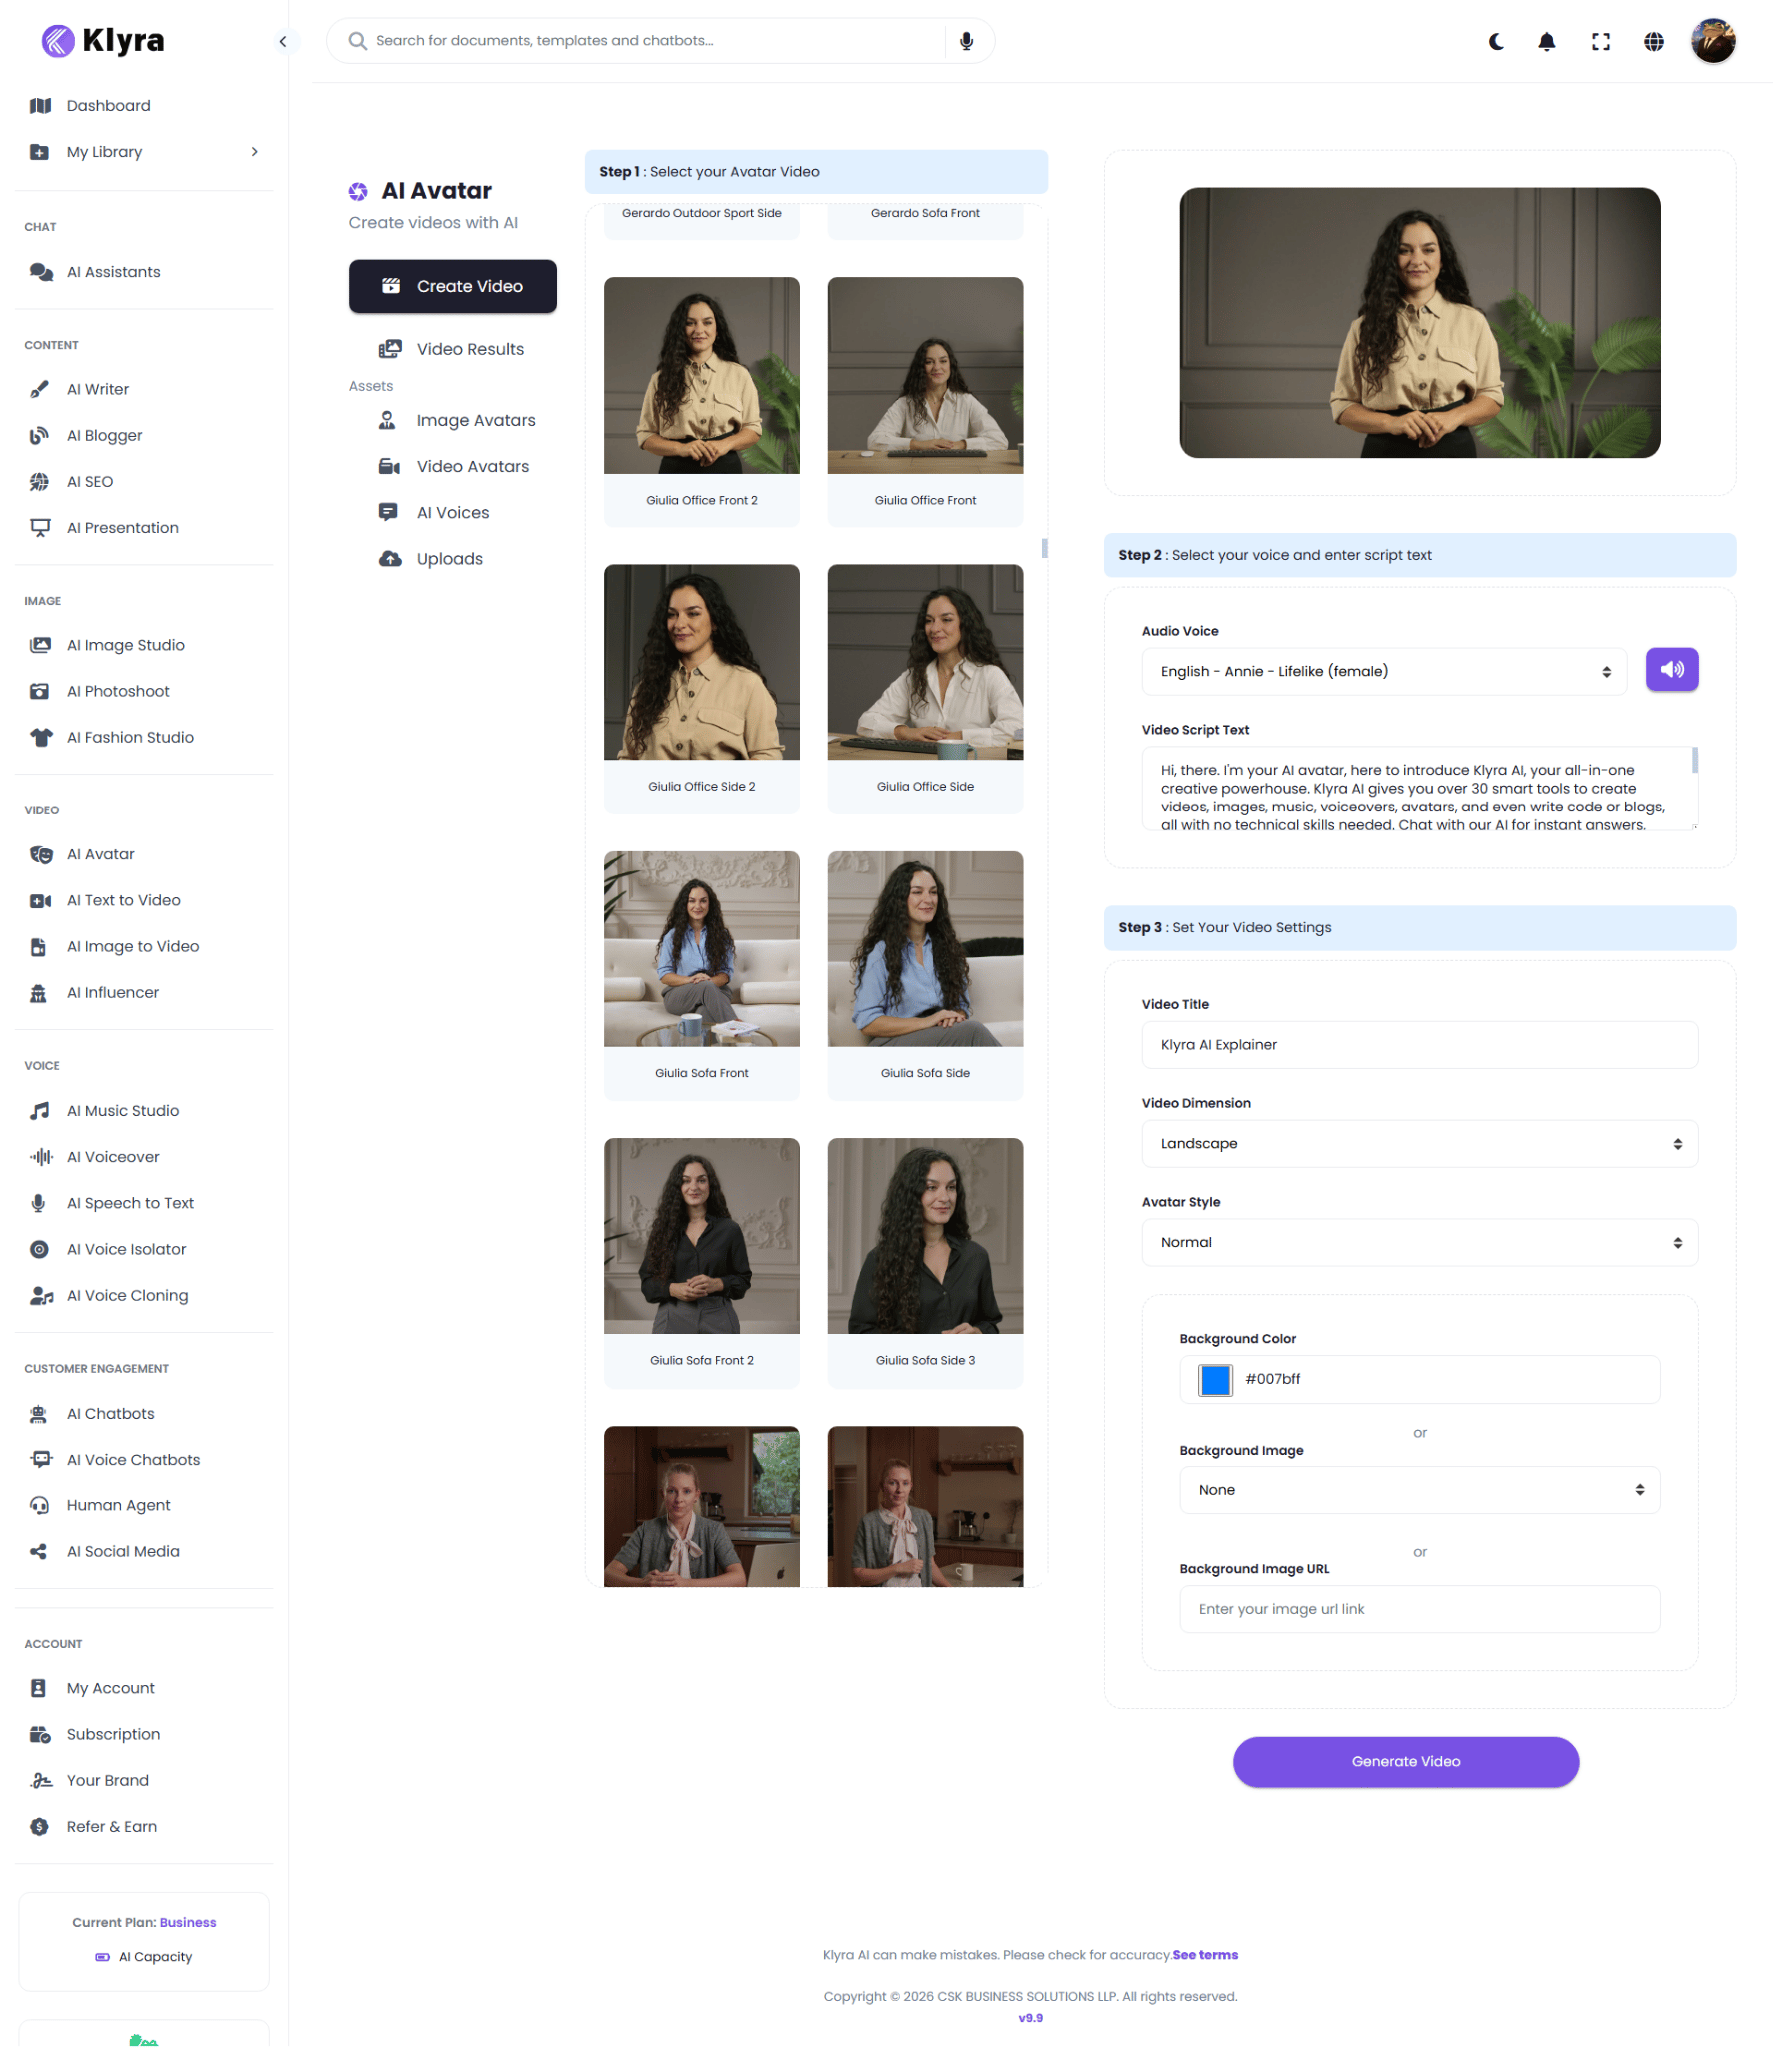 Klyra's AI Avatar feature supports hundreds of prebuilt video avatars that can be used to generate videos. fileciteturn0file0
### Step 2: Select your voice and enter script text
The second step is again **Select your voice and enter script text**.
Choose an **Audio Voice**, preview it if needed, and enter your **Video Script Text**.
The same voice and script principles apply:
* Choose a voice appropriate for the audience.
* Keep the message concise.
* Use natural language.
* Review the script before generating.
### Step 3: Set your Video Settings
The video-avatar workflow exposes a simpler set of presentation controls than the photo-avatar workflow.
#### Video Title
Enter a descriptive title for the video.
#### Video Dimension
Choose the required video orientation.
The screenshot shows **Landscape** selected.
#### Avatar Style
The interface provides an **Avatar Style** selector. The screenshot shows **Normal** selected.
Choose the available style that best fits the presentation.
### Choose a background
You can configure the background using:
* **Background Color**
* **Background Image**
* **Background Image URL**
This allows you to create a clean studio-style background or place the avatar in a more branded visual environment.
### Generate the video
Review the selected avatar, voice, script, title, dimension, avatar style, and background.
Then click **Generate Video**.
## Create a video from an AI Avatar Photo
Choose **Create Video from AI Avatar Photos** when you want to start with a still avatar image.
This workflow is useful for:
* Explainer videos
* Product introductions
* Business presentations
* Marketing videos
* Educational content
* Customer-facing announcements
* Other presenter-style videos
### Step 1: Select your Avatar Image
The first step is **Select your Avatar Image**.
The avatar gallery displays available image avatars. In the interface, avatar cards include examples such as Veronica, Leslie, Leah, Joanne, Jessica, Geoff, Ethan, Kevin, Shaun, and Evan.
Select the avatar you want to use.
Klyra's AI Avatar feature supports hundreds of prebuilt video avatars that can be used to generate videos. fileciteturn0file0
### Step 2: Select your voice and enter script text
The second step is again **Select your voice and enter script text**.
Choose an **Audio Voice**, preview it if needed, and enter your **Video Script Text**.
The same voice and script principles apply:
* Choose a voice appropriate for the audience.
* Keep the message concise.
* Use natural language.
* Review the script before generating.
### Step 3: Set your Video Settings
The video-avatar workflow exposes a simpler set of presentation controls than the photo-avatar workflow.
#### Video Title
Enter a descriptive title for the video.
#### Video Dimension
Choose the required video orientation.
The screenshot shows **Landscape** selected.
#### Avatar Style
The interface provides an **Avatar Style** selector. The screenshot shows **Normal** selected.
Choose the available style that best fits the presentation.
### Choose a background
You can configure the background using:
* **Background Color**
* **Background Image**
* **Background Image URL**
This allows you to create a clean studio-style background or place the avatar in a more branded visual environment.
### Generate the video
Review the selected avatar, voice, script, title, dimension, avatar style, and background.
Then click **Generate Video**.
## Create a video from an AI Avatar Photo
Choose **Create Video from AI Avatar Photos** when you want to start with a still avatar image.
This workflow is useful for:
* Explainer videos
* Product introductions
* Business presentations
* Marketing videos
* Educational content
* Customer-facing announcements
* Other presenter-style videos
### Step 1: Select your Avatar Image
The first step is **Select your Avatar Image**.
The avatar gallery displays available image avatars. In the interface, avatar cards include examples such as Veronica, Leslie, Leah, Joanne, Jessica, Geoff, Ethan, Kevin, Shaun, and Evan.
Select the avatar you want to use.
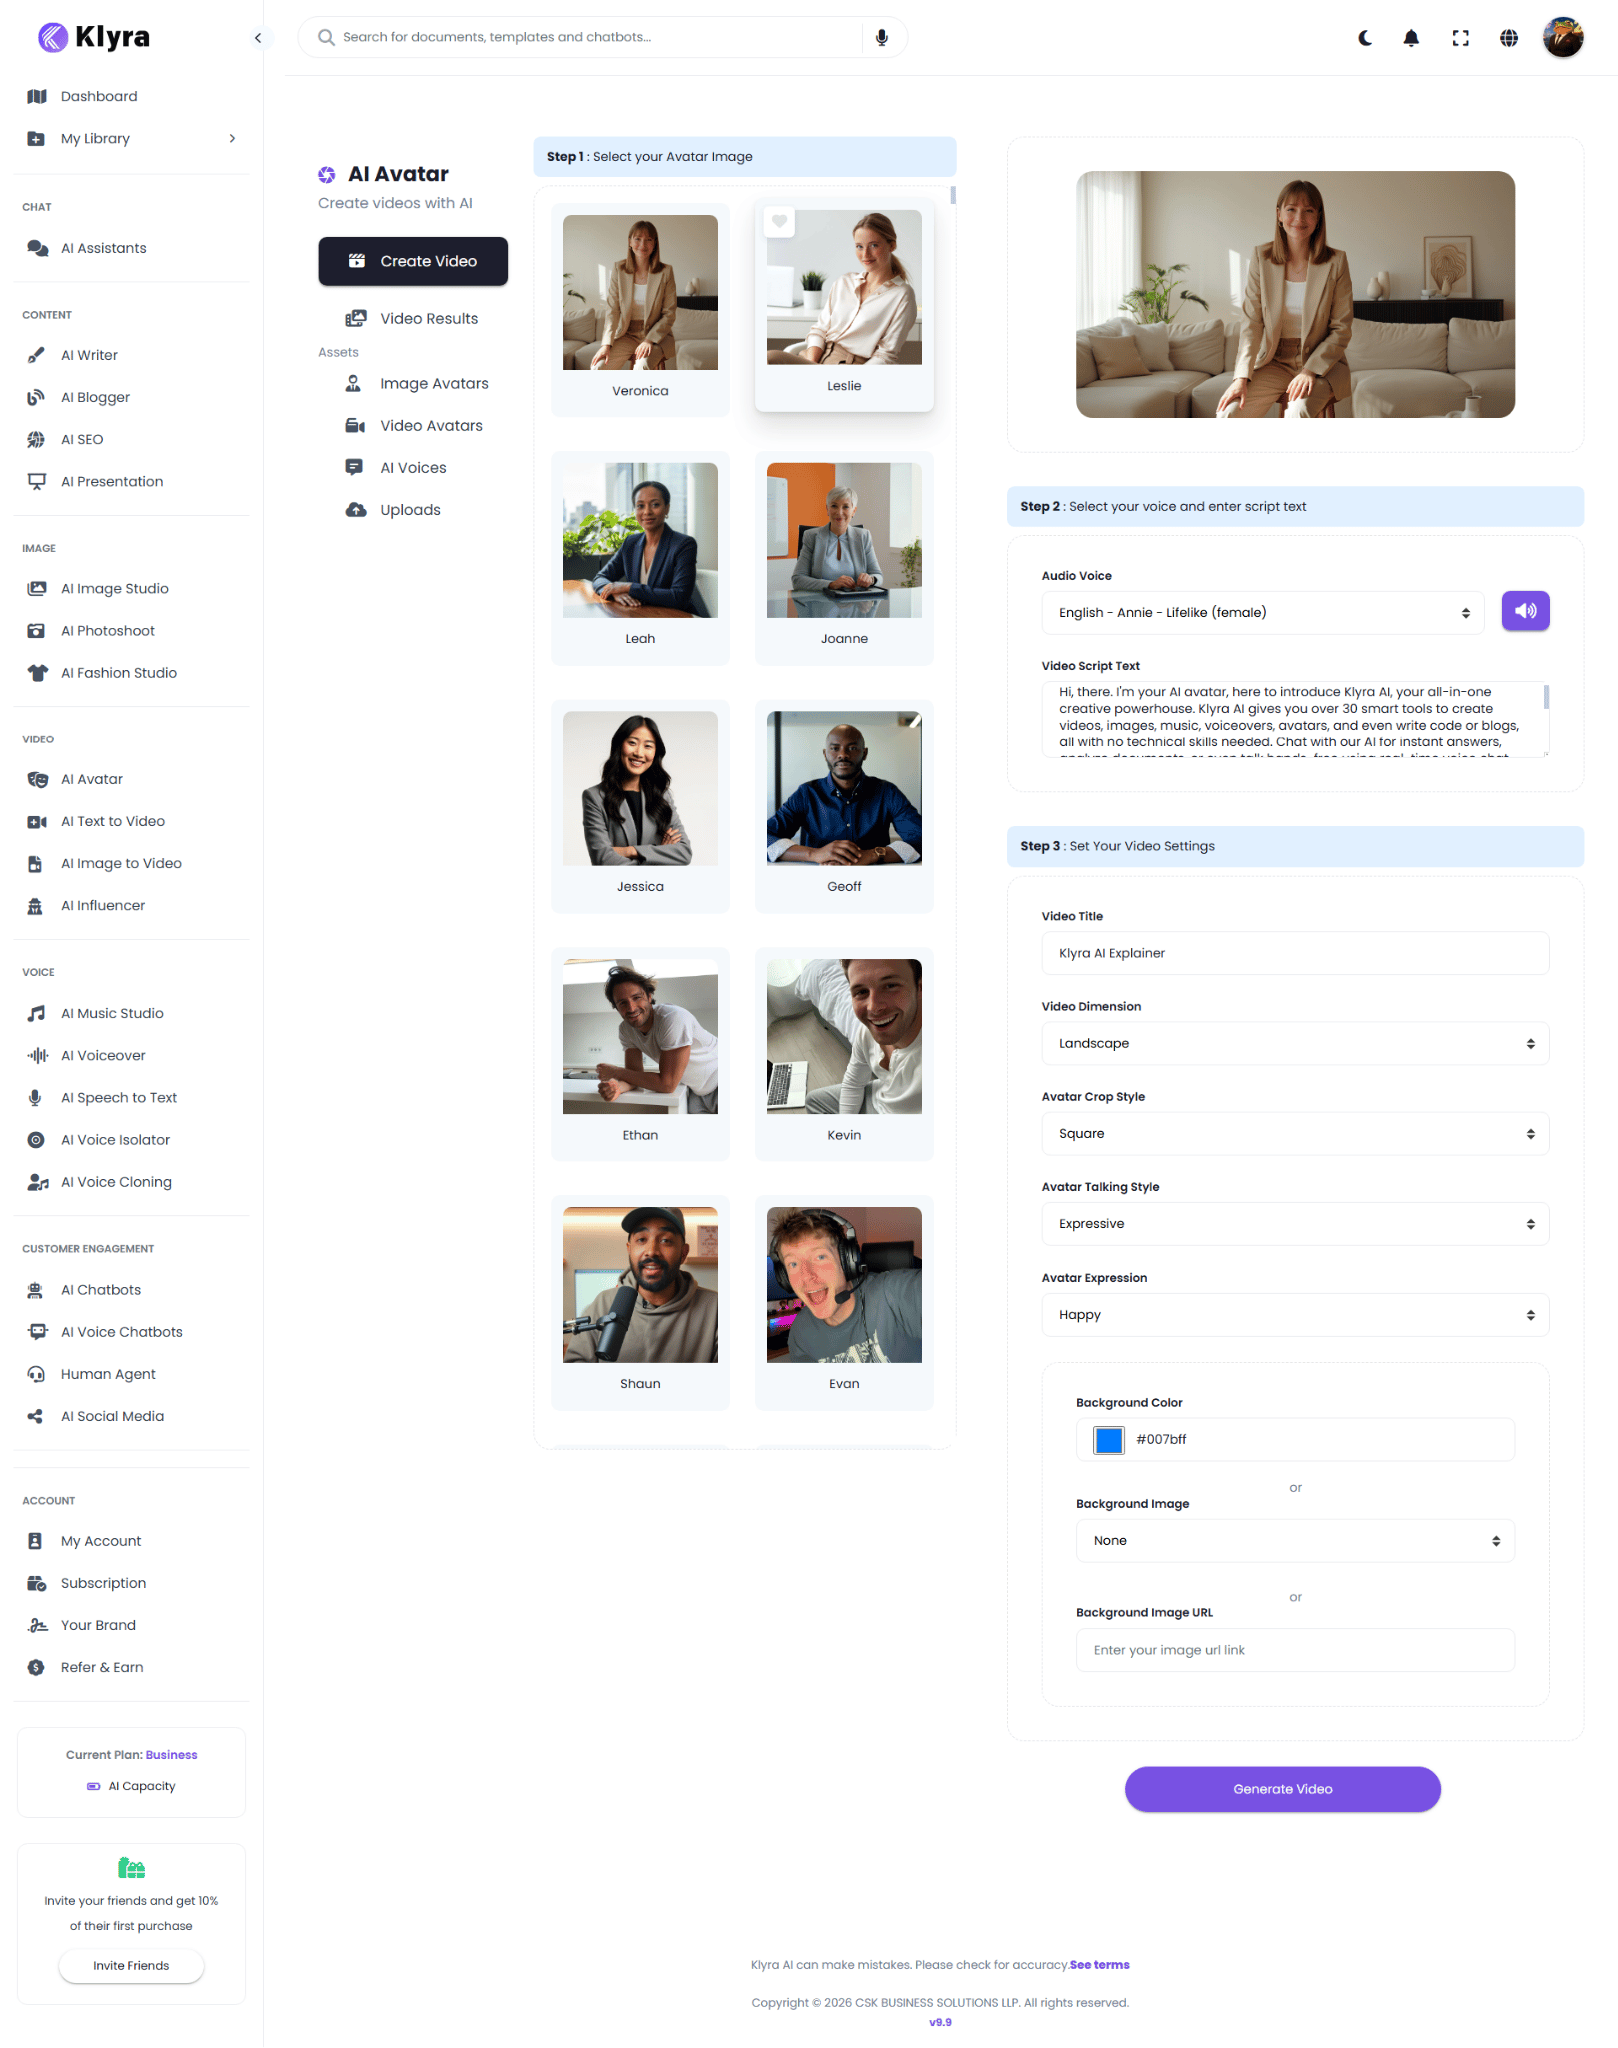 Klyra's AI Avatar documentation describes hundreds of prebuilt image avatars and also supports generating your own personal avatar by uploading your own photos. fileciteturn0file0
### Step 2: Select your voice and enter script text
After selecting the avatar, move to **Step 2: Select your voice and enter script text**.
#### Choose an Audio Voice
Use the **Audio Voice** selector to choose the voice your avatar will use.
The interface also provides a voice preview control so you can listen to the selected voice.
The AI Avatar product supports a large voice library covering more than 700 voices across 170+ languages. fileciteturn0file0
#### Enter your Video Script Text
Enter the exact message you want the avatar to speak in **Video Script Text**.
A good script should:
* Start with the main message.
* Use short, natural sentences.
* Match the selected avatar and voice.
* Avoid unnecessary filler.
* End with a clear next step when appropriate.
Example:
> Hi, I'm your AI avatar. Welcome to Klyra AI, the AI Operating System that brings AI-powered work together in one intelligent workspace.
Keep the script focused on one message. Shorter, well-structured scripts are generally easier to review and refine before generation.
### Step 3: Set your Video Settings
The photo-avatar workflow provides video presentation controls.
#### Video Title
Enter a title that helps you identify the generated video.
For example:
> Klyra AI Explainer
#### Video Dimension
Choose the output orientation from the available options.
The screenshot shows **Landscape** selected.
Choose the dimension that best fits where you intend to use the video.
#### Avatar Crop Style
The photo-avatar interface provides an **Avatar Crop Style** setting. The screenshot shows **Square** selected.
Choose the crop style that best fits the visual presentation you want.
#### Avatar Talking Style
The interface provides an **Avatar Talking Style** setting. The screenshot shows **Expressive** selected.
Choose the presentation style that matches your content.
#### Avatar Expression
The interface provides an **Avatar Expression** setting. The screenshot shows **Happy** selected.
Choose the expression that matches the message and tone of the video.
### Choose a background
The photo-avatar workflow provides three background approaches:
* **Background Color**
* **Background Image**
* **Background Image URL**
You can therefore create a simple branded background or use an image-based scene.
The AI Avatar feature documentation specifically supports custom image backgrounds for the final avatar result. fileciteturn0file0
### Generate the video
When the avatar, voice, script, and settings are ready, click **Generate Video**.
Klyra processes the configuration and creates the avatar video.
## Photo avatars vs. video avatars
The two workflows are closely related, but they begin with different avatar assets.
| | AI Avatar Photos | AI Avatar Videos |
| ------------------------ | ------------------------------------- | -------------------- |
| Starting asset | Still avatar image | Avatar video |
| Avatar selection | Image Avatar gallery | Video Avatar gallery |
| Voice | Selectable | Selectable |
| Script | Entered by user | Entered by user |
| Video title | Available | Available |
| Video dimension | Available | Available |
| Background color | Available | Available |
| Background image | Available | Available |
| Background image URL | Available | Available |
| Avatar-specific controls | Crop style, talking style, expression | Avatar style |
The settings shown above are based on the provided Klyra AI interfaces. Individual controls may vary as the AI Avatar experience evolves.
## Manage your avatar assets
The AI Avatar workspace includes an **Assets** area with:
* **Image Avatars**
* **Video Avatars**
* **AI Voices**
* **Uploads**
This gives you one place to work with the assets used by the avatar creation workflows.
### Image Avatars
Use **Image Avatars** to browse the available still-image avatar assets.
Klyra also supports creating a personal avatar by uploading your own photos. fileciteturn0file0
### Video Avatars
Use **Video Avatars** to browse the available avatar video assets.
### AI Voices
Use **AI Voices** to access the available voice assets.
The product documentation describes a library of more than 700 voiceovers across 170+ languages. fileciteturn0file0
### Uploads
Use **Uploads** to manage user-uploaded assets used by the application.
## Review generated videos
Open **Video Results** from the AI Avatar workspace to access videos created with the app.
Use this area to review your generated results and continue managing your avatar video workflow.
The provided screenshots show the Video Results entry point, while the detailed results screen is not included in the supplied source material. This tutorial therefore does not assume additional result-screen controls that are not shown.
## Recommended workflow
Use an AI Avatar Photo when you want to start from a still image. Use an AI Avatar Video when you already have a suitable avatar video asset.
Prepare a clear, concise script before configuring the final presentation.
Select a voice that matches the audience, message, and desired presentation style.
Choose the video dimension, avatar presentation settings, and background.
Generate the video and review the result before using it in a campaign, presentation, or customer-facing workflow.
## Best practices
### Match the avatar to the message
Choose an avatar whose appearance and presentation style fit your intended audience and use case.
### Keep scripts focused
Avoid putting multiple unrelated messages into one video. A focused script makes the final video easier to understand.
### Choose the voice deliberately
The AI Avatar experience provides a large voice library. Use the voice selector and preview controls to find a voice that fits your content. fileciteturn0file0
### Use backgrounds intentionally
A clean background can work well for explainers and business presentations, while a branded image can help support marketing content.
### Review before publishing
Review the generated video before sharing it publicly. Check the script, pronunciation, visual presentation, background, and overall message.
## Common use cases
The AI Avatar product is designed for a broad range of video workflows, including:
* Informational sessions
* Sales pitches
* Customer service enhancements
* Marketing campaigns
* Educational content
* Business communication
* Presenter-style explainers
Klyra positions AI Avatar as a way to create studio-quality avatar videos with customizable avatars and professional voiceovers. fileciteturn0file0
## Quick reference
| Task | Where to do it |
| ----------------------- | ----------------------------------------------------- |
| Open AI Avatar | **Video → AI Avatar** |
| Create from a photo | **Create Video → Create Video from AI Avatar Photos** |
| Create from a video | **Create Video → Create Video from AI Avatar Videos** |
| Browse image avatars | **Assets → Image Avatars** |
| Browse video avatars | **Assets → Video Avatars** |
| Browse voices | **Assets → AI Voices** |
| Manage uploads | **Assets → Uploads** |
| Review generated videos | **Video Results** |
| Generate | **Generate Video** |
## Troubleshooting
### I cannot find the avatar I want
Check the relevant avatar gallery:
* **Image Avatars** for still-image assets.
* **Video Avatars** for video assets.
If you want a personal avatar, use the supported upload workflow for your own photos. fileciteturn0file0
### My video does not have the presentation style I expected
Review the settings before generating:
* Avatar Crop Style
* Avatar Talking Style
* Avatar Expression
* Avatar Style
* Video Dimension
* Background
The available controls depend on whether you are creating from an AI Avatar Photo or AI Avatar Video.
### I want to use my own avatar
Klyra's AI Avatar feature supports generating a personal avatar by uploading your own profile photos. fileciteturn0file0
### I want to change the voice
Return to the **Audio Voice** selector and choose another available voice. The product supports a large multilingual voice library. fileciteturn0file0
## You're ready to create avatar videos
You now know how to:
* Open AI Avatar
* Choose between AI Avatar Photos and AI Avatar Videos
* Select an avatar
* Choose a voice
* Write a video script
* Configure video dimensions
* Configure avatar presentation settings
* Add a background color
* Add a background image
* Use a background image URL
* Generate an avatar video
* Manage avatar assets
* Review generated video results
AI Avatar brings these capabilities together inside Klyra AI, reinforcing the platform's goal of providing business-ready AI applications through one unified AI Operating System. fileciteturn0file1turn0file2
Klyra's AI Avatar documentation describes hundreds of prebuilt image avatars and also supports generating your own personal avatar by uploading your own photos. fileciteturn0file0
### Step 2: Select your voice and enter script text
After selecting the avatar, move to **Step 2: Select your voice and enter script text**.
#### Choose an Audio Voice
Use the **Audio Voice** selector to choose the voice your avatar will use.
The interface also provides a voice preview control so you can listen to the selected voice.
The AI Avatar product supports a large voice library covering more than 700 voices across 170+ languages. fileciteturn0file0
#### Enter your Video Script Text
Enter the exact message you want the avatar to speak in **Video Script Text**.
A good script should:
* Start with the main message.
* Use short, natural sentences.
* Match the selected avatar and voice.
* Avoid unnecessary filler.
* End with a clear next step when appropriate.
Example:
> Hi, I'm your AI avatar. Welcome to Klyra AI, the AI Operating System that brings AI-powered work together in one intelligent workspace.
Keep the script focused on one message. Shorter, well-structured scripts are generally easier to review and refine before generation.
### Step 3: Set your Video Settings
The photo-avatar workflow provides video presentation controls.
#### Video Title
Enter a title that helps you identify the generated video.
For example:
> Klyra AI Explainer
#### Video Dimension
Choose the output orientation from the available options.
The screenshot shows **Landscape** selected.
Choose the dimension that best fits where you intend to use the video.
#### Avatar Crop Style
The photo-avatar interface provides an **Avatar Crop Style** setting. The screenshot shows **Square** selected.
Choose the crop style that best fits the visual presentation you want.
#### Avatar Talking Style
The interface provides an **Avatar Talking Style** setting. The screenshot shows **Expressive** selected.
Choose the presentation style that matches your content.
#### Avatar Expression
The interface provides an **Avatar Expression** setting. The screenshot shows **Happy** selected.
Choose the expression that matches the message and tone of the video.
### Choose a background
The photo-avatar workflow provides three background approaches:
* **Background Color**
* **Background Image**
* **Background Image URL**
You can therefore create a simple branded background or use an image-based scene.
The AI Avatar feature documentation specifically supports custom image backgrounds for the final avatar result. fileciteturn0file0
### Generate the video
When the avatar, voice, script, and settings are ready, click **Generate Video**.
Klyra processes the configuration and creates the avatar video.
## Photo avatars vs. video avatars
The two workflows are closely related, but they begin with different avatar assets.
| | AI Avatar Photos | AI Avatar Videos |
| ------------------------ | ------------------------------------- | -------------------- |
| Starting asset | Still avatar image | Avatar video |
| Avatar selection | Image Avatar gallery | Video Avatar gallery |
| Voice | Selectable | Selectable |
| Script | Entered by user | Entered by user |
| Video title | Available | Available |
| Video dimension | Available | Available |
| Background color | Available | Available |
| Background image | Available | Available |
| Background image URL | Available | Available |
| Avatar-specific controls | Crop style, talking style, expression | Avatar style |
The settings shown above are based on the provided Klyra AI interfaces. Individual controls may vary as the AI Avatar experience evolves.
## Manage your avatar assets
The AI Avatar workspace includes an **Assets** area with:
* **Image Avatars**
* **Video Avatars**
* **AI Voices**
* **Uploads**
This gives you one place to work with the assets used by the avatar creation workflows.
### Image Avatars
Use **Image Avatars** to browse the available still-image avatar assets.
Klyra also supports creating a personal avatar by uploading your own photos. fileciteturn0file0
### Video Avatars
Use **Video Avatars** to browse the available avatar video assets.
### AI Voices
Use **AI Voices** to access the available voice assets.
The product documentation describes a library of more than 700 voiceovers across 170+ languages. fileciteturn0file0
### Uploads
Use **Uploads** to manage user-uploaded assets used by the application.
## Review generated videos
Open **Video Results** from the AI Avatar workspace to access videos created with the app.
Use this area to review your generated results and continue managing your avatar video workflow.
The provided screenshots show the Video Results entry point, while the detailed results screen is not included in the supplied source material. This tutorial therefore does not assume additional result-screen controls that are not shown.
## Recommended workflow
Use an AI Avatar Photo when you want to start from a still image. Use an AI Avatar Video when you already have a suitable avatar video asset.
Prepare a clear, concise script before configuring the final presentation.
Select a voice that matches the audience, message, and desired presentation style.
Choose the video dimension, avatar presentation settings, and background.
Generate the video and review the result before using it in a campaign, presentation, or customer-facing workflow.
## Best practices
### Match the avatar to the message
Choose an avatar whose appearance and presentation style fit your intended audience and use case.
### Keep scripts focused
Avoid putting multiple unrelated messages into one video. A focused script makes the final video easier to understand.
### Choose the voice deliberately
The AI Avatar experience provides a large voice library. Use the voice selector and preview controls to find a voice that fits your content. fileciteturn0file0
### Use backgrounds intentionally
A clean background can work well for explainers and business presentations, while a branded image can help support marketing content.
### Review before publishing
Review the generated video before sharing it publicly. Check the script, pronunciation, visual presentation, background, and overall message.
## Common use cases
The AI Avatar product is designed for a broad range of video workflows, including:
* Informational sessions
* Sales pitches
* Customer service enhancements
* Marketing campaigns
* Educational content
* Business communication
* Presenter-style explainers
Klyra positions AI Avatar as a way to create studio-quality avatar videos with customizable avatars and professional voiceovers. fileciteturn0file0
## Quick reference
| Task | Where to do it |
| ----------------------- | ----------------------------------------------------- |
| Open AI Avatar | **Video → AI Avatar** |
| Create from a photo | **Create Video → Create Video from AI Avatar Photos** |
| Create from a video | **Create Video → Create Video from AI Avatar Videos** |
| Browse image avatars | **Assets → Image Avatars** |
| Browse video avatars | **Assets → Video Avatars** |
| Browse voices | **Assets → AI Voices** |
| Manage uploads | **Assets → Uploads** |
| Review generated videos | **Video Results** |
| Generate | **Generate Video** |
## Troubleshooting
### I cannot find the avatar I want
Check the relevant avatar gallery:
* **Image Avatars** for still-image assets.
* **Video Avatars** for video assets.
If you want a personal avatar, use the supported upload workflow for your own photos. fileciteturn0file0
### My video does not have the presentation style I expected
Review the settings before generating:
* Avatar Crop Style
* Avatar Talking Style
* Avatar Expression
* Avatar Style
* Video Dimension
* Background
The available controls depend on whether you are creating from an AI Avatar Photo or AI Avatar Video.
### I want to use my own avatar
Klyra's AI Avatar feature supports generating a personal avatar by uploading your own profile photos. fileciteturn0file0
### I want to change the voice
Return to the **Audio Voice** selector and choose another available voice. The product supports a large multilingual voice library. fileciteturn0file0
## You're ready to create avatar videos
You now know how to:
* Open AI Avatar
* Choose between AI Avatar Photos and AI Avatar Videos
* Select an avatar
* Choose a voice
* Write a video script
* Configure video dimensions
* Configure avatar presentation settings
* Add a background color
* Add a background image
* Use a background image URL
* Generate an avatar video
* Manage avatar assets
* Review generated video results
AI Avatar brings these capabilities together inside Klyra AI, reinforcing the platform's goal of providing business-ready AI applications through one unified AI Operating System. fileciteturn0file1turn0file2